前面介绍了 YARP 通过配置文件的方式配置代理转发(传送门),而众所周知,微软的一贯作风就是能通过配置文件做的事情,通过编码的方式也能实现!YARP 也不例外,废话不多说,直接上代码!
首先,参照官方文档,我们先新建一个 InMemoryConfigProvider 类,并且继承 IProxyConfigProvider 接口,类里面还包含了一个 IProxyConfig 的类,别看漏了噢!
这里多嘴一下,下面的代码出现了 volatile 关键字,介绍一下它:volatile 是 C# 中用于控制同步的关键字,其意义是针对程序中一些敏感数据,不允许多线程同时访问,保证数据在任何访问时刻,最多有一个线程访问,以保证数据的完整性,volatile 是修饰变量的修饰符。
public class InMemoryConfigProvider : IProxyConfigProvider
{
    private volatile InMemoryConfig _config;

    public InMemoryConfigProvider(IReadOnlyList routes, IReadOnlyList clusters)
    {
        _config = new InMemoryConfig(routes, clusters);
    }

    public IProxyConfig GetConfig() => _config;

    public void Update(IReadOnlyList routes, IReadOnlyList clusters)
    {
        var oldConfig = _config;
        _config = new InMemoryConfig(routes, clusters);
        oldConfig.SignalChange();
    }

    private class InMemoryConfig : IProxyConfig
    {
        private readonly CancellationTokenSource _cts = new();

        public InMemoryConfig(IReadOnlyList routes, IReadOnlyList clusters)
        {
            Routes = routes;
            Clusters = clusters;
            ChangeToken = new CancellationChangeToken(_cts.Token);
        }

        public IReadOnlyList Routes { get; }

        public IReadOnlyList Clusters { get; }

        public IChangeToken ChangeToken { get; }

        internal void SignalChange()
        {
            _cts.Cancel();
        }
    }
}
然后添加一个扩展 InMemoryConfigProviderExtensions
public static class InMemoryConfigProviderExtensions
{
    public static IReverseProxyBuilder LoadFromMemory(this IReverseProxyBuilder builder, IReadOnlyList routes, IReadOnlyList clusters)
    {
        builder.Services.AddSingleton(new InMemoryConfigProvider(routes, clusters));
        return builder;
    }
}
接下来就是写配置了,我个人还是喜欢在配置文件中写,但是有动态配置需求的话,又不想登录服务器编辑 appsetting 文件,通过编码的方式确实更为方便,将配置写进库或者其它存储方式里面,那将是随心所欲啊!上代码:
Program.cs
var routes = new[]
{
new RouteConfig()
{
RouteId = "admin",
ClusterId = "admin",
Match = new RouteMatch
{
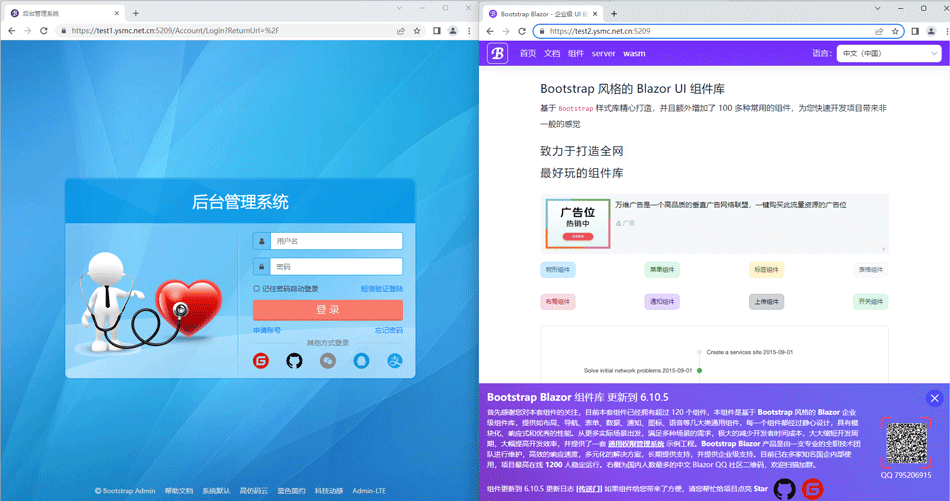
Hosts = new string[] {"test1.ysmc.net.cn" },
Path = "{**catch-all}"
}
},
new RouteConfig()
{
RouteId = "blazor",
ClusterId = "blazor",
Match = new RouteMatch
{
Hosts = new string[] {"test2.ysmc.net.cn" },
Path = "{**catch-all}"
}
}
};
var clusters = new[]
{
new ClusterConfig()
{
ClusterId = "admin",
LoadBalancingPolicy = "RoundRobin",
Destinations = new Dictionary(StringComparer.OrdinalIgnoreCase)
{
{ "admin", new DestinationConfig() { Address = "https://admin.blazor.zone" } }
}
},
new ClusterConfig()
{
ClusterId = "blazor",
LoadBalancingPolicy = "RoundRobin",
Destinations = new Dictionary(StringComparer.OrdinalIgnoreCase)
{
{ "blazor", new DestinationConfig() { Address = "https://www.blazor.zone" } }
}
}
};
builder.Services.AddReverseProxy().LoadFromMemory(routes, clusters);
上面的配置代码,跟配置文件方式的节点和属性,都是对应的,照着写就是了
"ReverseProxy": {
  "Routes": {
    "admin": {
      "ClusterId": "admin",
      "Match": {
        "Hosts": [ "test1.ysmc.net.cn" ],
        "Path": "{**catch-all}"
      }
    },
    "blazor": {
      "ClusterId": "blazor",
      "Match": {
        "Hosts": [ "test2.ysmc.net.cn" ],
        "Path": "{**catch-all}"
      }
    }
  },
  "Clusters": {
    "admin": {
      "LoadBalancingPolicy": "RoundRobin",
      "Destinations": {
        "admin": {
          "Address": "https://admin.blazor.zone/"
        }
      }
    },
    "blazor": {
      "LoadBalancingPolicy": "RoundRobin",
      "Destinations": {
        "blazor": {
          "Address": "https://www.blazor.zone/"
        }
      }
    }
  }
}
最终效果还是依旧的完美,感谢大佬的观看,谢谢!
以上就是这篇文章的全部内容了,希望本文的内容对大家的学习或者工作具有一定的参考学习价值,谢谢大家对IT俱乐部的支持。如果你想了解更多相关内容请查看下面相关链接

