源码在这里:https://github.com/darrenji/UseIdentityCRUDUserInMVC,本地下载
在VS2013中创建一个MVC项目,用默认的”无身份验证”作为身份验证机制。
通过控制台下载Bootstrap。
Install-Package -version 3.0.3 bootstrap
下载成功后,在解决方案下的Content和Scripts多了该版本的css和js文件。
把创建项目默认HomeController中的所有Action以及/Views/Home下的所有视图删除。
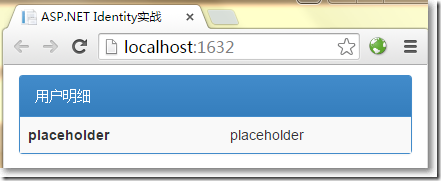
热热身
先来做一个简单练习。
在HomeController中的Index方法中,把一个字典传递给视图。
    public class HomeController : Controller
    {
        public ActionResult Index()
        {
            Dictionary data = new Dictionary();
            data.Add("placeholder", "placeholder");
            return View(data);
        }
    }
_Layout.cshtml设置如下:
ASP.NET Identity实战 @RenderBody()@Scripts.Render("~/bundles/jquery") @Scripts.Render("~/bundles/bootstrap") @RenderSection("scripts", required: false)
Home/Index.cshtml视图中:
@{
    ViewBag.Title = "Index";
    Layout = "~/Views/Shared/_Layout.cshtml";
}

    用户明细

        @foreach (string key in Model.Keys)
        {

@key
                @Model[key]

        }
前期准备
分别安装如下组件。
Install-Package Microsoft.AspNet.Identity.EntityFramework –Version 2.0.0
Install-Package Microsoft.AspNet.Identity.OWIN -Version 2.0.0
Install-Package Microsoft.Owin.Host.SystemWeb -Version 2.1.0
配置Web.config如下:
以上,
- 增加了connectionStrings节点,将自动创建localdb数据库
- 在appSettings节点中增加了一个key为owin:AppStartup项,这是确保OWIN运行正常的全局配置
在Models文件夹下创建如下类。
    public class AppUser : IdentityUser
    {
    }
在解决方案下创建Infrastructure文件夹。
在Infrastructure文件夹下创建一个上下文类,需要实现IdentityDbContext接口。
public class AppIdentityDbContext : IdentityDbContext{ public AppIdentityDbContext() : base("IdentityDb") { } static AppIdentityDbContext() { //使用EF Code First第一次创建的时候调用 Database.SetInitializer (new IdentityDbInit()); } public static AppIdentityDbContext Create() { return new AppIdentityDbContext(); } } //初始化 public class IdentityDbInit : DropCreateDatabaseIfModelChanges { protected override void Seed(AppIdentityDbContext context) { PerformInitialSetup(context); base.Seed(context); } //初始化工作 public void PerformInitialSetup(AppIdentityDbContext context) { } }
在Infrastructure文件夹下创建一个管理用户的类,需要继承UserManager
还记得,先前在appSettings节点中配置了一个如下方式:
OWIN需要一个全局启动文件,默认会到项目的顶级命名空间下找IdentityConfig这个类。
那就在App_Start中创建IdentityConfig这个类,这个类在WebApplication4这个命名空间下。
namespace WebApplication4
{
    public class IdentityConfig
    {
        public void Configuration(IAppBuilder app)
        {
            app.CreatePerOwinContext(AppIdentityDbContext.Create);
            app.CreatePerOwinContext(AppUserManager.Create);
            app.UseCookieAuthentication(new CookieAuthenticationOptions {
                AuthenticationType = DefaultAuthenticationTypes.ApplicationCookie,
                LoginPath = new Microsoft.Owin.PathString("/Account/Login")
            });
        }
    }
}
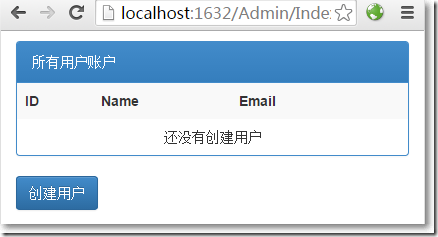
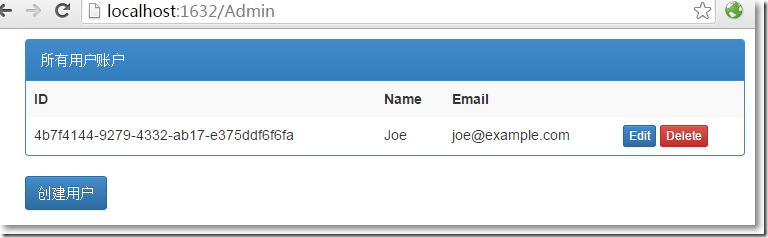
显示用户
创建AdminController,现在可以向视图传递所有的用户了,编写如下:
    public class AdminController : Controller
    {
        public ActionResult Index()
        {
            return View(UserManager.Users);
        }
        private AppUserManager UserManager
        {
            get
            {
                return HttpContext.GetOwinContext().GetUserManager();
            }
        }
    }
再创建Admin/Index.cshtml类型为IEnumerable
@model IEnumerable@{ ViewBag.Title = "Index"; Layout = "~/Views/Shared/_Layout.cshtml"; } @Html.ActionLink("创建用户", "Create", null, new { @class = "btn btn-primary" })所有用户账户
@if (Model.Count() == 0) { ID Name } else { foreach (WebApplication4.Models.AppUser user in Model) { 还没有创建用户 } } @user.Id @user.UserName @user.Email @using (Html.BeginForm("Delete", "Admin", new { id = user.Id })) { @Html.ActionLink("编辑", "Edit", new { id = user.Id }, new { @class = "btn btn-primary btn-xs" }) }
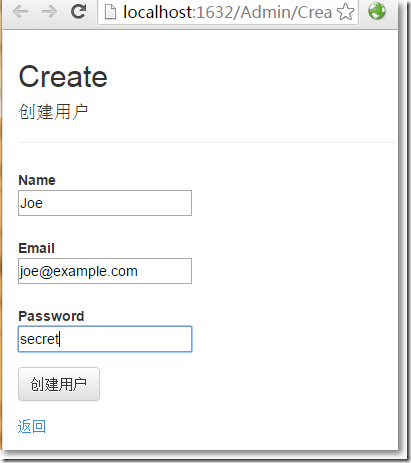
创建用户
在Models文件夹下创建一个视图模型。
namespace WebApplication4.Models
{
    public class CreateModel
    {
        public string Id { get; set; }
        [Required]
        public string Name { get; set; }
        [Required]
        public string Email { get; set; }
        [Required]
        public string Password { get; set; }
    }
}
在AdminController中添加创建用户相关的方法。
   public class AdminController : Controller
    {
        public ActionResult Index()
        {
            return View(UserManager.Users);
        }
        //创建显示
        public ActionResult Create()
        {
            return View();
        }
        [HttpPost]
        public async Task Create(CreateModel model)
        {
            if(ModelState.IsValid)
            {
                var user = new AppUser{UserName = model.Name, Email = model.Email};
                IdentityResult result = await UserManager.CreateAsync(user, model.Password);
                if(result.Succeeded)
                {
                    return RedirectToAction("Index");
                }else{
                    AddErrorsFromResult(result);
                }
            }
            return View(model);
        }
        //创建接收
        private void AddErrorsFromResult(IdentityResult result)
        {
            foreach(var error in result.Errors)
            {
                ModelState.AddModelError("", error);
            }
        }
        private AppUserManager UserManager
        {
            get
            {
                return HttpContext.GetOwinContext().GetUserManager();
            }
        }
    }
在Admin/Create.cshtml视图页中:
@model WebApplication4.Models.CreateModel
@{
    ViewBag.Title = "Create";
    Layout = "~/Views/Shared/_Layout.cshtml";
}
Create
@using (Html.BeginForm())
{
    @Html.AntiForgeryToken()


        创建用户

        @Html.ValidationSummary(true)

            @Html.LabelFor(model => model.Name, new { @class = "control-label col-md-2" })

                @Html.EditorFor(model => model.Name)
                @Html.ValidationMessageFor(model => model.Name)


            @Html.LabelFor(model => model.Email, new { @class = "control-label col-md-2" })

                @Html.EditorFor(model => model.Email)
                @Html.ValidationMessageFor(model => model.Email)


            @Html.LabelFor(model => model.Password, new { @class = "control-label col-md-2" })

                @Html.EditorFor(model => model.Password)
                @Html.ValidationMessageFor(model => model.Password)


}

    @Html.ActionLink("返回", "Index")
点击”创建”按钮,创建成功返回显示用户页面。
oh, my god,只是配置了一下就有数据了? 数据在哪呢?
点击左上角的”服务器资源管理器”,右键”IdentityDb”,点击”刷新”。
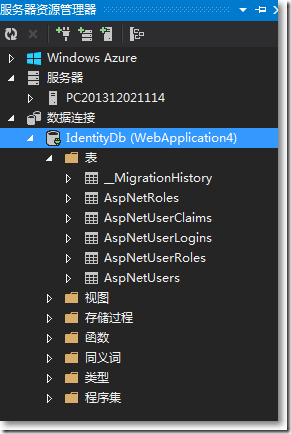
再打开AspNetUsers表,刚创建的用户赫然在列。

好像还有点欠缺,用户输入密码的时候,总应该有些限制吧。
能想到的,ASP.NET Identity都为我们准备好了。有一个PasswordValidator类就是干这个的。
在Infrastructure文件夹中创建一个PasswordValidator类的继承子类。
namespace WebApplication4.Infrastructure
{
    public class CustomPasswordValidator : PasswordValidator
    {
        public override async Task ValidateAsync(string pass)
        {
            IdentityResult result = await base.ValidateAsync(pass);
            if (pass.Contains("12345"))
            {
                var errors = result.Errors.ToList();
                errors.Add("密码中包含太多连续数字");
                result = new IdentityResult(errors);
            }
            return result;
        }
    }
}
然后需要把这个规则告诉UserManager。
namespace WebApplication4.Infrastructure
{
    public class AppUserManager : UserManager
    {
        public AppUserManager(IUserStore store) : base(store) { }
        public static AppUserManager Create(IdentityFactoryOptions options, IOwinContext context)
        {
            //identity ef上下文
            AppIdentityDbContext db = context.Get();
            //与identity ef相关的UserStore
            IUserStore us = new UserStore(db);
            AppUserManager manager = new AppUserManager(us);
            //密码相关
            manager.PasswordValidator = new CustomPasswordValidator {
                RequiredLength = 6,
                RequireNonLetterOrDigit = false,
                RequireDigit = false,
                RequireLowercase = true,
                RequireUppercase = true
            };
            return manager;
        }
    }
}
再次运行程序,创建用户页面,尝试输入不通过的密码。

不过,关于密码的规则,似乎可以在View Model的验证层面就可以解决掉。
编辑和删除用户
在AdminController中增加编辑和删除的部分。
    public class AdminController : Controller
    {
        public ActionResult Index()
        {
            return View(UserManager.Users);
        }
        //创建显示
        public ActionResult Create()
        {
            return View();
        }
        //创建接收
        [HttpPost]
        public async Task Create(CreateModel model)
        {
            if(ModelState.IsValid)
            {
                var user = new AppUser{UserName = model.Name, Email = model.Email};
                IdentityResult result = await UserManager.CreateAsync(user, model.Password);
                if(result.Succeeded)
                {
                    return RedirectToAction("Index");
                }else{
                    AddErrorsFromResult(result);
                }
            }
            return View(model);
        }
        //编辑显示
        public async Task Edit(string id)
        {
            AppUser user = await UserManager.FindByIdAsync(id);

            if(User != null)
            {
                CreateModel createModel = new CreateModel();
                createModel.Id = user.Id;
                createModel.Email = user.Email;
                createModel.Name = user.UserName;
                createModel.Password = user.PasswordHash;
                return View(createModel);
            }
            else
            {
                return RedirectToAction("Index");
            }
        }
        //接收编辑
        [HttpPost]
        public async Task Edit(CreateModel createModel)
        {

            if(ModelState.IsValid)
            {
                AppUser user = await UserManager.FindByIdAsync(createModel.Id);
                if (user != null)
                {
                    //关于邮箱
                    user.Email = createModel.Email;
                    IdentityResult validEmail = await UserManager.UserValidator.ValidateAsync(user);
                    if (!validEmail.Succeeded)
                    {
                        AddErrorsFromResult(validEmail);
                    }
                    user.UserName = createModel.Name;
                    //关于密码
                    IdentityResult validPass = null;
                    if (createModel.Password != string.Empty)
                    {
                        validPass = await UserManager.PasswordValidator.ValidateAsync(createModel.Password);
                        if (validPass.Succeeded)
                        {
                            user.PasswordHash = UserManager.PasswordHasher.HashPassword(createModel.Password);
                        }
                        else
                        {
                            AddErrorsFromResult(validPass);
                        }
                    }
                    user.Email = createModel.Email;
                    //验证结果
                    if ((validEmail.Succeeded && validPass == null) || (validEmail.Succeeded
    && createModel.Password != string.Empty && validPass.Succeeded))
                    {
                        IdentityResult result = await UserManager.UpdateAsync(user);
                        if (result.Succeeded)
                        {
                            return RedirectToAction("Index");
                        }
                        else
                        {
                            AddErrorsFromResult(result);
                        }
                    }
                    else
                    {
                        ModelState.AddModelError("", "无此用户");
                    }
                }
                return View(createModel);
            }
            else
            {
                return View(createModel);
            }

        }
        //删除
        [HttpPost]
        public async Task Delete(string id)
        {
            AppUser user = await UserManager.FindByIdAsync(id);
            if(user != null)
            {
                IdentityResult result = await UserManager.DeleteAsync(user);
                if(result.Succeeded)
                {
                    return RedirectToAction("Index");
                }
                else
                {
                    return View("Error", result.Errors);
                }
            }
            else
            {
                return View("Error", new string[] { "没有此用户" });
            }
        }
        private void AddErrorsFromResult(IdentityResult result)
        {
            foreach(var error in result.Errors)
            {
                ModelState.AddModelError("", error);
            }
        }
        private AppUserManager UserManager
        {
            get
            {
                return HttpContext.GetOwinContext().GetUserManager();
            }
        }
    }
Admin/Edit.cshtml视图。
@model WebApplication4.Models.CreateModel
@{
    ViewBag.Title = "Edit";
    Layout = "~/Views/Shared/_Layout.cshtml";
}
Edit
@using (Html.BeginForm())
{
    @Html.AntiForgeryToken()


        @Html.ValidationSummary(true)
        @Html.HiddenFor(model => model.Id)

            @Html.LabelFor(model => model.Name, new { @class = "control-label col-md-2" })

                @Html.EditorFor(model => model.Name)
                @Html.ValidationMessageFor(model => model.Name)


            @Html.LabelFor(model => model.Email, new { @class = "control-label col-md-2" })

                @Html.EditorFor(model => model.Email)
                @Html.ValidationMessageFor(model => model.Email)


            @Html.LabelFor(model => model.Password, new { @class = "control-label col-md-2" })

                @Html.EditorFor(model => model.Password)
                @Html.ValidationMessageFor(model => model.Password)


}

    @Html.ActionLink("返回", "Index")
另外,如果删除失败,跳转到Shared/Error.cshtml视图页。
@model IEnumerable@{ ViewBag.Title = "Error";} @switch (Model.Count()) { case 0: @: Something went wrong. Please try again break; case 1: @Model.First(); break; default: @: 发现如下错误:@Html.ActionLink("确定", "Index", null, new { @class = "btn btn-default" })@foreach (string error in Model) {
break; }- @error
}
至此,使用ASP.NET Identy实现对用户的增删改查完毕,ASP.NET Identity真的很好很强大!
以上就是这篇文章的全部内容了,希望本文的内容对大家的学习或者工作具有一定的参考学习价值,谢谢大家对IT俱乐部的支持。如果你想了解更多相关内容请查看下面相关链接

