概要
本次主要分享如何从零到一个分布式项目,以一个秒杀抢购的案例,从而了解分布式到底是什么个情况。
依赖包
Redis客户端
整体流程介绍
- 编写服务端api接口
- 编写客户端程序(模拟发起并发请求)
- 使用nginx+IIS部署上线
具体代码
1、服务端API接口
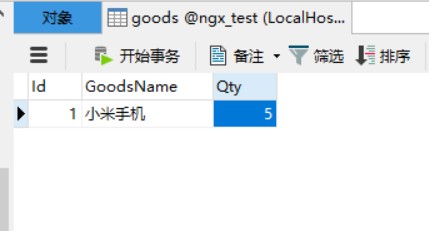
本次案例模拟的就是数据库里面有个商品表,然后并发扣减一个商品的数量。数量大于0正常减一,抢购成功,商品数量等于0了自然就抢购失败。
初始化5个小米手机,100个用户并发秒杀。(Redis实现分布式锁)
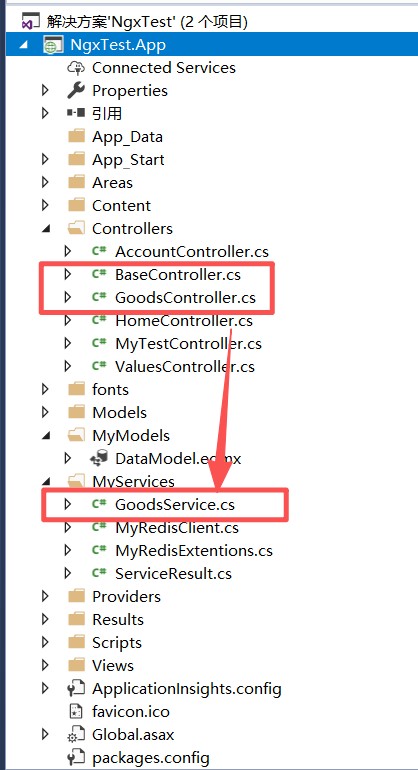
核心代码就在GoodsService,控制器就是对外提供API接口,那个BaseController则只是封装了统一响应格式,具体代码如下
- GoodsService
这里面我写了三种情况的代码
1、无并发控制,这毫无疑问,最后那个结果肯定是乱七八糟;
2、线程锁(单体),这个在咱们的项目只有一台服务器的情况下肯定是没得问题的,只是效率肯定是比较低,排队嘛。这里为什么没有用lock锁而是信号量呢,因为咱们是异步的,同步才能使用lock锁。
3、分布式锁。当咱们的后端服务部署多台,第二种单进程肯定就不好使了啊,这个时候就得基于Redis做分布式锁了。钥匙放在Redis上,谁抢到钥匙谁操作,不然就等着释放锁。这里需要注意的是那个等待的超时时间不能小于咱们业务的一个实际执行时间啊,比如咱们业务要执行3秒,你设置抢锁1秒就超时,那估计就第一个成功,后面全超时了啊
public class GoodsService
    {
        private readonly ngx_testEntities myDbContext = new ngx_testEntities();
        //private static readonly SemaphoreSlim asyncLock = new SemaphoreSlim(1, 1);
        private readonly IDatabase redis = MyRedisClient.GetInstance();
        public async Task> Sell(int goodsId)
        {
            #region 无并发控制
            /*
                var result = new ServiceResult();
                   var goodsInfo = myDbContext.goods.SingleOrDefault(g => g.Id == goodsId && g.Qty > 0);
                   if (goodsInfo == null)
                   {
                       result.Message = "抢购失败,商品不存在或已售空";
                       return result;
                   }
                   goodsInfo.Qty--;
                   await myDbContext.SaveChangesAsync();
                   result.IsOk = true;
                   result.Data = (int)goodsInfo.Qty;
                   return result;
                */
            #endregion
            #region 线程锁(单体)
            /*
                 await asyncLock.WaitAsync();
                try
                {
                    var result = new ServiceResult();
                    var goodsInfo = myDbContext.goods.SingleOrDefault(g => g.Id == goodsId && g.Qty > 0);
                    if (goodsInfo == null)
                    {
                        result.Message = "抢购失败,商品不存在或已售空";
                        return result;
                    }
                    goodsInfo.Qty--;
                    await myDbContext.SaveChangesAsync();
                    result.IsOk = true;
                    result.Data = (int)goodsInfo.Qty;
                    return result;
                }
                finally
                {
                    asyncLock.Release();
                }
                 */
            #endregion
            #region 分布式锁
            string token = null;
            try
            {
                token =await redis.LockAsync($"goods:{goodsId}", timeOut: 10, expiry: 30);
                var result = new ServiceResult();
                var goodsInfo = myDbContext.goods.SingleOrDefault(g => g.Id == goodsId && g.Qty > 0);
                if (goodsInfo == null)
                {
                    result.Message = "抢购失败,商品不存在或已售空";
                    return result;
                }
                goodsInfo.Qty--;
                await myDbContext.SaveChangesAsync();
                result.IsOk = true;
                result.Data = (int)goodsInfo.Qty;
                return result;
            }
            finally
            {
                if (token != null)
                    redis.UnLock($"goods:{goodsId}", token);
            }
            #endregion
        }
    }
- MyRedisClient 主要是多个请求只初始化连接一次Redis,这里让它单例
public class MyRedisClient
    {
        private static volatile ConnectionMultiplexer connection;
        private static volatile IDatabase database;
        private static readonly object myLock = new object();
        public static string ConnectionString { get; set; } = "127.0.0.1";
        private MyRedisClient() { }
        public static IDatabase GetInstance()
        {
            if (database == null)
            {
                lock (myLock)
                {
                    if (database == null)
                    {
                        var configuration = ConfigurationOptions.Parse(ConnectionString);
                        connection = ConnectionMultiplexer.Connect(configuration);
                        database = connection.GetDatabase();
                    }
                }
            }
            return database;
        }
        public static ConnectionMultiplexer GetConnection()
        {
            GetInstance();
            return connection;
        }
        public static void Dispose()
        {
            lock (myLock)
            {
                if (connection != null)
                {
                    connection.Dispose();
                    connection = null;
                    database = null;
                }
            }
        }
    }
- MyRedisExtentions 分布式锁加锁/释放锁 封装
public static class MyRedisExtentions
    {
        ///
        /// 获取分布式锁(阻塞直到成功,最大等待 timeOut 秒)
        ///
        /// 锁的键
        /// 最大等待秒数
        /// 锁的持有秒数
        /// 锁的标识,用于释放
        public static async Task LockAsync(this IDatabase database,string key, int timeOut = 10, int expiry = 30)
        {
            string token = Guid.NewGuid().ToString();          // 全局唯一标识
            DateTime endTime = DateTime.Now.AddSeconds(timeOut);
            while (DateTime.Now
        /// 释放分布式锁
        ///
        /// 锁的键
        /// 获取锁时返回的令牌
        public static void UnLock(this IDatabase database, string key, string token)
        {
            database.LockRelease(key, token);
        }
    }
- BaseController+GoodsController 这没啥好说的,提供API接口
  public abstract class BaseController : ApiController
    {
        protected IHttpActionResult Success(string message = "", object data = null)
        {
            return Json(new { Code = 0, Message = message, Data = data });
        }
        protected IHttpActionResult Fail(string message = "", object data = null)
        {
            return Json(new { Code = 1, Message = message, Data = data });
        }
    }
public class GoodsController : BaseController
    {
        private readonly GoodsService goodsService = new GoodsService();
        [HttpPost]
        public async Task Sell(int goodsId)
        {
            var result = await goodsService.Sell(goodsId);
            return result.IsOk ? Success(data: result.Data) : Fail(result.Message);
        }
    }
2、客户端(一个控制台程序),模拟并发请求
  class Program
    {
        static void Main(string[] args)
        {
            Console.WriteLine("回车继续。。。");
            Console.ReadLine();
            Run().Wait();
            Console.ReadKey();
        }
        private static async Task Run()
        {
            using (var httpClient = new HttpClient())
            {
                var tasks = new List();
                for (int i = 0; i >(respBody);
            if (res.Code != 0)
            {
                Console.WriteLine($"请求 {index} 失败: {res.Message}");
                return;
            }
            Console.WriteLine($"请求 {index} 成功: 剩余商品数量{res.Data}");
        }
    }
    class MyResponse
    {
        public int Code { get; set; }
        public string Message { get; set; }
        public T Data { get; set; }
    }
部署
1、IIS建两个站点,端口(8081,8082)当然也可以自己看着指定,总之就是后端API部署两个站点。这个各位大哥肯定都知道咋整就不用多说。
2、nginx安装配置
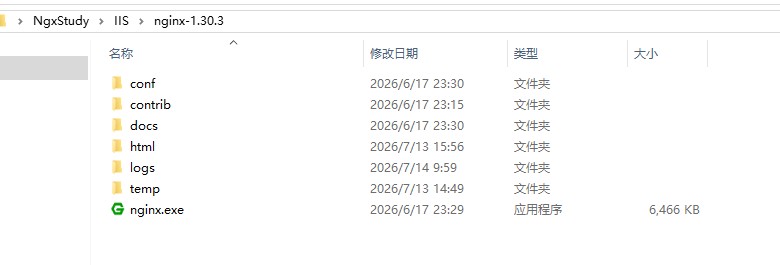
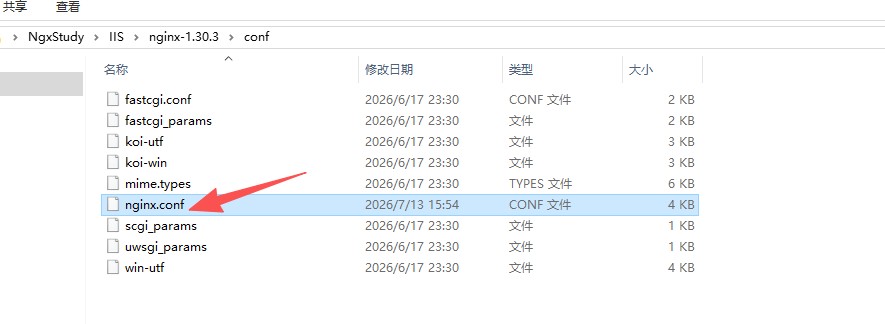
1、官网去下载windows版本的,一般是一个压缩包,直接解压就行,解压完了就是下面这个结构。直接看conf/nginx.conf这个配置文件。
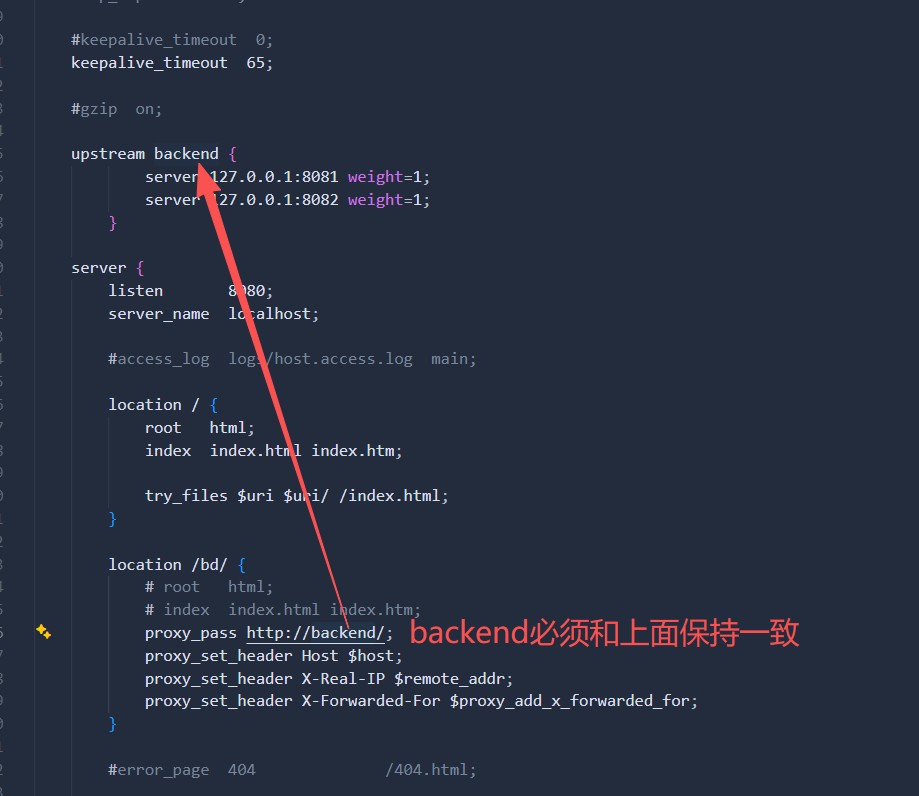
2、点开配置文件看着很多但是很多东西目前都不关心,我们关心的就是怎么配置负载均衡啊。
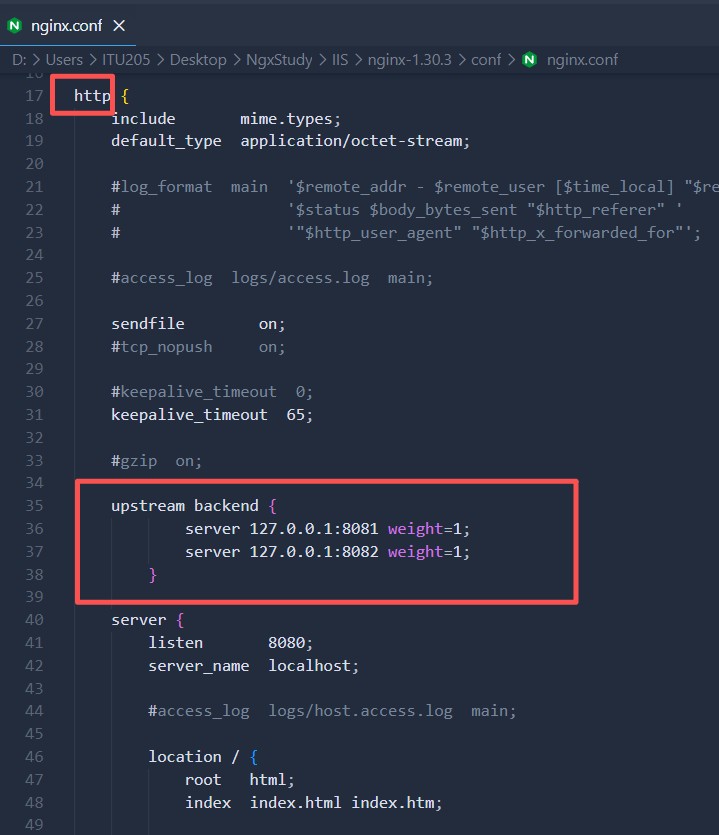
(1)、http节点下面配置负载均衡的服务器信息,咱们是本地的8081、8082。那个weight是权重,配一样就是轮询,第一个请求走第一台服务器,第二个第二台这样,根据实际情况硬件资源强一些权重可以设置高一些。
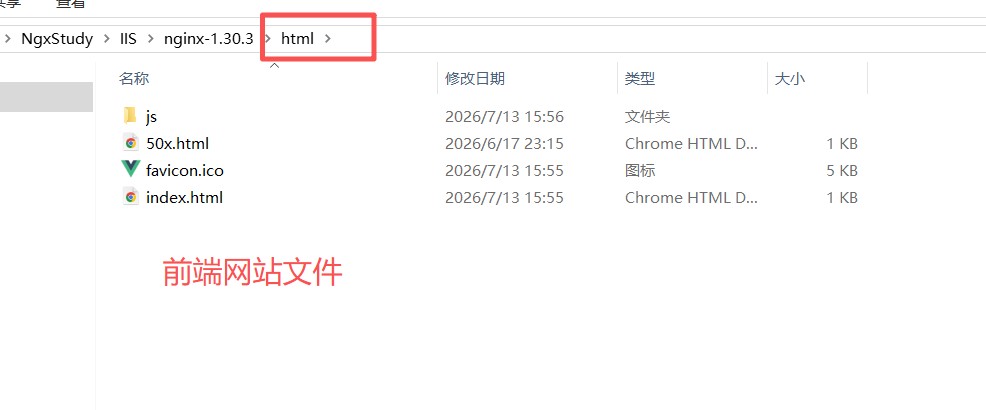
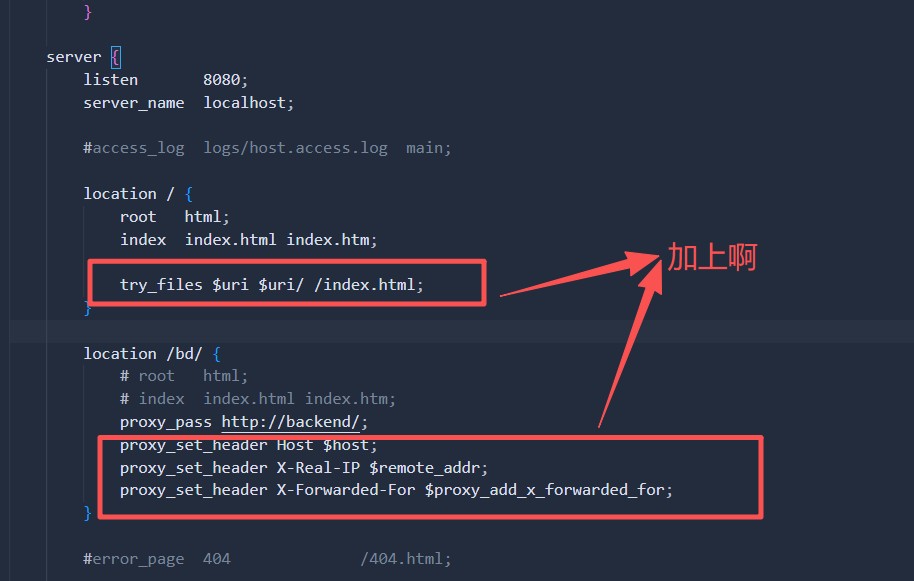
2、server节点下配置“listen”表示nginx监听哪个端口,location则根据请求地址路由前缀转到不同的地址吧。我这里设计的根目录就是放前端项目,就是html/那个目录。/bd/这个开头的就转到我们上面配置的负载均衡的代理地址,backend得和上面配置的对应起来啊
完整nginx.conf
#user  nobody;
worker_processes  1;
#error_log  logs/error.log;
#error_log  logs/error.log  notice;
#error_log  logs/error.log  info;
#pid        logs/nginx.pid;
events {
    worker_connections  1024;
}
http {
    include       mime.types;
    default_type  application/octet-stream;
    #log_format  main  '$remote_addr - $remote_user [$time_local] "$request" '
    #                  '$status $body_bytes_sent "$http_referer" '
    #                  '"$http_user_agent" "$http_x_forwarded_for"';
    #access_log  logs/access.log  main;
    sendfile        on;
    #tcp_nopush     on;
    #keepalive_timeout  0;
    keepalive_timeout  65;
    #gzip  on;
    upstream backend {
            server 127.0.0.1:8081 weight=1;
            server 127.0.0.1:8082 weight=1;
        }
    server {
        listen       8080;
        server_name  localhost;
        #access_log  logs/host.access.log  main;
        location / {
            root   html;
            index  index.html index.htm;
            try_files $uri $uri/ /index.html;
        }
        location /bd/ {
            # root   html;
            # index  index.html index.htm;
            proxy_pass http://backend/;
            proxy_set_header Host $host;
            proxy_set_header X-Real-IP $remote_addr;
            proxy_set_header X-Forwarded-For $proxy_add_x_forwarded_for;
        }
        #error_page  404              /404.html;
        # redirect server error pages to the static page /50x.html
        #
        error_page   500 502 503 504  /50x.html;
        location = /50x.html {
            root   html;
        }
        # proxy the PHP scripts to Apache listening on 127.0.0.1:80
        #
        #location ~ .php$ {
        #    proxy_pass   http://127.0.0.1;
        #}
        # pass the PHP scripts to FastCGI server listening on 127.0.0.1:9000
        #
        #location ~ .php$ {
        #    root           html;
        #    fastcgi_pass   127.0.0.1:9000;
        #    fastcgi_index  index.php;
        #    fastcgi_param  SCRIPT_FILENAME  /scripts$fastcgi_script_name;
        #    include        fastcgi_params;
        #}
        # deny access to .htaccess files, if Apache's document root
        # concurs with nginx's one
        #
        #location ~ /.ht {
        #    deny  all;
        #}
    }
    # another virtual host using mix of IP-, name-, and port-based configuration
    #
    #server {
    #    listen       8000;
    #    listen       somename:8080;
    #    server_name  somename  alias  another.alias;
    #    location / {
    #        root   html;
    #        index  index.html index.htm;
    #    }
    #}
    # HTTPS server
    #
    #server {
    #    listen       443 ssl;
    #    server_name  localhost;
    #    ssl_certificate      cert.pem;
    #    ssl_certificate_key  cert.key;
    #    ssl_session_cache    shared:SSL:1m;
    #    ssl_session_timeout  5m;
    #    ssl_ciphers  HIGH:!aNULL:!MD5;
    #    ssl_prefer_server_ciphers  on;
    #    location / {
    #        root   html;
    #        index  index.html index.htm;
    #    }
    #}
}
···
到此这篇关于.NET分布式案例秒杀抢购整体流程(基于.NET4.5)的文章就介绍到这了,更多相关.net秒杀抢购内容请搜索IT俱乐部以前的文章或继续浏览下面的相关文章希望大家以后多多支持IT俱乐部!