前言
因为网上好多都没有通过Loki的API自己实现对日志监控系统,所以我就下定决心自己出一版关于loki与springboot的博文供大家参考,这个可以说是比较实用,很适合中小型企业。因此我酝酿了挺久了,对于loki的研究也比较久,希望各位读者能有新的收获。
简介
Loki是Grafana Labs团队的开源项目,可以组成一个功能齐全的日志堆栈。Loki是一个水平可扩展,高可用性,多租户的日志聚合系统。它的设计非常经济高效且易于操作,因为它不会为日志内容编制索引,而是为每个日志流编制一组标签。Loki是用来存储日志和处理查询,需要通过promtail来收集日志,也可是通过后端的logback等日志框架来收集日志,通过grafana提供的loki可视化查看日志,当然了loki也提供了API,可以根据自己的需求来自己实现可视化界面,能够减少三方插件的使用。
安装
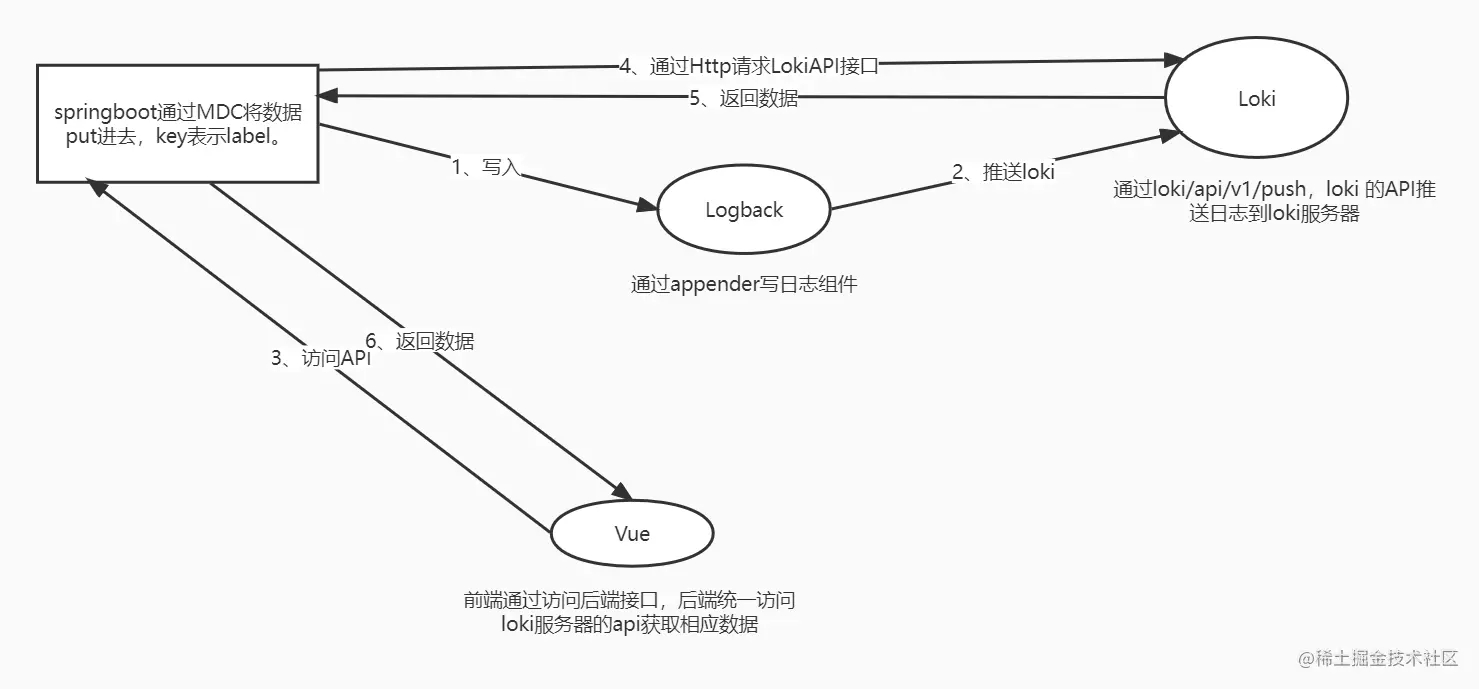
上一篇文章已经介绍了如何安装以及使用Grafana+loki+promtail进行搭建日志系统,https://www.2it.club/article/248318.htm可以看看这篇文章。接下来笔者要介绍的是通过Loki的API编写自己可视化界面,并且通过logback来实现收集日志。 大致的结构如图

简单介绍一下,主要就是通过springboot后端的logback日志框架来收集日志,在推送到loki中存储,loki执行对日志的查询,通过API根据标签等信息去查询日志并且在自定义的前端界面中展示。
整体思路
其实宏观来看,要达成这个需求说起来是十分简单的,只需配置logback配置,在通过MDC写入、收集日志,这里可以好多的写法,可以是通过反射写入日志,也可以是在需要打印的地方写入日志,并且是将日志区分为不同的标签。在前端就可以根据所定义的标签来查看相应的日志。前端获取日志信息逻辑也很简单,就只是通过Loki提供的API获取每行的日志。接下来我就一一详细的介绍SpringBoot与Loki的那些事。 可以查看此图便于理解:
Loki实战开发
接下来就详细讲解笔者在实战开发中是如何编写的,本次介绍只是对编写的代码进行详讲,对于代码可能不会全部粘贴,不然冗余起来效果不好,各位读者可以各自发挥,更加完善。其实整个业务也不难,基本都是loki自身提供的API,读者可以通过Loki官方网站grafana.com/docs/loki/l… 去进一步对Loki的API进行查阅,后面笔者可能也会出一篇来专门对Loki的API以及配置进行介绍。好了,废话不多说,马上进入正题。
springboot中的配置
首先需要配置向Loki推送日志,也就是需要通过Loki的API:POST /loki/api/v1/push ,可以直接将地址通过appender写死在logback日志框架中,但是在项目开发中,要考虑到环境的不同,应该是能够根据需要来修改loki服务器的地址,因此将loki的服务器地址配置在application-dev.yml中。
loki:
  url: http://localhost:3100/loki/api/v1
配置logback日志框架
先获取yml配置的地址,通过appender添加到日志框架中,当然,配置客户端也不一定是LogBack框架,还有Log4j2框架也是能够使用的,具体配置可以看官网github.com/loki4j/loki… 和 github.com/tkowalcz/tj… ,本章只对loki进行讲解,对于日志框架,后期也会一一列出,各位读者有什么不了解的,可以先到网上查阅资料。因为笔者不是部署多台Loki服务器,不同的系统采用system这个标签来进行区分。
1000 ${LOKI_URL}/push ${log.pattern} true
注解与切面写入日志
自定义注解,并且设置日志标签值。
/**
 * @author: lyd
 * @description: 自定义日志注解,用作LOKI日志分类
 * @Date: 2022/10/10
 */
@Retention(RetentionPolicy.RUNTIME)
@Target({ ElementType.METHOD})
@Documented
public @interface LokiLog {
    LokiLogType type() default LokiLogType.DEFAULT;
}
通过枚举的方式来定义日志类型的标签值
/**
 * @author: lyd
 * @description: 枚举便签值 - 类型自己定义
 * @Date: 2022/10/11
 */
public enum LokiLogType {
    DEFAULT("默认"),
    A("A"),
    B("B"),
    C("C");
    private String desc;
    LokiLogType(String desc) {
     this.desc=desc;
    }
    public String getDesc() {
        return desc;
    }
}
编写切面,写入日志(详情可以参照这篇文章https://www.2it.club/article/230135.htm,内部通过MDC.put(“log_file_type”, logType.getDesc());(MDC ( Mapped Diagnostic Contexts ),它是一个线程安全的存放诊断日志的容器。可以参照 https://www.2it.club/article/232986.htm可以理解为log_file_type是标签名,logType.getDesc()是标签值。
/**
 * @author: lyd
 * @description: 自定义日志切面:https://cloud.tencent.com/developer/article/1655923
 * @Date: 2022/10/10
 */
@Aspect
@Slf4j
@Component
public class LokiLogAspect {
    /**
     * 切到所有OperatorLog注解修饰的方法
     */
    @Pointcut("@annotation(org.nl.wms.log.LokiLog)")
    public void operatorLog() {
        // 空方法
    }
    /**
     * 利用@Around环绕增强
     *
     * @return
     */
    @Around("operatorLog()")
    public synchronized Object around(ProceedingJoinPoint pjp) throws Throwable {
//        ServletRequestAttributes attributes = (ServletRequestAttributes) RequestContextHolder.getRequestAttributes();
//        HttpServletRequest request = attributes.getRequest();
//        HttpServletResponse response = attributes.getResponse();
        Signature signature = pjp.getSignature();
        MethodSignature methodSignature = (MethodSignature) signature;
        Method method = methodSignature.getMethod();
        LokiLog lokiLog = method.getAnnotation(LokiLog.class);
        // 获取描述信息
        LokiLogType logType = lokiLog.type();
        MDC.put("log_file_type", logType.getDesc());
        log.info("输入参数:" + JSONObject.toJSONString(pjp.getArgs()));
        Object proceed = pjp.proceed();
        log.info("返回参数:" + JSONObject.toJSONString(proceed));
        MDC.remove("log_file_type");
        return proceed;
    }
}
使用注解,在方法中引用注解即可
@LokiLog(type = LokiLogType.A)
前端界面与后端接口
前端界面介绍起来可能比较麻烦,毕竟写的代码也比较多,这里就选取讲解,代码量比较多,也不会是全部代码粘贴,样式之类的,我相信读者会根据自己的需求去实现,这里主要的是记录开发的思路。
日志的初步获取
前端的界面就如图,本次是以el-admin这个为基础制作的demo。

查找日志是需要通过标签与标签值来获取日志信息,因此首先需要的是携带标签对到后端访问Loki的API拿到数据,读者可以查阅官网的API,结合着学习。

一开始当vue视图渲染的时候,就会从后端获取loki日志标签,具体后端接口的业务代码如下:
/**
 * 获取labels和values树
 *
 * @return
 */
@Override
public JSONArray getLabelsValues() {
    JSONArray result = new JSONArray();
    // 获取所有标签
    String labelString = HttpUtil.get(lokiUrl + "/labels", CharsetUtil.CHARSET_UTF_8);
    JSONObject parse = (JSONObject) JSONObject.parse(labelString);
    JSONArray labels = parse.getJSONArray("data");
    for (int i=0; i
核心代码就只有通过Hutool工具包去访问API获取标签HttpUtil.get(lokiUrl + “/labels”, CharsetUtil.CHARSET_UTF_8); 以及 获取标签值HttpUtil.get(lokiUrl + “/label/” + labels.getString(i) + “/values”, CharsetUtil.CHARSET_UTF_8); 因为我的前端是用elment-ui的树来接收的,因此我就将返回的数据设计成相应的形式。
模糊查找与更多参数
loki提供了相应的API来进行模糊查找日志,无非就是通过loki的API携带关键字进行模糊查找日志,笔者的做法是获取含有关键字的日志内容。
"/query_range?query={system="" + systemName + "", " + logLabel + "="" + logLabelValue + ""} |= `" + text + "`"
并且还能够通过时间段来查询,笔者实现了的效果如图


不仅可以通过关键字,还有时间段时间范围以及查找的方向和一次性显示的条数,最好是建议不要超过1000条数据,滚动步数是实现滚动下拉的时候获取新的日志数据的条目数。 后端代码如下,简单介绍一下,就是提供所需要的查询条件来对日志进行筛选。不管是获取日志数据还是滚动下拉获取的日志数据都可以通用这个接口,然而主要的参数设置可以在前端进行打磨,以下代码还有优化的空间,毕竟当时刚开始写的时候没考虑这么多。
@Override
    public JSONObject getLogData(JSONObject json) {
        String logLabel = "";
        String logLabelValue = "";
        Long start = 0L;
        Long end = 0L;
        String text = "";
        String limit = "100";
        String direction = "backward";
        if (json.get("logLabel") != null) logLabel = json.getString("logLabel");
        if (json.get("logLabelValue") != null) logLabelValue = json.getString("logLabelValue");
        if (json.get("text") != null) text = json.getString("text");
        if (json.get("start") != null) start = json.getLong("start");
        if (json.get("end") != null) end = json.getLong("end");
        if (json.get("limits") != null) limit = json.getString("limits");
        if (json.get("direction") != null) direction = json.getString("direction");
        /**
         * 组织参数
         * 纳秒数
         * 1660037391880000000
         * 1641453208415000000
         * http://localhost:3100/loki/api/v1/query_range?query={host="localhost"} |= ``&limit=1500&start=1641453208415000000&end=1660027623419419002
         */
        JSONObject parse = null;
        String query = lokiUrl + "/query_range?query={system="" + systemName + "", " + logLabel + "="" + logLabelValue + ""} |= `" + text + "`";
        String result = "";
        if (start==0L) {
            result = HttpUtil.get(query + "&limit=" + limit + "&direction=" + direction, CharsetUtil.CHARSET_UTF_8);
        } else {
            result = HttpUtil.get(query + "&limit=" + limit + "&start=" + start + "&end=" + end + "&direction=" + direction, CharsetUtil.CHARSET_UTF_8);
        }
        try {
            parse = (JSONObject) JSONObject.parse(result);
        } catch (Exception e) {
//            reslut的值可能为:too many outstanding requests,无法转化成Json
            System.out.println("reslut:" + result);
//            e.printStackTrace();
        }
        return parse;
    }
前端的逻辑是比较复杂的,因为需要做大量的赋值与设置。 前端js方法代码,主要是对参数数据的组织,这里需要注意的是,因为loki需要的是纳秒级别的时间戳,这里就需要十分注意前端js的精度。还有一点就是,如果后端日志是有颜色标签的,那么前端直接渲染就会显示标签,所以这里需要进行相应的处理,就是用过AnsiUp插件进行操作,详细看此篇文章:https://www.2it.club/article/266641.htm
queryData() {
  console.log(this.labelAndValue)
  // 清空查询数据
  this.clearParam()
  if (this.labelAndValue.length > 0) {
    queryParam.logLabel = this.labelAndValue[0]
    queryParam.logLabelValue = this.labelAndValue[1]
  }
  if (queryParam.logLabelValue === null) { // 判空
    this.$message({
      showClose: true,
      message: '请选择标签',
      type: 'warning'
    })
    this.showEmpty = true
    this.emptyText = '请选择标签'
    return
  }
  if (this.timeRange.length !== 0) { // 如果是输入时间范围
    queryParam.start = (new Date(this.timeRange[0]).getTime() * 1000000).toString()
    queryParam.end = (new Date(this.timeRange[1]).getTime() * 1000000).toString()
  }
  if (this.timeZoneValue) {
    const time = new Date()
    queryParam.start = ((time.getTime() - this.timeZoneValue) * 1000000).toString()
    queryParam.end = (time.getTime() * 1000000).toString()
  }
  if (this.text) {
    queryParam.text = this.text.replace(/^s*|s*$/g, '') // 去空
  }
  if (this.limits) {
    queryParam.limits = this.limits
  }
  queryParam.direction = this.direction
  var ansi_up = new AnsiUp()
  logOperation.getLogData(queryParam).then(res => {
    this.showEmpty = false
    if (res.data.result.length === 1) {
      this.logs = res.data.result[0].values
      for (const i in res.data.result[0].values) {
        this.logs[i][1] = ansi_up.ansi_to_html(res.data.result[0].values[i][1])
      }
    } else if (res.data.result.length > 1) {
      // 清空
      this.logs = []
      for (const j in res.data.result) { // 用push的方式将所有日志数组添加进去
        for (const values_index in res.data.result[j].values) {
          this.logs.push(res.data.result[j].values[values_index])
        }
      }
      for (const k in this.logs) {
        this.logs[k][1] = ansi_up.ansi_to_html(this.logs[k][1])
      }
      if (this.direction === 'backward') { // 由于使用公共标签会导致时间顺序错乱,因此对二维数组进行排序
        this.logs.sort((a, b) => b[0] - a[0])
      } else {
        this.logs.sort((a, b) => a[0] - b[0])
      }
    } else {
      this.showEmpty = true
      this.emptyText = '暂无日志信息,请选择时间段试试'
    }
  })
},
通过AnsiUp插件可以将带有颜色标签的日志以颜色展示,代码如下:
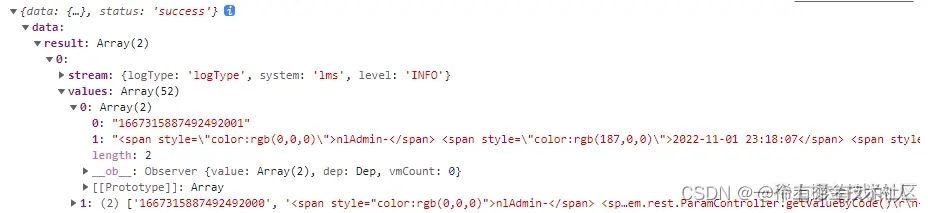
向后端请求日志返回的结果是如下图所示
滚动追加日志
其实下拉滚动的代码与上面直接获取日志的是差不多的,只是在数据的追加是不一样的做法,这里需要注意的是要考虑日志的展示是正序还是逆序,不同的顺序计算时间范围是不一样的,就如下代码
if (this.direction === 'backward') { // 设置时间区间
  queryParam.start = (this.logs[this.logs.length - 1][0] - zone).toString()
  queryParam.end = this.logs[this.logs.length - 1][0]
} else {
  queryParam.start = this.logs[this.logs.length - 1][0]
  queryParam.end = (parseFloat(this.logs[this.logs.length - 1][0]) + parseFloat(zone.toString())).toString()
}
在滚动获取日志的思路是获取最后一条数据的时间,往后推一定的时间差,所以需要考虑是正序还是倒序,默认是6小时。
mounted() {
  window.addEventListener('scroll', this.handleScroll)
}
methods: {
    handleScroll() { // 滚动事件
      const scrollTop = document.documentElement.scrollTop// 滚动高度
      const clientHeight = document.documentElement.clientHeight// 可视高度
      const scrollHeight = document.documentElement.scrollHeight// 内容高度
      const bottomest = Math.ceil(scrollTop + clientHeight)
      if (bottomest >= scrollHeight) {
        // 加载新数据
        queryParam.limits = this.scrollStep
        queryParam.direction = this.direction
        // 获取时间差
        let zone = queryParam.end - queryParam.start
        if (this.timeRange.length) { // 如果是输入时间范围
          zone = ((new Date(this.timeRange[1]).getTime() - new Date(this.timeRange[0]).getTime()) * 1000000).toString()
        }
        if (this.timeZoneValue) {
          zone = this.timeZoneValue * 1000000
        }
        if (zone === 0) {
          zone = 3600 * 1000 * 6
        }
        if (this.direction === 'backward') { // 设置时间区间
          queryParam.start = (this.logs[this.logs.length - 1][0] - zone).toString()
          queryParam.end = this.logs[this.logs.length - 1][0]
        } else {
          queryParam.start = this.logs[this.logs.length - 1][0]
          queryParam.end = (parseFloat(this.logs[this.logs.length - 1][0]) + parseFloat(zone.toString())).toString()
        }
        var ansi_up = new AnsiUp()
        logOperation.getLogData(queryParam).then(res => {
          console.log(res)
          this.showEmpty = false
          if (res.data.result.length === 1) {
            // 如果返回的日志是一样的就不显示
            if (res.data.result[0].values.length === 1 && ansi_up.ansi_to_html(res.data.result[0].values[0][1]) === this.logs[this.logs.length - 1][1]) {
              this.$notify({
                title: '警告',
                duration: 1000,
                message: '当前时间段日志已最新!',
                type: 'warning'
              })
              return
            }
            const log = res.data.result[0].values
            for (const i in res.data.result[0].values) {
              log[i][1] = ansi_up.ansi_to_html(res.data.result[0].values[i][1])
              this.logs.push(log[i])
            }
          } else if (res.data.result.length > 1) {
            const tempArray = [] // 数据需要处理,由于是追加数组,所以需要用额外变量来存放
            // 刷新就是添加,不清空原数组
            for (const j in res.data.result) { // 用push的方式将所有日志数组添加进去
              for (const values_index in res.data.result[j].values) {
                tempArray.push(res.data.result[j].values[values_index])
              }
            }
            if (this.direction === 'backward') { // 由于使用公共标签会导致时间顺序错乱,因此对二维数组进行排序
              tempArray.sort((a, b) => b[0] - a[0])
            } else {
              tempArray.sort((a, b) => a[0] - b[0])
            }
            for (const k in tempArray) {
              tempArray[k][1] = ansi_up.ansi_to_html(tempArray[k][1]) // 数据转换
              this.logs.push(tempArray[k]) // 追加数据
            }
          } else {
            this.$notify({
              title: '警告',
              duration: 1000,
              message: '暂无以往日志数据!',
              type: 'warning'
            })
          }
        })
      }
    }
}
定时刷新日志
当然,日志的获取也是需要实时刷新的,这种不仅可以使用定时器还能够使用websocket,笔者使用的是定时器,因为这个写起来比较简单。相关的代码以及解析如下: 视图
    查询{{ runStatu }}
    {{ item.label }}
方法代码 代码大致也和上面两种情况是类似的,思路是获取当前时间前(时间差)的时间到当前时间的日志信息。这里不需要管日志的时序方向,只需要做好始终时间,注意纳秒级别,还有定时器不要忘记销毁。
startInterval(item) {
  this.runStatu = item.label
  console.log(item.value)
  if (item.value !== 0) {
    this.timer = setInterval(() => { // 定时刷新
      this.intervalLogs()
    }, item.value)
  } else {
    console.log('销毁了')
    clearInterval(this.timer)
  }
},
intervalLogs() { // 定时器的方法
  // 组织参数
  // 设置开始时间和结束时间
  // 开始为现在时间
  const start = new Date()
  const end = new Date()
  // 时差判断
  let zone = queryParam.end - queryParam.start
  if (this.timeRange.length) { // 如果是输入时间范围
    zone = ((new Date(this.timeRange[1]).getTime() - new Date(this.timeRange[0]).getTime()) * 1000000).toString()
  }
  if (this.timeZoneValue) {
    zone = this.timeZoneValue * 1000000
  }
  if (zone === 0) { // 防止空指针
    start.setTime(start.getTime() - 3600 * 1000 * 6)
    queryParam.start = (start.getTime() * 1000000).toString()
  } else {
    queryParam.start = (start.getTime() * 1000000 - zone).toString()
  }
  queryParam.end = (end.getTime() * 1000000).toString()
  queryParam.limits = this.limits
  console.log('定时器最后参数:', queryParam)
  var ansi_up = new AnsiUp() // 后端日志格式转化
  logOperation.getLogData(queryParam).then(res => {
    console.log('res', res)
    this.showEmpty = false
    debugger
    if (res.data.result.length === 1) {
      this.logs = res.data.result[0].values
      for (const i in res.data.result[0].values) { // 格式转换
        this.logs[i][1] = ansi_up.ansi_to_html(res.data.result[0].values[i][1])
      }
    } else if (res.data.result.length > 1) {
      // 清空
      this.logs = []
      for (const j in res.data.result) { // 用push的方式将所有日志数组添加进去
        for (const values_index in res.data.result[j].values) {
          this.logs.push(res.data.result[j].values[values_index])
        }
      }
      for (const k in this.logs) {
        this.logs[k][1] = ansi_up.ansi_to_html(this.logs[k][1])
      }
      if (this.direction === 'backward') { // 由于使用公共标签会导致时间顺序错乱,因此对二维数组进行排序
        this.logs.sort((a, b) => b[0] - a[0])
      } else {
        this.logs.sort((a, b) => a[0] - b[0])
      }
    } else {
      this.showEmpty = true
      this.emptyText = '暂无日志信息,请选择时间段试试'
    }
  })
},
最后粘一小段展示的界面

总结
loki是轻量级的分布式日志查询框架,特别适合中小型企业,尤其是工业项目,在项目上线的时候可以通过这样的一个界面来观察日志,确实能够得到很大的帮助,但是这个loki不是特别的稳定,最为常见的是会出现ERP ERROR,这种错误是最头疼的,个人感觉可能是计算机或者网络的因素造成。
以上就是SpringBoot Loki安装简介及实战思路的详细内容,更多关于SpringBoot Loki安装的资料请关注IT俱乐部其它相关文章!

