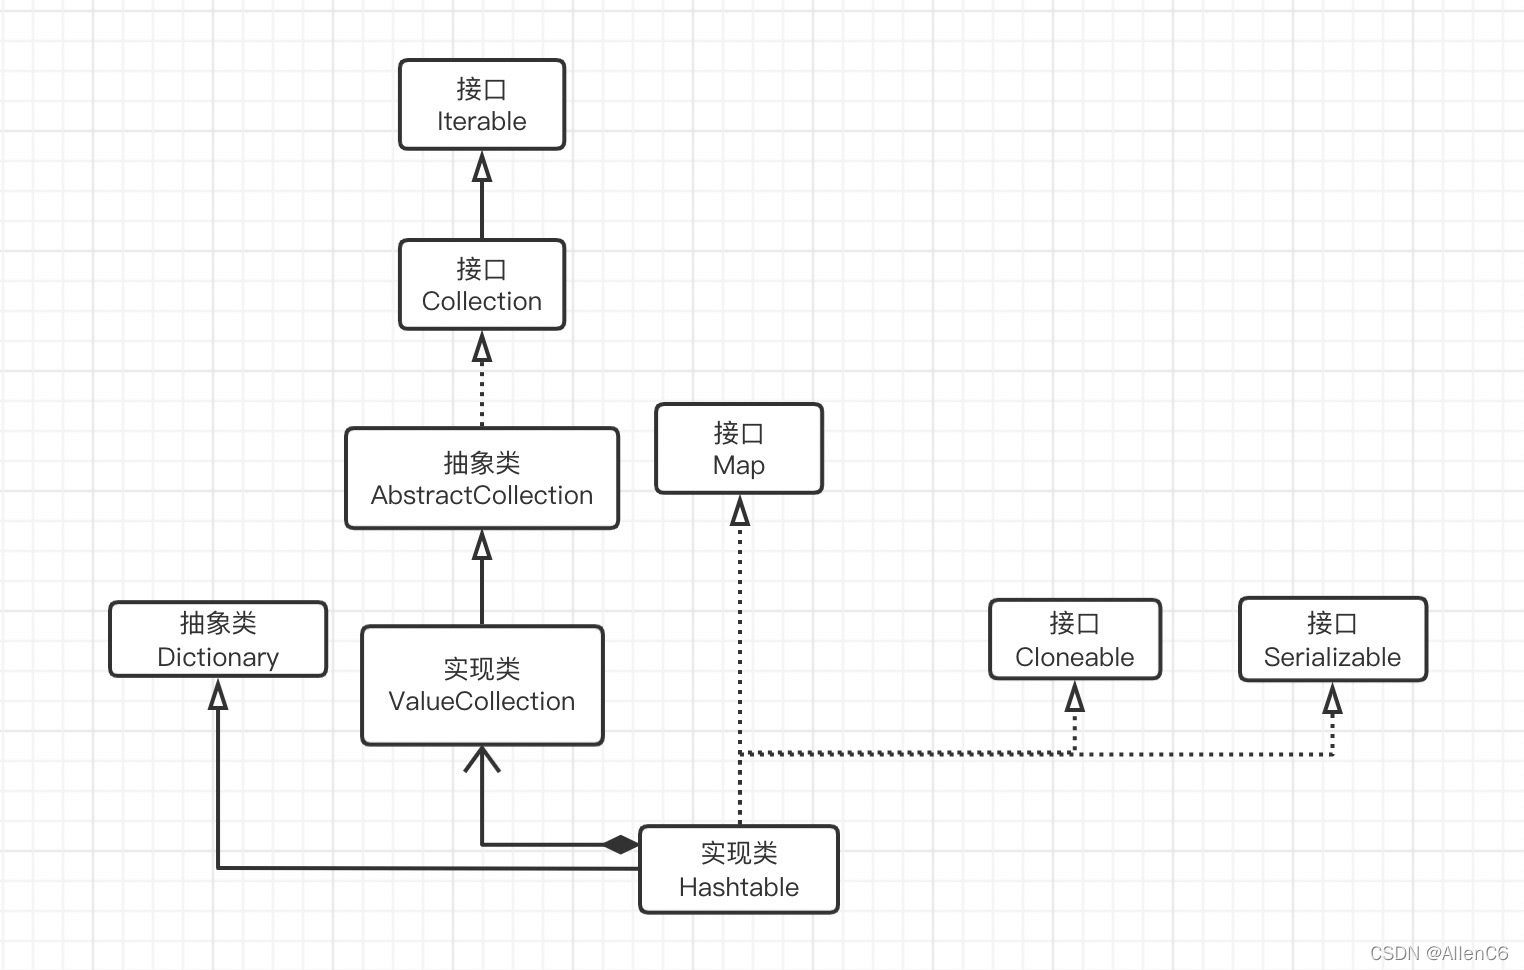
一、类继承关系图
二、HashTable介绍
HashTable的操作几乎和HashMap一致,主要的区别在于HashTable为了实现多线程安全,在几乎所有的方法上都加上了synchronized锁,而加锁的结果就是HashTable操作的效率十分低下。
不建议使用HashTable,Oracle官方也将其废弃,建议在多线程环境下使用ConcurrentHashMap类。
三、HashTable和HashMap的对比
1.线程安全
HashMap是线程不安全的类,多线程下会造成并发冲突,但单线程下运行效率较高;HashTable是线程安全的类,很多方法都是用synchronized修饰,但同时因为加锁导致并发效率低下,单线程环境效率也十分低;
2.插入null
HashMap允许有键为null,值为null;但HashTable不允许键或值为null;
3.容量
HashMap底层数组长度必须为2的幂,这样做是为了hash准备,默认为16;而HashTable底层数组长度可以为任意值,这就造成了hash算法散射不均匀,容易造成hash冲突,默认为11;
   public Hashtable(int initialCapacity, float loadFactor) {
        if (initialCapacity [initialCapacity];
        threshold = (int)Math.min(initialCapacity * loadFactor, MAX_ARRAY_SIZE + 1);
    }
    /**
     * Constructs a new, empty hashtable with the specified initial capacity
     * and default load factor (0.75).
     *
     * @param     initialCapacity   the initial capacity of the hashtable.
     * @exception IllegalArgumentException if the initial capacity is less
     *              than zero.
     */
    public Hashtable(int initialCapacity) {
        this(initialCapacity, 0.75f);
    }
    /**
     * Constructs a new, empty hashtable with a default initial capacity (11)
     * and load factor (0.75).
     */
    public Hashtable() {
        this(11, 0.75f);
    }
    /**
     * Constructs a new hashtable with the same mappings as the given
     * Map.  The hashtable is created with an initial capacity sufficient to
     * hold the mappings in the given Map and a default load factor (0.75).
     *
     * @param t the map whose mappings are to be placed in this map.
     * @throws NullPointerException if the specified map is null.
     * @since   1.2
     */
    public Hashtable(Map extends K, ? extends V> t) {
        this(Math.max(2*t.size(), 11), 0.75f);
        putAll(t);
    }
4.Hash映射
HashMap的hash算法通过非常规设计,将底层table长度设计为2的幂,使用位与运算代替取模运算,减少运算消耗;而HashTable的hash算法首先使得hash值小于整型数最大值,再通过取模进行散射运算;
int hash = key.hashCode();
int index = (hash & 0x7FFFFFFF) % tab.length;
5.扩容机制
HashMap创建一个为原先2倍的数组,然后对原数组进行遍历以及然后重新通过位运算计算位置,不管是红黑树还是链表,都先采取尾插法分成两条链,然后再通过链的数量决定是树化还是转链表(其实就是把TreeNode变成Node,因为红黑树分成两条链后其实就是TreeNode组成的链表);HashTable扩容将创建一个原长度2倍的数组 + 1,然后对原数组进行遍历以及rehash,头插法;
hashTable的扩容:
int newCapacity = (oldCapacity
hashTable的头插法:
        for (int i = oldCapacity ; i-- > 0 ;) {
            for (Entry old = (Entry)oldMap[i] ; old != null ; ) {
                Entry e = old;
                old = old.next;
                int index = (e.hash & 0x7FFFFFFF) % newCapacity;
                e.next = (Entry)newMap[index];
                newMap[index] = e;
            }
        }
6.结构区别
HashMap是由数组+链表形成,在JDK1.8之后链表长度大于8时转化为红黑树;而HashTable一直都是数组+链表;
四、Collections.synchronizedMap解析
1.Collections.synchronizedMap是怎么实现线程安全的
调用Collections.synchronizedMap实际是给Map包装成了SynchronizedMap
    public static  Map synchronizedMap(Map m) {
        return new SynchronizedMap(m);
    }
2.SynchronizedMap源码
先看属性:
        private final Map m;     // Backing Map
        final Object      mutex;        // Object on which to synchronize
再看构造方法:
        SynchronizedMap(Map m) {
            this.m = Objects.requireNonNull(m);
            mutex = this;
        }
        SynchronizedMap(Map m, Object mutex) {
            this.m = m;
            this.mutex = mutex;
        }
通过构造方法,把map传进来,如果不传Object mutex参数,mutex就是this
再看一下具体是怎么实现线程安全的:
        public int size() {
            synchronized (mutex) {return m.size();}
        }
        public boolean isEmpty() {
            synchronized (mutex) {return m.isEmpty();}
        }
        public boolean containsKey(Object key) {
            synchronized (mutex) {return m.containsKey(key);}
        }
        public boolean containsValue(Object value) {
            synchronized (mutex) {return m.containsValue(value);}
        }
        public V get(Object key) {
            synchronized (mutex) {return m.get(key);}
        }
        public V put(K key, V value) {
            synchronized (mutex) {return m.put(key, value);}
        }
        public V remove(Object key) {
            synchronized (mutex) {return m.remove(key);}
        }
        public void putAll(Map extends K, ? extends V> map) {
            synchronized (mutex) {m.putAll(map);}
        }
        public void clear() {
            synchronized (mutex) {m.clear();}
        }
发现几乎所有操作Map的代码,都把mutex作为锁,获取到锁之后去操作Map。
这种和HashTable直接锁整个方法粒度差不多,都不推荐使用,推荐使用ConcurrentHashMap
到此这篇关于Java HashTable与Collections.synchronizedMap源码深入解析的文章就介绍到这了,更多相关Java HashTable与Collections.synchronizedMap内容请搜索IT俱乐部以前的文章或继续浏览下面的相关文章希望大家以后多多支持IT俱乐部!

