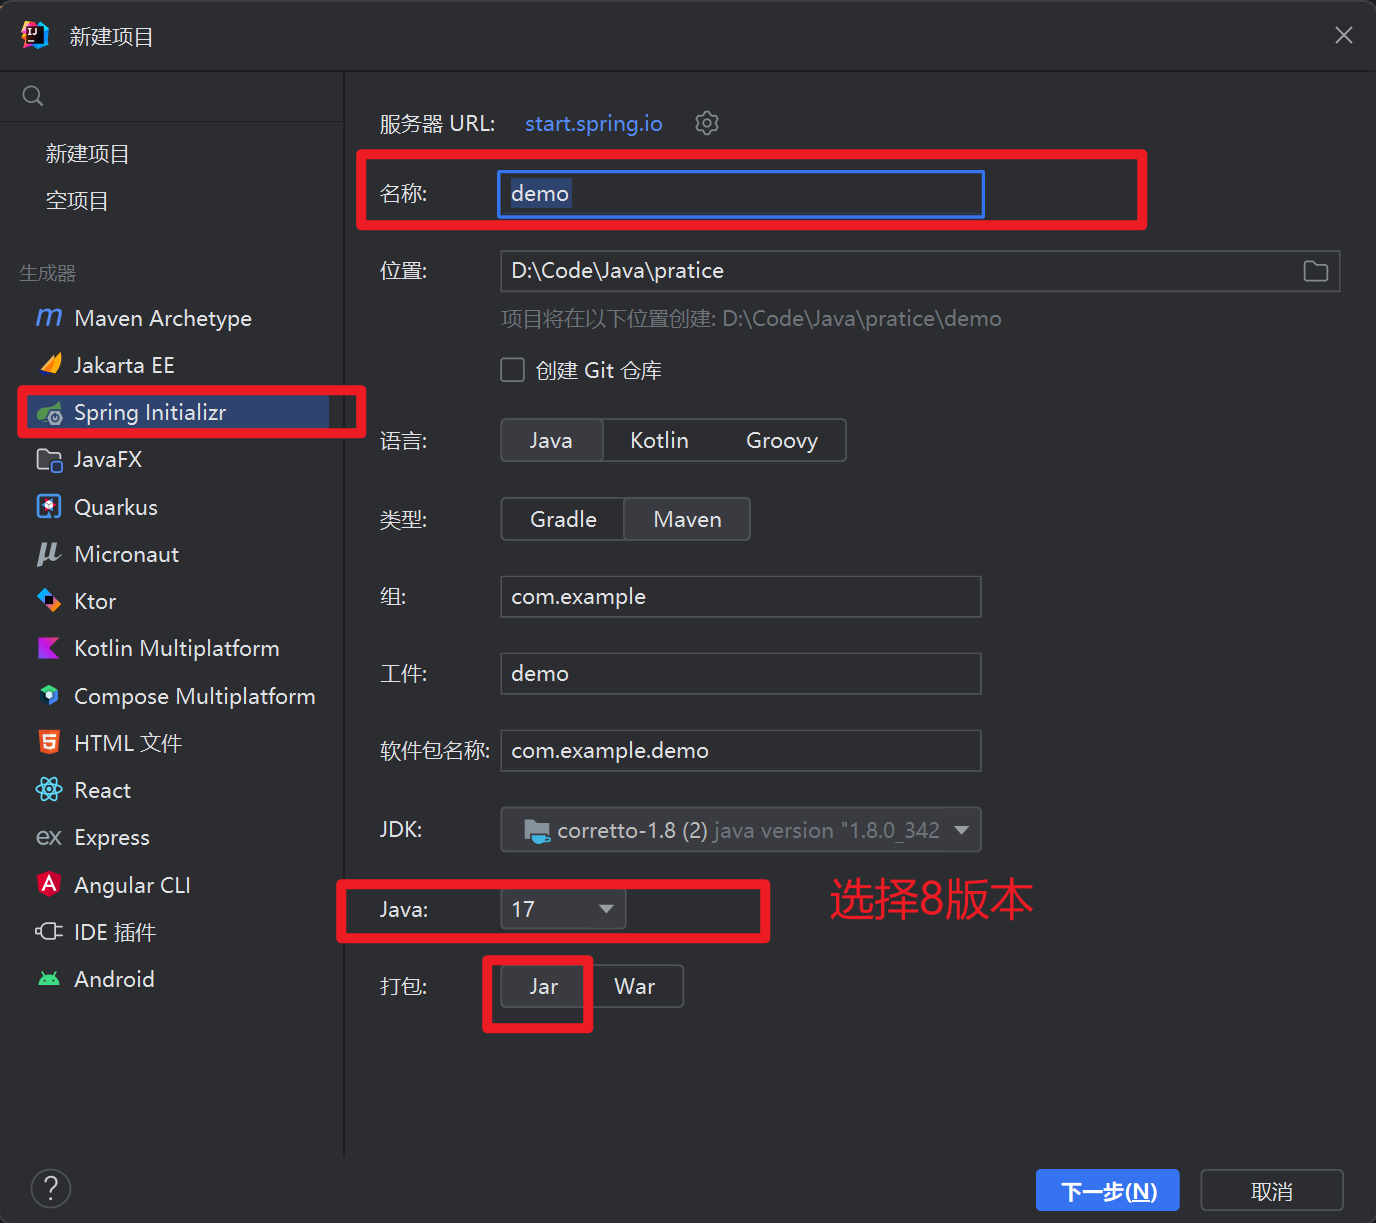
idea spring Initializr创建项目
勾选项目所需要的依赖
pom.xml文件会加载勾选的依赖,也可以不勾选后面通过自己常用的pom.xml统一导入。
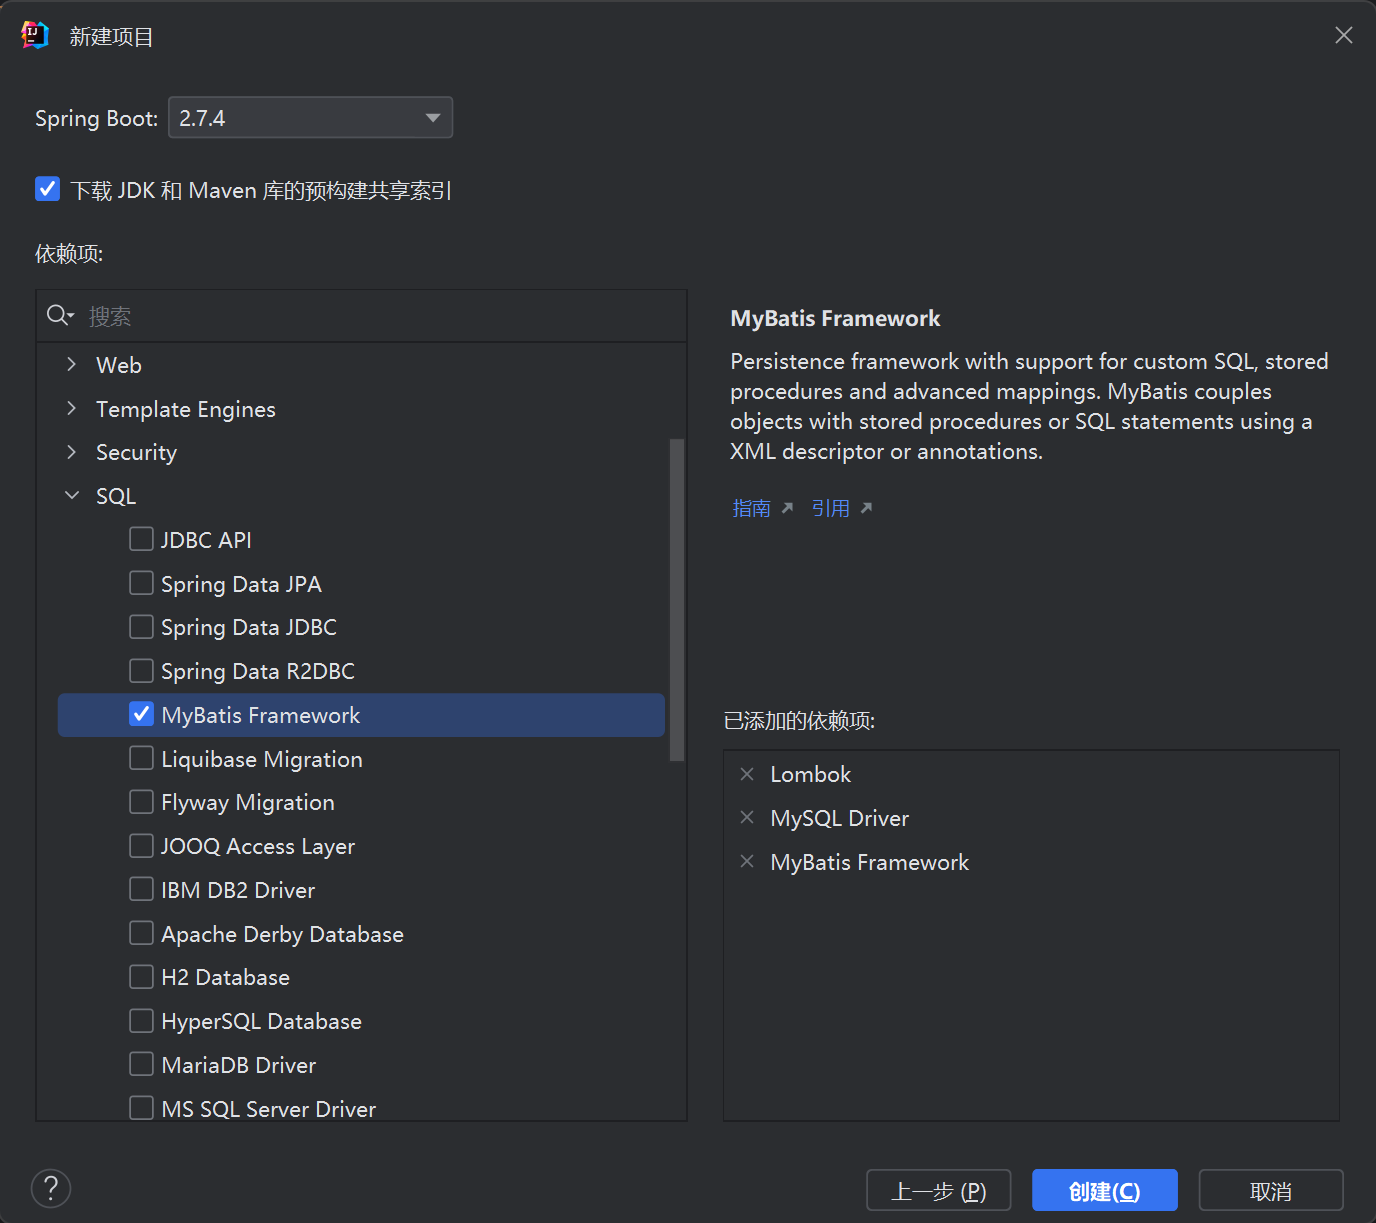
- Lombok 可以通过注解省去一些get,set方法。
简单项目常用pom.xml:
mybatis-plus、mybatis、
4.0.0org.springframework.bootspring-boot-starter-parent2.7.3com.example.communityspringboot030.0.1-SNAPSHOTspringboot03springboot031.8org.springframework.bootspring-boot-starter-weborg.mybatis.spring.bootmybatis-spring-boot-starter2.2.2mysqlmysql-connector-javaruntimeorg.springframework.bootspring-boot-starter-testtestorg.projectlomboklombokcom.baomidoumybatis-plus-boot-starter3.4.2com.alibabadruid1.1.13io.jsonwebtokenjjwt0.9.1org.codehaus.jacksonjackson-mapper-asl1.9.13org.springframework.bootspring-boot-starter-mailorg.springframework.bootspring-boot-configuration-processortrueorg.springframework.bootspring-boot-maven-plugin
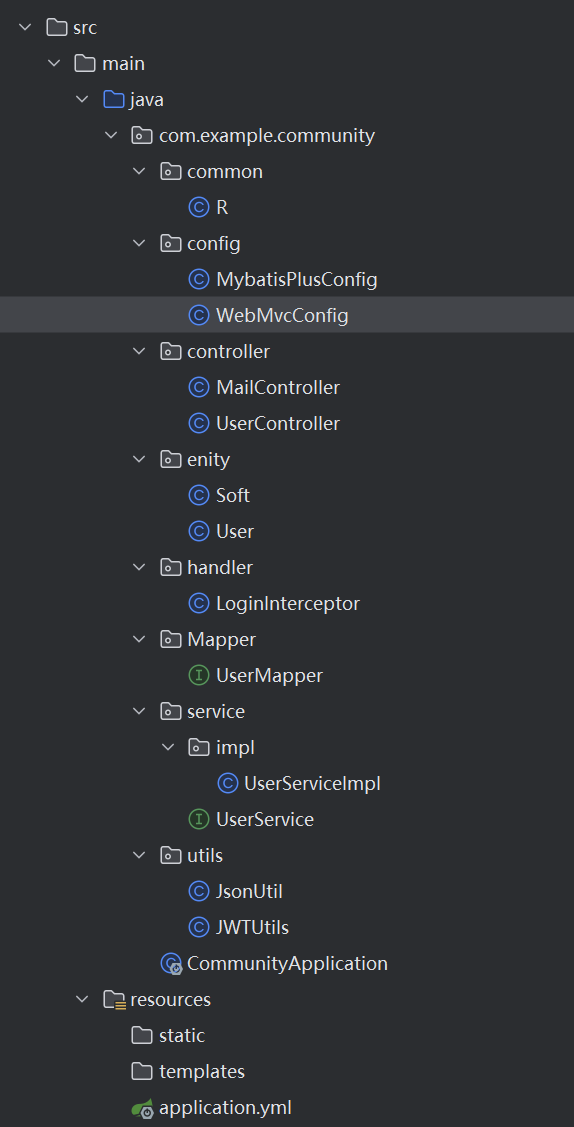
整体项目结构
创建User实体类放入Enity下
@TableName("user")是实体对应的表的名字
@TableId(type = IdType.AUTO)表的主键
@TableField(exist = false)不存在,就不会返回空。
package com.example.community.enity;

import com.baomidou.mybatisplus.annotation.IdType;
import com.baomidou.mybatisplus.annotation.TableField;
import com.baomidou.mybatisplus.annotation.TableId;
import com.baomidou.mybatisplus.annotation.TableName;
import lombok.Data;

@Data
@TableName("user")
public class User {
    @TableId(type = IdType.AUTO)
    private Integer userId;
    private String email;
    private String username;
    private String password;
    private String avatar;
    private String phone;
    @TableField(exist = false)
    private String code;
    public User(String email, String password) {
        this.email = email;
        this.password = password;
    }
}
创建通用返回的结果类
可以使用泛型传入对应的实体类,这里我就不传了。
package com.example.community.common;

import lombok.Data;

@Data
public class R {
    private Integer code;
    private String msg;
    private Object data;

    public R(Integer code, String msg, Object ob) {
        this.code = code;
        this.msg = msg;
        this.data = ob;
    }
    public R(Integer code, String msg) {
        this.code = code;
        this.msg = msg;
    }
    public static  R success(String msg){
        R r= new R(1,msg);
        return r;
    }
    public static  R success(String msg,Object ob){
        R r= new R(1,msg,ob);
        return r;
    }

    public static  R error(String msg){
        R r= new R(0,msg,null);
        return r;
    }
}
创建controller
在controller里可以对前端的请求进行一个分发,处理。根据地址链接找到对应的controller。
登入模块,可以创建一个UserController处理用户的相关信息。
package com.example.community.controller;

import com.example.community.common.R;
import com.example.community.enity.User;
import com.example.community.service.UserService;
import lombok.extern.slf4j.Slf4j;
import org.springframework.beans.factory.annotation.Autowired;
import org.springframework.web.bind.annotation.*;

import javax.servlet.http.HttpSession;
import java.util.Map;

@Slf4j
@RestController()
@RequestMapping("/user")
@CrossOrigin(origins = {"http://localhost:8090", "null"})
public class UserController {
    @Autowired
    UserService service;

    @PostMapping("/login")
    public R login(@RequestBody User user) {
        log.info("user"+user.toString());
        return service.login(user.getEmail(), user.getPassword());
    }

    @PostMapping("/register")
    @ResponseBody
    public R register(@RequestBody Map data, HttpSession session) {
        log.info(data.toString());
        String code1 = (String) session.getAttribute("code");
        String email1 = (String) session.getAttribute("email");
        log.info("---------------------------");
        log.info(email1);
        log.info(code1);
        log.info("---------------------------");
        if(code1 == null || email1 == null){
            return R.error("验证码已过期或邮箱有误");
        }
        if (!data.get("password").equals(data.get("password_confirmation"))) {
            return R.error("两次密码不一致");
        }

        if (!email1.equals(data.get("email").toString())) {
            return R.error("邮箱错误");
        }
        if (!code1.equals(data.get("code").toString())) {
            return R.error("验证码错误");
        }
        User user1 = new User(data.get("email").toString(), data.get("password").toString());
        return service.register(user1);
    }
}
创建service层
service层给controller层提供服务,调用dao层mapper查询数据库的数据,提供相对应的服务。
在这里我是用了mybtis-plus来进行数据库简单的查询。
用户模块的service层代码:
UserService接口
继承mybatis-plus的IService
package com.example.community.service;

import com.baomidou.mybatisplus.extension.service.IService;
import com.example.community.common.R;
import com.example.community.enity.User;

public interface UserService extends IService {
    public R selectUserByUsername(String name);
    public R login(String username, String password);
    public R register(User user);
    public R logout(String token);
}
UserService实现类
在这个类中,调用了mapper提供的方法。
继承ServiceImpl
package com.example.community.service.impl;

import com.baomidou.mybatisplus.core.conditions.query.QueryWrapper;
import com.baomidou.mybatisplus.extension.service.impl.ServiceImpl;
import com.example.community.Mapper.UserMapper;
import com.example.community.common.R;
import com.example.community.enity.User;
import com.example.community.service.UserService;
import org.springframework.beans.factory.annotation.Autowired;
import org.springframework.stereotype.Service;

@Service
public class UserServiceImpl extends ServiceImpl implements UserService {
    @Autowired
    private UserMapper userMapper;
    @Override
    public R selectUserByUsername(String name){
        return null;
    }
    @Override
    public R login(String email, String password){
        User user = userMapper.selectOne(new QueryWrapper().eq("email", email));
        if(user == null){
            return R.error("用户不存在");
        }
        if(!user.getPassword().equals(password)){
            return R.error("密码错误");
        }
        return R.success("登录成功");
    }
    @Override
    public R register(User user){
        User user1 = userMapper.selectOne(new QueryWrapper().eq("username", user.getUsername()));
        if(user1 != null){
            return R.error("用户已存在");
        }
        userMapper.insert(user);
        return R.success("注册成功");
    }

    @Override
    public R logout(String token){
        return null;
    }
}
创建Mapper / Dao层
使用了mybatis-plus,所以只需要继承BaseMapper既可。
package com.example.community.Mapper;

import com.baomidou.mybatisplus.core.mapper.BaseMapper;
import com.example.community.enity.User;
import org.apache.ibatis.annotations.Mapper;

@Mapper
public interface UserMapper extends BaseMapper {

}
邮箱验证码、生成Token
- 使用邮箱进行登入验证码验证
- 使用
jwt生成token返回给前端,服务端可以用来判断用户是否登入。并且支持跨域
实现这两个功能需要使用到一些工具类和配置,如下:
package com.example.community.utils;


import io.jsonwebtoken.Jwt;
import io.jsonwebtoken.JwtBuilder;
import io.jsonwebtoken.Jwts;
import io.jsonwebtoken.SignatureAlgorithm;

import java.util.Date;
import java.util.HashMap;
import java.util.Map;

public class JWTUtils {

    private static final String jwtToken = "123456Mszlu!@#$$";

    public static String createToken(Long userId) {
        Map claims = new HashMap();
        claims.put("userId", userId);
        JwtBuilder jwtBuilder = Jwts.builder()
                .signWith(SignatureAlgorithm.HS256, jwtToken) // 签发算法,秘钥为jwtToken
                .setClaims(claims) // body数据,要唯一,自行设置
                .setIssuedAt(new Date()) // 设置签发时间
                .setExpiration(new Date(System.currentTimeMillis() + 24 * 60 * 60 * 1000));// 一天的有效时间
        String token = jwtBuilder.compact();
        return token;
    }

    public static Map checkToken(String token) {
        try {
            Jwt parse = Jwts.parser().setSigningKey(jwtToken).parse(token);
            return (Map) parse.getBody();
        } catch (Exception e) {
            e.printStackTrace();
        }
        return null;

    }
}
拦截器的配置
package com.example.community.handler;

import com.alibaba.druid.util.StringUtils;
import com.example.community.common.R;
import com.example.community.utils.JsonUtil;
import lombok.extern.slf4j.Slf4j;
import org.springframework.stereotype.Component;
import org.springframework.web.method.HandlerMethod;
import org.springframework.web.servlet.HandlerInterceptor;

import javax.servlet.http.HttpServletRequest;
import javax.servlet.http.HttpServletResponse;

@Component
@Slf4j
public class LoginInterceptor implements HandlerInterceptor {

    @Override
    public boolean preHandle(HttpServletRequest request, HttpServletResponse response,Object handler) throws  Exception{
        log.info("请求被拦截{}",request);

        if(!(handler instanceof HandlerMethod)){
            return true;
        }
        String token = request.getHeader("Authorization");
        log.info("token:{}",token);
        if(StringUtils.isEmpty(token)){
            R r= R.error("未登录");
            response.setContentType("application/json;charset=utf-8");
            log.info("{}",r);
            response.getWriter().print(JsonUtil.objectToJson(r));
            return false;
        }

        return true;
    }
}
package com.example.community.config;

import com.example.community.handler.LoginInterceptor;
import org.springframework.context.annotation.Configuration;
import org.springframework.web.servlet.config.annotation.CorsRegistry;
import org.springframework.web.servlet.config.annotation.InterceptorRegistry;
import org.springframework.web.servlet.config.annotation.WebMvcConfigurer;

@Configuration
public class WebMvcConfig implements WebMvcConfigurer {
    @Override
    public void addInterceptors(InterceptorRegistry registry) {
        // 用户拦截器
        registry.addInterceptor(new LoginInterceptor())
                // 需要拦截的请求
                .addPathPatterns("/user/**","/article/**")
                // 需要放行的请求
                .excludePathPatterns("/user/login","/user/register","/mail/**")
                // 添加swagger-ui的放行路径
                .excludePathPatterns("/swagger-resources/**", "/webjars/**", "/v2/**", "/swagger-ui.html/**", "/doc.html/**")
        ;
    }
    @Override
    public void addCorsMappings(CorsRegistry registry) {
        registry.addMapping("/**")
                .allowedOriginPatterns("*")
                .allowedMethods("POST", "GET", "PUT", "OPTIONS", "DELETE")
                .maxAge(3600)
                .allowCredentials(true);
    }
}
实现邮箱认证登入,之前写过一个,传送门
总结
到此这篇关于Springboot初始化项目并完成登入注册的文章就介绍到这了,更多相关Springboot初始化项目并登入注册内容请搜索IT俱乐部以前的文章或继续浏览下面的相关文章希望大家以后多多支持IT俱乐部!

