实现思路
1、请求后端获得背景图、滑块、x、y、误差范围bound
2、将滑块设置到对应的位置:top = y
3、添加鼠标滑动事件
实现代码
后端请求(Controller)
SliderVerifyController
/**
 * @author: Yang
 * @create: 2022-10-25
 * @Description: 滑动验证
 */
@RestController
@RequestMapping("/sliderVerify")
public class SliderVerifyController {
    @Resource
    private SliderVerifyService sliderVerifyService;

    @GetMapping
    public ResponseResult generateSliderVerify() {

        return sliderVerifyService.generateSliderVerify();
    }
}
SliderVerifyServiceImpl
/**
 * @author: Yang
 * @create: 2022-10-25
 * @Description:
 */
@Service
public class SliderVerifyServiceImpl implements SliderVerifyService {

    @Value("${my.staticPath}")
    private String path;
    @Override
    public ResponseResult generateSliderVerify() {
        int index = new Random().nextInt(5) + 1;

        ImageSlideVerify slideVerify = ImageSlideVerifyUtil.cutting(
                new File(System.getProperty("user.dir") + "/web_component/src/main/resources/static/sliderVerify/" + index + ".png"));
        return new ResponseResult(200, slideVerify);
    }
}
HTML代码
	滑动验证码


	let blockImg = document.querySelector("#block");// 滑块
	let bgImg = document.querySelector("#bg");// 背景
	let sliderBlock = document.querySelector("#slider-block");// 滑动栏的滑块
	function sliderVerify(callback){
		// 获取验证码信息
		const xhr = new XMLHttpRequest();
		xhr.open("get", "http://localhost:8080/sliderVerify", true);
		xhr.send();
		xhr.onreadystatechange = function(){
			if(this.readyState == 4 && this.status == 200){
				let data = JSON.parse(this.response).data;
				blockImg.src = data.blockImg;
				bgImg.src = data.bgImg;
				blockImg.style.top = data.y + 80 + "px";
				callback && callback(data); // 回调函数
			}
		}
	}
	// 执行
	sliderVerify(function (data) {
		// 添加鼠标事件
		sliderBlock.addEventListener("mousedown", (e1) => {
			const x = e1.x;
			window.onmousemove = function(e) {
				let left = e.x - x;
				// 设置边界,因为我的图片大小都是固定425,所以我直接固定
				if(e1.target.offsetLeft >= 425){
					sliderBlock.style.left = 425 + "px";
					blockImg.style.left = 425 - 20 + "px";
					return;
				}
				// 移动
				sliderBlock.style.left = left + "px";
				blockImg.style.left = left - 20 + "px";
			}
			// 鼠标释放
			window.onmouseup = function(e){
				// 获取滑动到的位置
				let left = sliderBlock.style.left.split("px")[0];
				// 减去80内边距并转成数字
				left = Number(left) - 80;
				// 清空鼠标滑动事件
				window.onmousemove = null;
				// 回到初始位置
				sliderBlock.style.left = 0 + "px";
				blockImg.style.left = 0 - 20 + "px";
				// 判断是否在范围内
				if(left >= data.x - data.bound && left <= data.x + data.bound){
					alert("验证成功");
				} else {
					alert("验证错误")
					window.location.reload()
				}
			}
		})
	});

	#content{
		user-select: none;
		position: relative;
		padding: 80px;
		padding-bottom: 0;
	}
	#block{
		position: absolute;
		/* top: 169px; */
		left: -20px;
	}
	#slider{
		position: relative;
		display: flex;
		align-items: center;
		box-sizing: border-box;
		width: 505px;
		height: 50px;
		padding: 0 2px;
		border: 3px groove ;
	}
	#slider-block{
		position: relative;
		width: 70px;
		height: 40px;
		background-color: antiquewhite;
	}
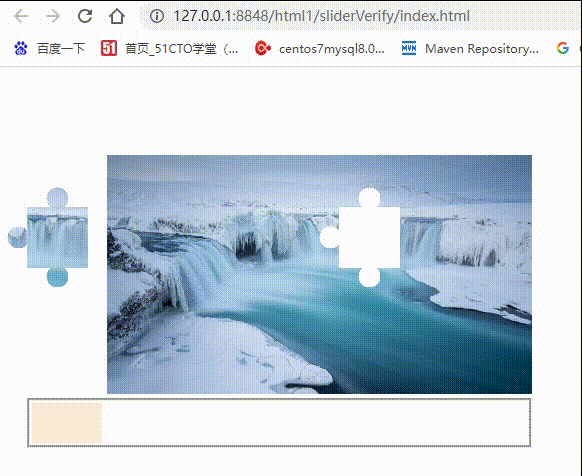
实现结果
到此这篇关于Java实现滑动验证码(前端部分)的文章就介绍到这了,更多相关Java滑动验证码内容请搜索IT俱乐部以前的文章或继续浏览下面的相关文章希望大家以后多多支持IT俱乐部!


