一.搭建
1.前端
npm install
npm run serve
2.后端
老生常谈的配置,修改mysql与redis即可。
二.业务功能介绍
功能上jeecgboot主要提供了系列的代码生成器、模板页面、报表页面。
1.报表功能
主要提供报表的相关操作。提供了积木报表插件,可以自定义数据报表、图形报表。并将报表挂载到菜单上。

2.在线开发
也就是代码生成器,可以可视化的在页面上新建数据库表,并通过数据库表生成前后台代码。减少业务代码开发的时间。

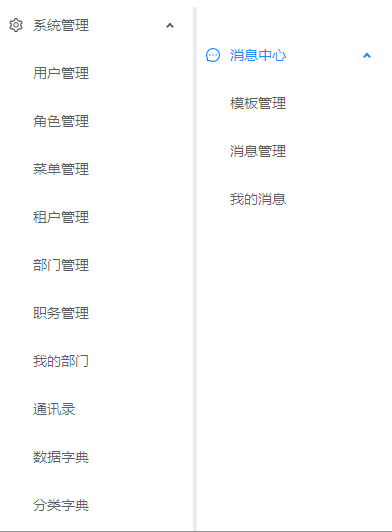
3.系统管理
用户管理、角色管理、机构管理、消息管理等基础模块。
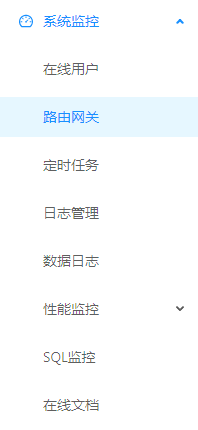
4.系统监控
主要负责各种日志、监控的统一处理。
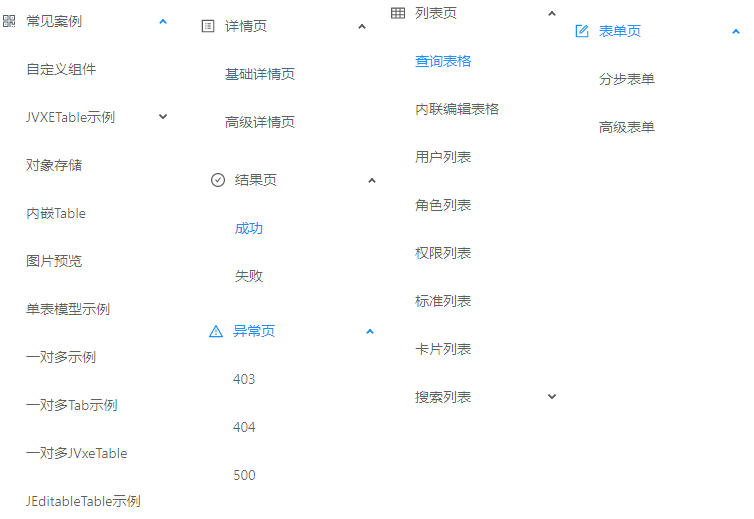
5.页面组件样式
常见案例、详情页、结果页、异常页、列表页、表单页主要提供了样式页面与控件页面示例。在开发过程中如果需要模板直接复制代码即可。详情请
三.后台架构介绍
1.概括

其中报表和代码生成器没有提供源码,如果有兴趣可以自行查看jar包源码。

2.架构核心包jeecg-boot-base
jeecg-boot-base包括了下文的几个部分。

1.接口包jeecg-boot-base-api

1.对外接口jeecg-system-cloud-api
使用feign+hystrix实现了服务间调用加熔断,单机环境并没有使用。
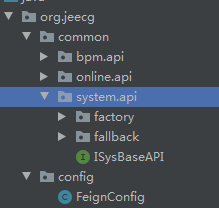
2.服务内接口jeecg-system-local-api
该包提供了下文使用的常用方法接口。仅提供了接口并无其他配置。

2.核心配置包jeecg-boot-base-core
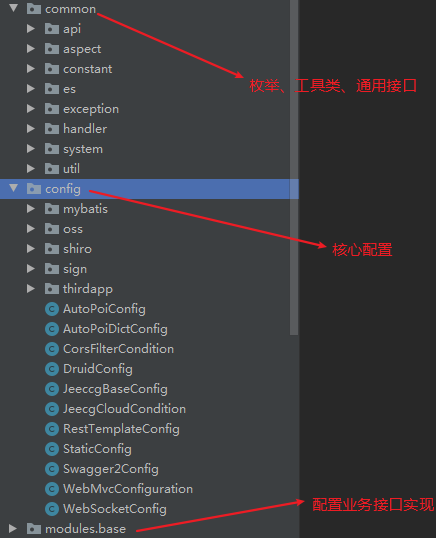
1.通用类common 1.api
其中为通用接口与通用返回对象。
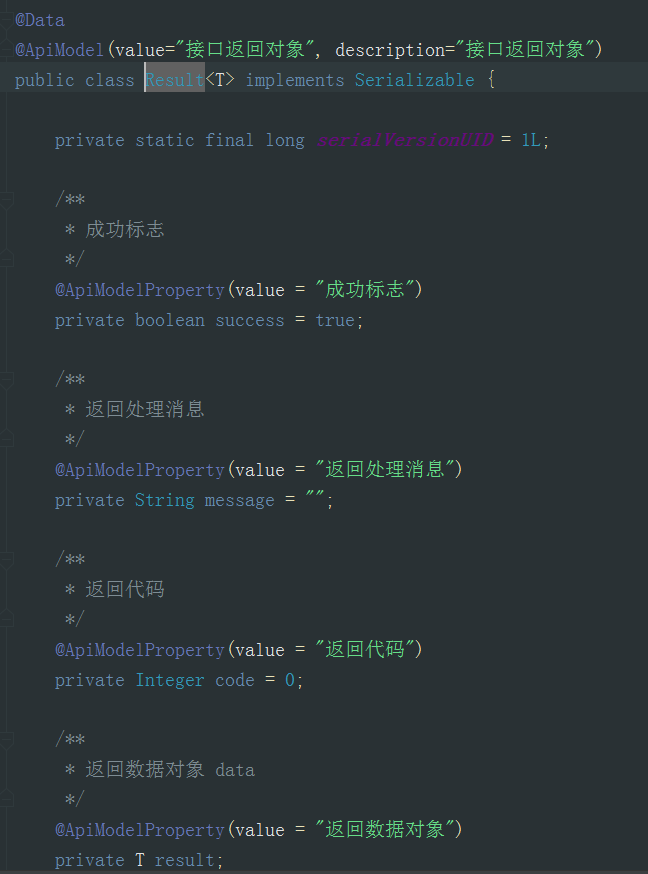
1.Result
其中Result为所有类的返回实体,这样能够通过code编码和message获取是否成功和成功/失败的信息。此类是常用的架构设计
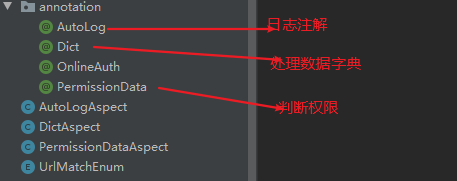
2.aspect
为项目的自定义注解,使用了AOP的切面方式实现,这里就不详细说了,比较简单都可以看懂。
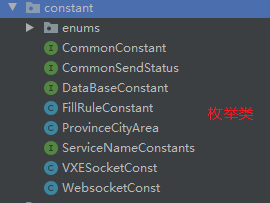
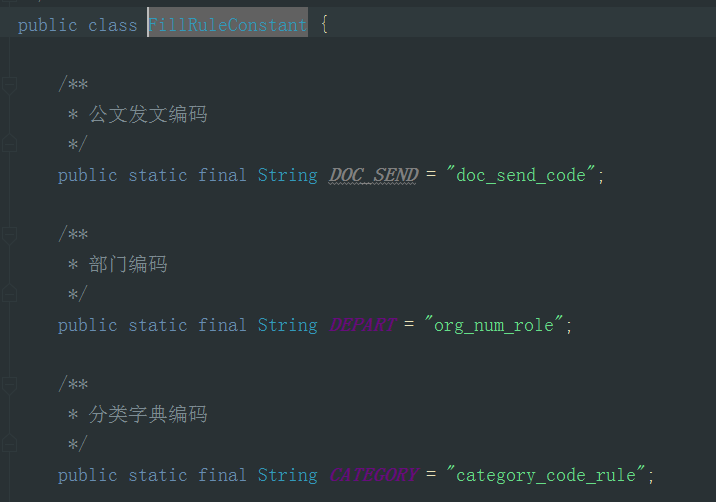
3.constant
存放着枚举类与常量池,这里不多说了。
4.es
为操作es的通用类,主要是配置es连接和查询时动态拼接and/or的方法。

5.exception
exception为自定义的异常类。
1.JeecgBootExceptionHandler
这里详细说一下JeecgBootExceptionHandler,该类也是常见的架构设计之一,核心为@RestControllerAdvice、@ExceptionHandler。当业务代码中没有对异常拦截时,该类会自动拦截异常,并数据log日志。所以某些日志在该类配置后,就不需要在每个接口中都捕获这个异常了。

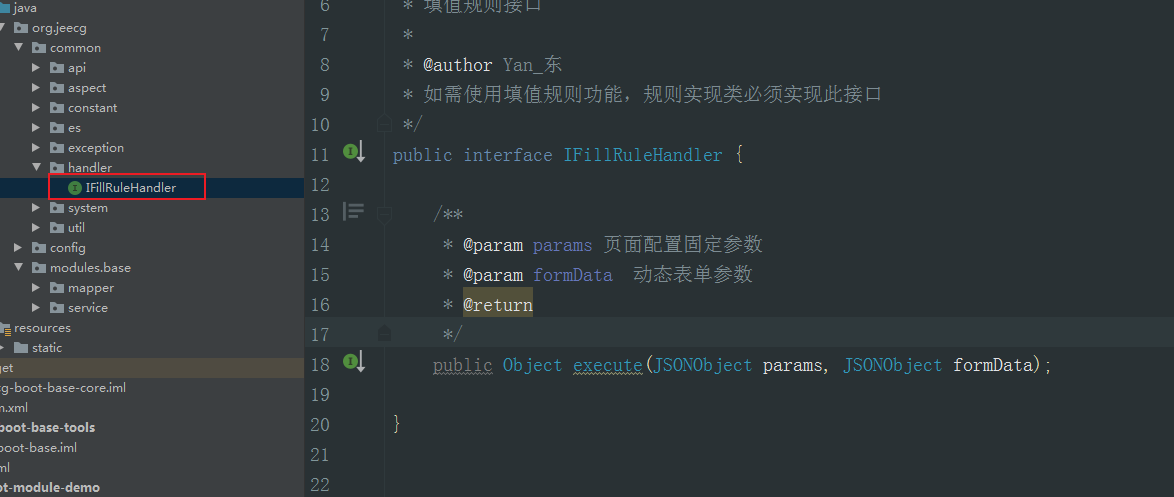
6.handler
为下文规范提供了接口类。没有其他特别说明。
7.system类
这里主要说controller、entity、service等业务代码的父类
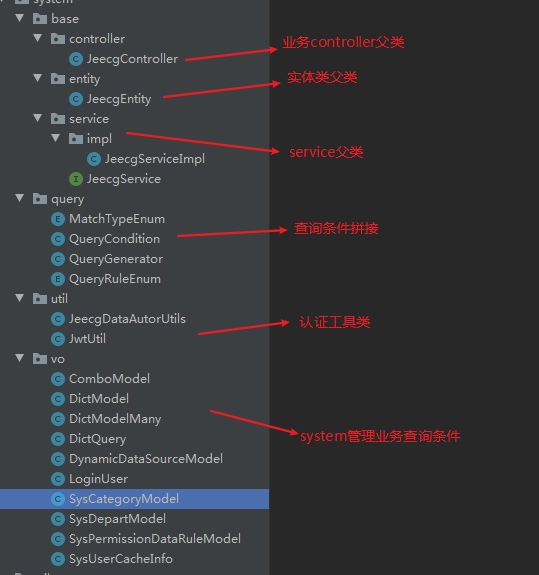
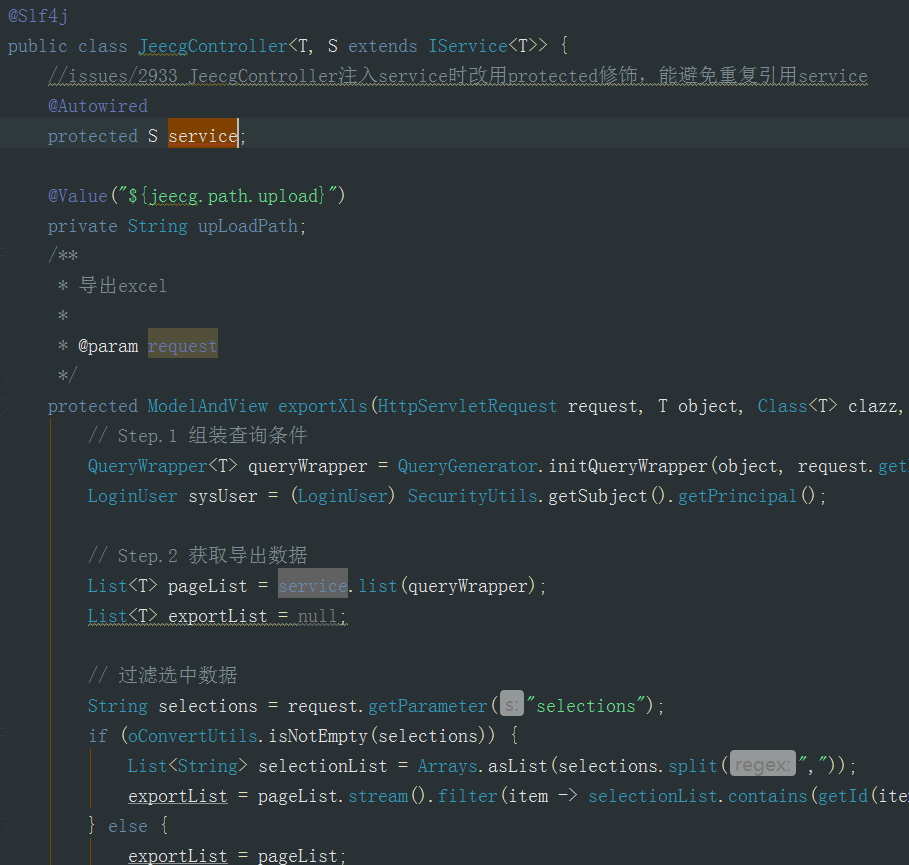
1.JeecgController
所以controller的父类,提供了导入导出的功能。还可以在里面扩展分页、排序、常用调用方法等,这样就可以避免相同的代码多次添加。这也是架构设计中常用的技巧。
2.JeecgEntity
将通用字段如id、创建人、修改人、创建时间、修改时间等字段统一封装在一个实体中,使用其他实体继承。这也是架构设计中常用的技巧。

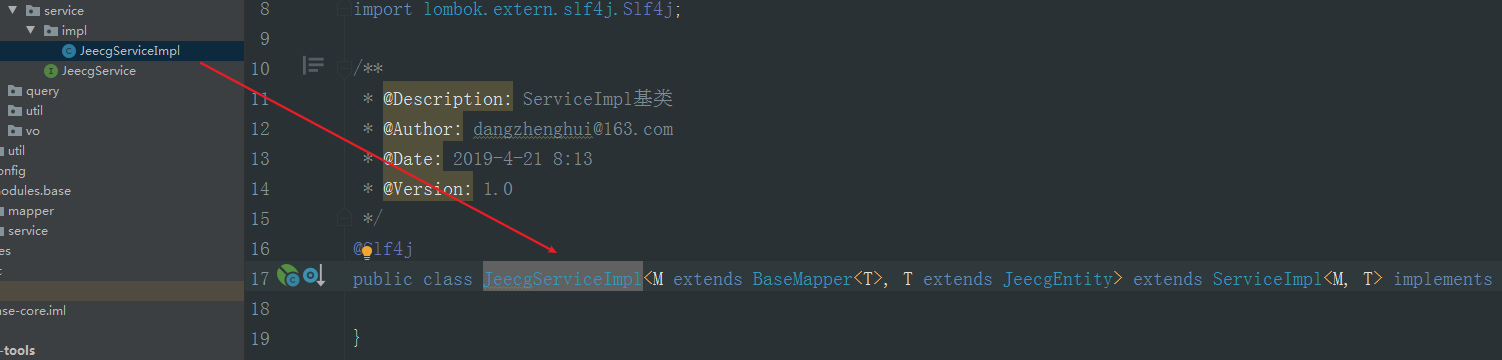
3.service
主要提供Mybatis-plus提供的curd方法。
8.utli
提供了一大波的工具类,如果在工作中需要,直接复制使用。

2.通用配置类config
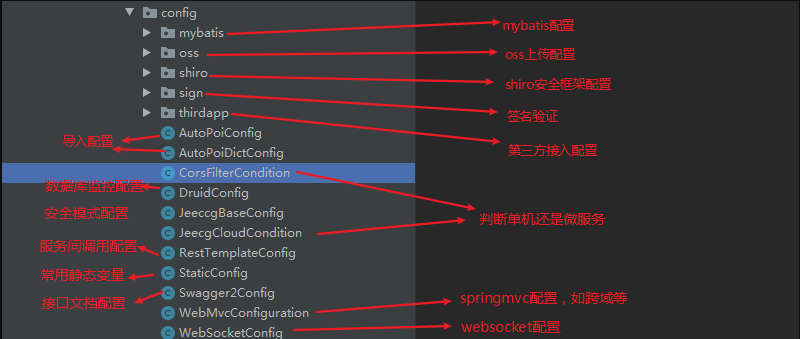
1.mybatis

1.MybatisInterceptor
MybatisInterceptor这里主要说MybatisInterceptor,该类负责在mybatis执行语句前,拦截并获取参数,将创建人、创建时间等字符动态插入。这里上部分核心代码。
MappedStatement mappedStatement = (MappedStatement) invocation.getArgs()[0];
		String sqlId = mappedStatement.getId();
		log.debug("------sqlId------" + sqlId);
		//获取sql类型是插入还是修改
		SqlCommandType sqlCommandType = mappedStatement.getSqlCommandType();
		//获取插入参数
		Object parameter = invocation.getArgs()[1];
		if (parameter == null) {
			return invocation.proceed();
		}
		if (SqlCommandType.INSERT == sqlCommandType) {
			LoginUser sysUser = this.getLoginUser();
			//通过反射获取入参的类
			Field[] fields = oConvertUtils.getAllFields(parameter);
			for (Field field : fields) {
				log.debug("------field.name------" + field.getName());
				try {
				    //将创建人信息动态加入
					if ("createBy".equals(field.getName())) {
						field.setAccessible(true);
						Object local_createBy = field.get(parameter);
						field.setAccessible(false);
						if (local_createBy == null || local_createBy.equals("")) {
							if (sysUser != null) {
								// 登录人账号
								field.setAccessible(true);
								field.set(parameter, sysUser.getUsername());
								field.setAccessible(false);
							}
						}
					}
			}
2.MybatisPlusSaasConfig
该类主要负责多租户,什么是多租户呢?
多租户:就是多个公司/客户公用一套系统/数据库,这就需要保证数据的权限。
该场景比较少不详细说明。
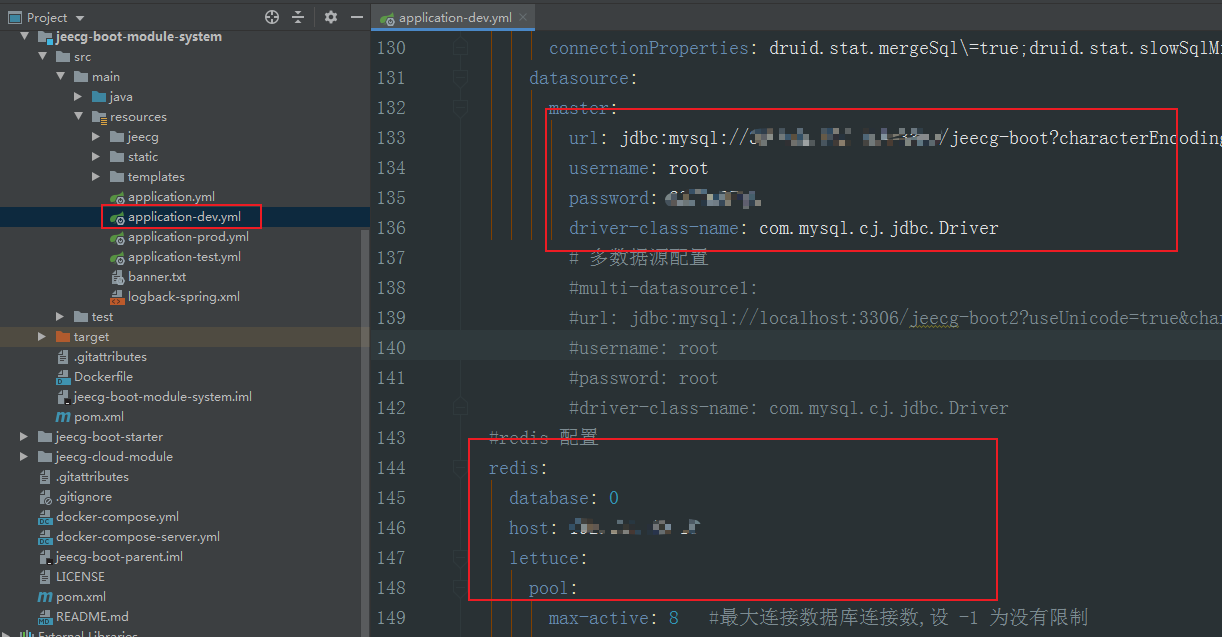
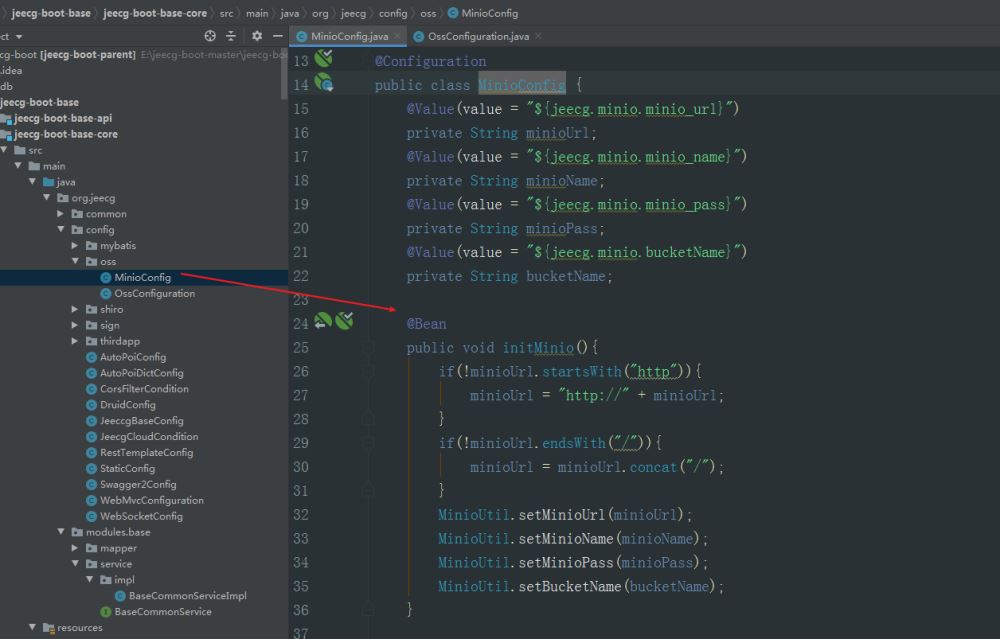
2.oss
主要从application-dev.yml获取到上传的路径与配置。
3.shiro
安全框架主要有两个目标:认证与鉴权。
认证:判断用户名密码是否正确。
鉴权:判断用户是否有权限访问该接口。
这里本文着重讲解,如果遇到shiro相关应用,可以项目直接移植使用。
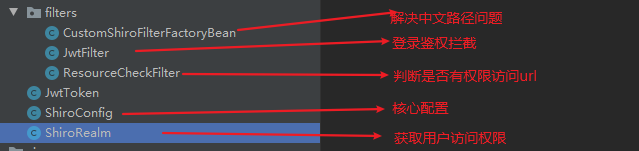
1.CustomShiroFilterFactoryBean
该类主要负责解决资源中文路径问题。这里有个通用的解决方式。
新建类集成ShiroFilterFactoryBean方法,并重写核心方法createInstance(),并在注入时,注入新建的类CustomShiroFilterFactoryBean,这样就达到的以往重新源码的功能。因为spring提供的功能都是用该思想,所以修改源码的地方就原来越少了,都可以使用该方式实现。
2.JwtFilter
同上文,复写BasicHttpAuthenticationFilter的验证登录用户的方法,在执行登录接口后判断用户是否正确。
3.ResourceCheckFilter
负责鉴权使用,判断当前用户是否有权限访问。
    //表示是否允许访问 ,如果允许访问返回true,否则false;
    @Override
    protected boolean isAccessAllowed(ServletRequest servletRequest, ServletResponse servletResponse, Object o) throws Exception {
        Subject subject = getSubject(servletRequest, servletResponse);
        //获取当前url
        String url = getPathWithinApplication(servletRequest);
        log.info("当前用户正在访问的 url => " + url);
        return subject.isPermitted(url);
    }

    //onAccessDenied:表示当访问拒绝时是否已经处理了; 如果返回 true 表示需要继续处理; 如果返回 false
    @Override
    protected boolean onAccessDenied(ServletRequest servletRequest, ServletResponse servletResponse) throws Exception {
        HttpServletRequest request = (HttpServletRequest) servletRequest;
        HttpServletResponse response = (HttpServletResponse) servletResponse;
        response.sendRedirect(request.getContextPath() + this.errorUrl);
        // 返回 false 表示已经处理,例如页面跳转啥的,表示不在走以下的拦截器了(如果还有配置的话)
        return false;
    }
4.ShiroRealm
主要负责获取用户所有的菜单权限,并提供token的一系列方法。
    //获取所有菜单权限集合
    @Override
    protected AuthorizationInfo doGetAuthorizationInfo(PrincipalCollection principals) {
    }

    //验证用户输入的账号和密码是否正确
    @Override
    protected AuthenticationInfo doGetAuthenticationInfo(AuthenticationToken auth) throws AuthenticationException {
    }

    //校验token的有效性
    public LoginUser checkUserTokenIsEffect(String token) throws AuthenticationException {
    }

    //刷新token有效时间
    public boolean jwtTokenRefresh(String token, String userName, String passWord) {
    }

    //清除当前用户的权限认证缓存
    @Override
    public void clearCache(PrincipalCollection principals) {
        super.clearCache(principals);
    }
5.ShiroConfig
此为shiro的核心配置类,大多数写法都是固定写法。
public class ShiroConfig {

    @Value("${jeecg.shiro.excludeUrls}")
    private String excludeUrls;
    @Resource
    LettuceConnectionFactory lettuceConnectionFactory;
    @Autowired
    private Environment env;


    /**
     * Filter Chain定义说明
     *
     * 1、一个URL可以配置多个Filter,使用逗号分隔
     * 2、当设置多个过滤器时,全部验证通过,才视为通过
     * 3、部分过滤器可指定参数,如perms,roles
     */
    @Bean("shiroFilter")
    public ShiroFilterFactoryBean shiroFilter(SecurityManager securityManager) {
        CustomShiroFilterFactoryBean shiroFilterFactoryBean = new CustomShiroFilterFactoryBean();
        shiroFilterFactoryBean.setSecurityManager(securityManager);
        // 拦截器
        Map filterChainDefinitionMap = new LinkedHashMap();
        if(oConvertUtils.isNotEmpty(excludeUrls)){
            String[] permissionUrl = excludeUrls.split(",");
            for(String url : permissionUrl){
                filterChainDefinitionMap.put(url,"anon");
            }
        }
        // 配置不会被拦截的链接 顺序判断 也就是不同通过token访问的地址
        filterChainDefinitionMap.put("/sys/cas/client/validateLogin", "anon"); /

        // 添加自己的过滤器并且取名为jwt
        Map filterMap = new HashMap(1);
        //如果cloudServer为空 则说明是单体 需要加载跨域配置【微服务跨域切换】
        Object cloudServer = env.getProperty(CommonConstant.CLOUD_SERVER_KEY);
        //前文定义的过滤器
        filterMap.put("jwt", new JwtFilter(cloudServer==null));
        shiroFilterFactoryBean.setFilters(filterMap);
        // <!-- 过滤链定义,从上向下顺序执行,一般将/**放在最为下边
        filterChainDefinitionMap.put("/**", "jwt");

        // 未授权界面返回JSON
        shiroFilterFactoryBean.setUnauthorizedUrl("/sys/common/403");
        shiroFilterFactoryBean.setFilterChainDefinitionMap(filterChainDefinitionMap);
        return shiroFilterFactoryBean;
    }

    //加入security自定义配置类
    @Bean("securityManager")
    public DefaultWebSecurityManager securityManager(ShiroRealm myRealm) {
        DefaultWebSecurityManager securityManager = new DefaultWebSecurityManager();
        //加入上文提供的授权配置
        securityManager.setRealm(myRealm);
        DefaultSubjectDAO subjectDAO = new DefaultSubjectDAO();
        DefaultSessionStorageEvaluator defaultSessionStorageEvaluator = new DefaultSessionStorageEvaluator();
        defaultSessionStorageEvaluator.setSessionStorageEnabled(false);
        subjectDAO.setSessionStorageEvaluator(defaultSessionStorageEvaluator);
        securityManager.setSubjectDAO(subjectDAO);
        //使用redis缓存有关信息(实现在下文)
        securityManager.setCacheManager(redisCacheManager());
        return securityManager;
    }

    //下面的代码是添加注解支持
    @Bean
    @DependsOn("lifecycleBeanPostProcessor")
    public DefaultAdvisorAutoProxyCreator defaultAdvisorAutoProxyCreator() {
        DefaultAdvisorAutoProxyCreator defaultAdvisorAutoProxyCreator = new DefaultAdvisorAutoProxyCreator();
        defaultAdvisorAutoProxyCreator.setProxyTargetClass(true);
        defaultAdvisorAutoProxyCreator.setUsePrefix(true);
        defaultAdvisorAutoProxyCreator.setAdvisorBeanNamePrefix("_no_advisor");
        return defaultAdvisorAutoProxyCreator;
    }

    //管理shiro生命周期
    @Bean
    public static LifecycleBeanPostProcessor lifecycleBeanPostProcessor() {
        return new LifecycleBeanPostProcessor();
    }

    //开启shiro注解
    @Bean
    public AuthorizationAttributeSourceAdvisor authorizationAttributeSourceAdvisor(DefaultWebSecurityManager securityManager) {
        AuthorizationAttributeSourceAdvisor advisor = new AuthorizationAttributeSourceAdvisor();
        advisor.setSecurityManager(securityManager);
        return advisor;
    }

    // 使用redis缓存用户信息 ,并设置redis
    public RedisCacheManager redisCacheManager() {
        RedisCacheManager redisCacheManager = new RedisCacheManager();
        //配置redis实例
        redisCacheManager.setRedisManager(redisManager());
        //redis中针对不同用户缓存(此处的id需要对应user实体中的id字段,用于唯一标识)
        redisCacheManager.setPrincipalIdFieldName("id");
        //用户权限信息缓存时间
        redisCacheManager.setExpire(200000);
        return redisCacheManager;
    }

     //连接redsi,分为单机与集群
    @Bean
    public IRedisManager redisManager() {
        log.info("===============(2)创建RedisManager,连接Redis..");
        IRedisManager manager;
        // redis 单机支持,在集群为空,或者集群无机器时候使用 add by jzyadmin@163.com
        if (lettuceConnectionFactory.getClusterConfiguration() == null || lettuceConnectionFactory.getClusterConfiguration().getClusterNodes().isEmpty()) {
            RedisManager redisManager = new RedisManager();
            redisManager.setHost(lettuceConnectionFactory.getHostName());
            redisManager.setPort(lettuceConnectionFactory.getPort());
            redisManager.setDatabase(lettuceConnectionFactory.getDatabase());
            redisManager.setTimeout(0);
            if (!StringUtils.isEmpty(lettuceConnectionFactory.getPassword())) {
                redisManager.setPassword(lettuceConnectionFactory.getPassword());
            }
            manager = redisManager;
        }else{
            // redis集群支持,优先使用集群配置
            RedisClusterManager redisManager = new RedisClusterManager();
            Set portSet = new HashSet();
            lettuceConnectionFactory.getClusterConfiguration().getClusterNodes().forEach(node -> portSet.add(new HostAndPort(node.getHost() , node.getPort())));
            //update-begin--Author:scott Date:20210531 for:修改集群模式下未设置redis密码的bug issues/I3QNIC
            if (oConvertUtils.isNotEmpty(lettuceConnectionFactory.getPassword())) {
                JedisCluster jedisCluster = new JedisCluster(portSet, 2000, 2000, 5,
                    lettuceConnectionFactory.getPassword(), new GenericObjectPoolConfig());
                redisManager.setPassword(lettuceConnectionFactory.getPassword());
                redisManager.setJedisCluster(jedisCluster);
            } else {
                JedisCluster jedisCluster = new JedisCluster(portSet);
                redisManager.setJedisCluster(jedisCluster);
            }
            manager = redisManager;
        }
        return manager;
    }

}
4.sign
这里不详细讲解,主要描述前台传来的签名是否合法。

5.thirdapp
根据application-dev.yml配置获取是否开启第三方接入验证。@ConfigurationProperties(prefix = "third-app.type")获取配置文件中的third-app.type的value值。

6.AutoPoiConfig、AutoPoiDictConfig
主要负责将excel中的数据转换为数据字典。

7.CorsFilterCondition、JeecgCloudCondition
通过获取application-dev.yml,主要判断是否有CLOUD_SERVER_KEY = "spring.cloud.nacos.discovery.server-addr";的key值。
context.getEnvironment().getProperty(CommonConstant.CLOUD_SERVER_KEY);是从application-dev.yml生成的map获取value值。

8.RestTemplateConfig
在服务间调用时设置连接时长,如果单体应用,改配置没有使用。

9.StaticConfig
从application-dev.yml获取配置,设置静态参数初始化。

10.Swagger2Config
Swagger2文档配置类,如果有需要请执行复制使用。

11.WebMvcConfiguration
springboot的常用配置,如跨域配置,精度丢失配置,静态资源配置。都是固定写法,如果需要请自行参考。

12.WebSocketConfig
springboot提供的websocket的start配置方式,如果有疑问可以参考博主之前的博文-websocket的集成使用

3.业务接口modules.base
主要提供了日志相关的curd,不多做描述。

3.工具包jeecg-boot-base-tools
主要提供了一些功能的实现类与使用方法,不多说 ,比较简单。

1.TransmitUserTokenFilter、UserTokenContext
主要负责将token放在上下文中。

2.JeecgRedisListerer、RedisReceiver
这里是发送消息模板的封装。核心是从上下文中的getbean方法动态的指定想要调用的JeecgRedisListerer实现类。一种多态的实现方式。

3.JeecgRedisCacheWriter
可以看到思想还是上文所说,将RedisCacheWriter类中的方法全部复制出来,并生成新类JeecgRedisCacheWriter,在新类中修改,他的目的是信息模块在存入缓存时,有统一的前缀。在使用时,注入使用JeecgRedisCacheWriter即可,跟修改源码有这一样效果,但是更加优雅。可以看出spring的设计思想是多牛批。

3.测试包jeecg-boot-base
主要负责调用其他功能,没啥实质意义。
下图类是xxljob执行定时任务时的写法,可以看一看。

4.业务包jeecg-boot-module-system
主要为业务代码包,这里找几个着重讲解一下。

1.api.controller
为微服务为其他服务提供基础应用接口的包,如果没有微服务该包不生效。
2.message
该模块为消息模块业务,其中使用了quartz和spring提供的websocket start。如果有兴趣可以参考博主给的连接。

3.monitor
提供了redis监控的接口。如果需要可以自行查看,比较简单。
4.quartz
定时任务start,如果想具体了解可以参考博主文章:quartz集成全解析
5.jeecg-boot-starter

springboot的核心就是提供各种各样的start,在jeecg中也提供了很多的start,分别是上述的四个,其中job为xxl开源项目、cloud为在服务间调用时,将token放再头中,这里不详细讲解。
下文示例均在jeecg-cloud-module/jeecg-cloud-system-start中。
1.jeecg-boot-starter-rabbitmq

1.MqListener、BaseRabbiMqHandler
在监听消息队列时,使用以下方法即可。原因是必须加入ack与nack。防止队列占用。
使用时,该类继承了BaseRabbiMqHandler,并使用父类的方法,并使用new MqListener()函数式方法获取消息队列中的信息。
@Slf4j
@RabbitListener(queues = CloudConstant.MQ_JEECG_PLACE_ORDER)
@RabbitComponent(value = "helloReceiver1")
public class HelloReceiver1 extends BaseRabbiMqHandler {
    @RabbitHandler
    public void onMessage(BaseMap baseMap, Channel channel, @Header(AmqpHeaders.DELIVERY_TAG) long deliveryTag) {
        //使用了父类的方法
        super.onMessage(baseMap, deliveryTag, channel, new MqListener() {
            @Override
            public void handler(BaseMap map, Channel channel) {
                //业务处理
                String orderId = map.get("orderId").toString();
                log.info("MQ Receiver1,orderId : " + orderId);
            }
        });
    }
}
BaseRabbiMqHandler主要的功能是提供了ack与nack,并将token放入头中。
@Slf4j
public class BaseRabbiMqHandler {

    private String token= UserTokenContext.getToken();

    public void onMessage(T t, Long deliveryTag, Channel channel, MqListener mqListener) {
        try {
            UserTokenContext.setToken(token);
            mqListener.handler(t, channel);
            channel.basicAck(deliveryTag, false);
        } catch (Exception e) {
            log.info("接收消息失败,重新放回队列");
            try {
                /**
                 * deliveryTag:该消息的index
                 * multiple:是否批量.true:将一次性拒绝所有小于deliveryTag的消息。
                 * requeue:被拒绝的是否重新入队列
                 */
                channel.basicNack(deliveryTag, false, true);
            } catch (IOException ex) {
                ex.printStackTrace();
            }
        }
    }
}

public interface MqListener {

    default void handler(T map, Channel channel) {
    }
}
2.RabbitMqClient
主要在队列初始化时实现队列的初始化,而是否初始化根据使用时的@RabbitListener、@RabbitComponent判断。
	public interface MqListener {
	    default void handler(T map, Channel channel) {
	    }
	}

    @Bean
    public void initQueue() {
        //获取带RabbitComponent注解的类
        Map beansWithRqbbitComponentMap = this.applicationContext.getBeansWithAnnotation(RabbitComponent.class);
        Class clazz = null;
        //循环map
        for (Map.Entry entry : beansWithRqbbitComponentMap.entrySet()) {
            log.info("初始化队列............");
            //获取到实例对象的class信息
            clazz = entry.getValue().getClass();
            Method[] methods = clazz.getMethods();
            //判断是否有RabbitListener注解
            RabbitListener rabbitListener = clazz.getAnnotation(RabbitListener.class);
            //类上有注解 就创建队列
            if (ObjectUtil.isNotEmpty(rabbitListener)) {
                createQueue(rabbitListener);
            }
            //方法上有注解 就创建队列
            for (Method method : methods) {
                RabbitListener methodRabbitListener = method.getAnnotation(RabbitListener.class);
                if (ObjectUtil.isNotEmpty(methodRabbitListener)) {
                    createQueue(methodRabbitListener);
                }
            }
        }
    }

    /**
     * 初始化队列
     *
     * @param rabbitListener
     */
    private void createQueue(RabbitListener rabbitListener) {
        String[] queues = rabbitListener.queues();
        //创建交换机
        DirectExchange directExchange = createExchange(DelayExchangeBuilder.DELAY_EXCHANGE);
        rabbitAdmin.declareExchange(directExchange);
        //创建队列
        if (ObjectUtil.isNotEmpty(queues)) {
            for (String queueName : queues) {
                Properties result = rabbitAdmin.getQueueProperties(queueName);
                if (ObjectUtil.isEmpty(result)) {
                    Queue queue = new Queue(queueName);
                    addQueue(queue);
                    Binding binding = BindingBuilder.bind(queue).to(directExchange).with(queueName);
                    rabbitAdmin.declareBinding(binding);
                    log.info("创建队列:" + queueName);
                }else{
                    log.info("已有队列:" + queueName);
                }
            }
        }
    }
3.RabbitMqConfig
为消息队列的常用配置方式。这里不多描述。
4.event

这个包主要是为使用mq发送消息使用,多类别的消息会实现JeecgBusEventHandler类,而BaseApplicationEvent通过消息类型传入的不同的参数选择合适的业务类发送消息。
5.DelayExchangeBuilder
为延时队列的交换机声明与绑定。
2.jeecg-boot-starter-lock

1.如何使用分布式锁
使用时有两种方式,一种是使用注解方式,一种是使用redisson提供的API。
@Scheduled(cron = "0/5 * * * * ?")
    @JLock(lockKey = CloudConstant.REDISSON_DEMO_LOCK_KEY1)
    public void execute() throws InterruptedException {
        log.info("执行execute任务开始,休眠三秒");
        Thread.sleep(3000);
        System.out.println("=======================业务逻辑1=============================");
        Map map = new BaseMap();
        map.put("orderId", "BJ0001");
        rabbitMqClient.sendMessage(CloudConstant.MQ_JEECG_PLACE_ORDER, map);
        //延迟10秒发送
        map.put("orderId", "NJ0002");
        rabbitMqClient.sendMessage(CloudConstant.MQ_JEECG_PLACE_ORDER, map, 10000);
        log.info("execute任务结束,休眠三秒");
    }

    public DemoLockTest() {
    }

    /**
     * 测试分布式锁【编码方式】
     */
    //@Scheduled(cron = "0/5 * * * * ?")
    public void execute2() throws InterruptedException {
        if (redissonLock.tryLock(CloudConstant.REDISSON_DEMO_LOCK_KEY2, -1, 6000)) {
            log.info("执行任务execute2开始,休眠十秒");
            Thread.sleep(10000);
            System.out.println("=======================业务逻辑2=============================");
            log.info("定时execute2结束,休眠十秒");

            redissonLock.unlock(CloudConstant.REDISSON_DEMO_LOCK_KEY2);
        } else {
            log.info("execute2获取锁失败");
        }
    }
2.RepeatSubmitAspect
通过公平锁判断是否是多次点击按钮。
    @Around("pointCut(jRepeat)")
    public Object repeatSubmit(ProceedingJoinPoint joinPoint,JRepeat jRepeat) throws Throwable {
        String[] parameterNames = new LocalVariableTableParameterNameDiscoverer().getParameterNames(((MethodSignature) joinPoint.getSignature()).getMethod());
        if (Objects.nonNull(jRepeat)) {
            // 获取参数
            Object[] args = joinPoint.getArgs();
            // 进行一些参数的处理,比如获取订单号,操作人id等
            StringBuffer lockKeyBuffer = new StringBuffer();
            String key =getValueBySpEL(jRepeat.lockKey(), parameterNames, args,"RepeatSubmit").get(0);
            // 公平加锁,lockTime后锁自动释放
            boolean isLocked = false;
            try {
                isLocked = redissonLockClient.fairLock(key, TimeUnit.SECONDS, jRepeat.lockTime());
                // 如果成功获取到锁就继续执行
                if (isLocked) {
                    // 执行进程
                    return joinPoint.proceed();
                } else {
                    // 未获取到锁
                    throw new Exception("请勿重复提交");
                }
            } finally {
                // 如果锁还存在,在方法执行完成后,释放锁
                if (isLocked) {
                    redissonLockClient.unlock(key);
                }
            }
        }
        return joinPoint.proceed();
    }
3.DistributedLockHandler
该类主要是jLock的切面类,通过jLock注解参数,判断需要加锁的类型,同时加锁的方法也不相同。
    //jLock切面,进行加锁
    @SneakyThrows
    @Around("@annotation(jLock)")
    public Object around(ProceedingJoinPoint joinPoint, JLock jLock) {
        Object obj = null;
        log.info("进入RedisLock环绕通知...");
        RLock rLock = getLock(joinPoint, jLock);
        boolean res = false;
        //获取超时时间
        long expireSeconds = jLock.expireSeconds();
        //等待多久,n秒内获取不到锁,则直接返回
        long waitTime = jLock.waitTime();
        //执行aop
        if (rLock != null) {
            try {
                if (waitTime == -1) {
                    res = true;
                    //一直等待加锁
                    rLock.lock(expireSeconds, TimeUnit.MILLISECONDS);
                } else {
                    res = rLock.tryLock(waitTime, expireSeconds, TimeUnit.MILLISECONDS);
                }
                if (res) {
                    obj = joinPoint.proceed();
                } else {
                    log.error("获取锁异常");
                }
            } finally {
                if (res) {
                    rLock.unlock();
                }
            }
        }
        log.info("结束RedisLock环绕通知...");
        return obj;
    }

    //通过参数判断加锁类型
    @SneakyThrows
    private RLock getLock(ProceedingJoinPoint joinPoint, JLock jLock) {
        //获取key
        String[] keys = jLock.lockKey();
        if (keys.length == 0) {
            throw new RuntimeException("keys不能为空");
        }
        //获取参数
        String[] parameterNames = new LocalVariableTableParameterNameDiscoverer().getParameterNames(((MethodSignature) joinPoint.getSignature()).getMethod());
        Object[] args = joinPoint.getArgs();
        LockModel lockModel = jLock.lockModel();
        if (!lockModel.equals(LockModel.MULTIPLE) && !lockModel.equals(LockModel.REDLOCK) && keys.length > 1) {
            throw new RuntimeException("参数有多个,锁模式为->" + lockModel.name() + ".无法锁定");
        }
        RLock rLock = null;
        String keyConstant = jLock.keyConstant();
        //判断锁类型
        if (lockModel.equals(LockModel.AUTO)) {
            if (keys.length > 1) {
                lockModel = LockModel.REDLOCK;
            } else {
                lockModel = LockModel.REENTRANT;
            }
        }
        //根据不同的锁类型执行不同的加锁方式
        switch (lockModel) {
            case FAIR:
                rLock = redissonClient.getFairLock(getValueBySpEL(keys[0], parameterNames, args, keyConstant).get(0));
                break;
            case REDLOCK:
                List rLocks = new ArrayList();
                for (String key : keys) {
                    List valueBySpEL = getValueBySpEL(key, parameterNames, args, keyConstant);
                    for (String s : valueBySpEL) {
                        rLocks.add(redissonClient.getLock(s));
                    }
                }
                RLock[] locks = new RLock[rLocks.size()];
                int index = 0;
                for (RLock r : rLocks) {
                    locks[index++] = r;
                }
                rLock = new RedissonRedLock(locks);
                break;
            case MULTIPLE:
                rLocks = new ArrayList();
                for (String key : keys) {
                    List valueBySpEL = getValueBySpEL(key, parameterNames, args, keyConstant);
                    for (String s : valueBySpEL) {
                        rLocks.add(redissonClient.getLock(s));
                    }
                }
                locks = new RLock[rLocks.size()];
                index = 0;
                for (RLock r : rLocks) {
                    locks[index++] = r;
                }
                rLock = new RedissonMultiLock(locks);
                break;
            case REENTRANT:
                List valueBySpEL = getValueBySpEL(keys[0], parameterNames, args, keyConstant);
                //如果spel表达式是数组或者LIST 则使用红锁
                if (valueBySpEL.size() == 1) {
                    rLock = redissonClient.getLock(valueBySpEL.get(0));
                } else {
                    locks = new RLock[valueBySpEL.size()];
                    index = 0;
                    for (String s : valueBySpEL) {
                        locks[index++] = redissonClient.getLock(s);
                    }
                    rLock = new RedissonRedLock(locks);
                }
                break;
            case READ:
                rLock = redissonClient.getReadWriteLock(getValueBySpEL(keys[0], parameterNames, args, keyConstant).get(0)).readLock();
                break;
            case WRITE:
                rLock = redissonClient.getReadWriteLock(getValueBySpEL(keys[0], parameterNames, args, keyConstant).get(0)).writeLock();
                break;
        }
        return rLock;
    }
4.RedissonLockClient
redisson客户端,提供了一大波方法,请自行查看。
public class RedissonLockClient {

    @Autowired
    private RedissonClient redissonClient;

    @Autowired
    private RedisTemplate redisTemplate;

    /**
     * 获取锁
     */
    public RLock getLock(String lockKey) {
        return redissonClient.getLock(lockKey);
    }

    /**
     * 加锁操作
     *
     * @return boolean
     */
    public boolean tryLock(String lockName, long expireSeconds) {
        return tryLock(lockName, 0, expireSeconds);
    }
    .
    .
    .
5.core包
主要通过application.yml配置文件获取redis连接类型,通过根据该参数动态的选择策略类,连接redis。
public class RedissonManager {
    public Redisson getRedisson() {
        return redisson;
    }

    //Redisson连接方式配置工厂
    static class RedissonConfigFactory {

        private RedissonConfigFactory() {
        }

        private static volatile RedissonConfigFactory factory = null;

        public static RedissonConfigFactory getInstance() {
            if (factory == null) {
                synchronized (Object.class) {
                    if (factory == null) {
                        factory = new RedissonConfigFactory();
                    }
                }
            }
            return factory;
        }


        //根据连接类型創建连接方式的配置
        Config createConfig(RedissonProperties redissonProperties) {
            Preconditions.checkNotNull(redissonProperties);
            Preconditions.checkNotNull(redissonProperties.getAddress(), "redis地址未配置");
            RedisConnectionType connectionType = redissonProperties.getType();
            // 声明连接方式
            RedissonConfigStrategy redissonConfigStrategy;
            if (connectionType.equals(RedisConnectionType.SENTINEL)) {
                redissonConfigStrategy = new SentinelRedissonConfigStrategyImpl();
            } else if (connectionType.equals(RedisConnectionType.CLUSTER)) {
                redissonConfigStrategy = new ClusterRedissonConfigStrategyImpl();
            } else if (connectionType.equals(RedisConnectionType.MASTERSLAVE)) {
                redissonConfigStrategy = new MasterslaveRedissonConfigStrategyImpl();
            } else {
                redissonConfigStrategy = new StandaloneRedissonConfigStrategyImpl();
            }
            Preconditions.checkNotNull(redissonConfigStrategy, "连接方式创建异常");

            return redissonConfigStrategy.createRedissonConfig(redissonProperties);
        }
    }
}

//策略实现,此类是指定redis的连接方式是哨兵。
public class SentinelRedissonConfigStrategyImpl implements RedissonConfigStrategy {

	@Override
	public Config createRedissonConfig(RedissonProperties redissonProperties) {
		Config config = new Config();
		try {
			String address = redissonProperties.getAddress();
			String password = redissonProperties.getPassword();
			int database = redissonProperties.getDatabase();
			String[] addrTokens = address.split(",");
			String sentinelAliasName = addrTokens[0];
			// 设置redis配置文件sentinel.conf配置的sentinel别名
			config.useSentinelServers().setMasterName(sentinelAliasName);
			config.useSentinelServers().setDatabase(database);
			if (StringUtils.isNotBlank(password)) {
				config.useSentinelServers().setPassword(password);
			}
			// 设置哨兵节点的服务IP和端口
			for (int i = 1; i < addrTokens.length; i++) {
				config.useSentinelServers().addSentinelAddress(GlobalConstant.REDIS_CONNECTION_PREFIX+ addrTokens[i]);
			}
			log.info("初始化哨兵方式Config,redisAddress:" + address);
		} catch (Exception e) {
			log.error("哨兵Redisson初始化错误", e);
			e.printStackTrace();
		}
		return config;
	}
}
6.jeecg-cloud-module

这里详细的说一下jeecg-cloud-gateway,因为其他的都是开源项目没下载即用。
jeecg-cloud-system-start为封装start的使用方法,上文已经介绍了。
1.jeecg-cloud-gateway

1.GatewayRoutersConfiguration
当固定的几个路由,有特殊化的执行方法。

2.RateLimiterConfiguration
主要配置限流,与application.yml一起使用,下文配置含义是,发送过来的请求只能容纳redis-rate-limiter.burstCapacity的配置(3次)多余的会全部丢弃(限流),每秒消费redis-rate-limiter.replenishRate(1次)。


3.FallbackController
熔断的执行方法。

4.GlobalAccessTokenFilter
全局拦截器,在调用其他服务时,将用户信息放在请求头中。

5.SentinelFilterContextConfig
使Sentinel链路流控模式生效,固定写法。
6.HystrixFallbackHandler、SentinelBlockRequestHandler
在降级/限流时,将异常信息转换成json返回给前台。
7.LoderRouderHandler
动态刷新路由。

8.MySwaggerResourceProvider、SwaggerResourceController
将swagger地址统一管理起来
9.DynamicRouteLoader、DynamicRouteService
DynamicRouteLoader:通过application.yml判断从nacos/redis中获取路由信息,并实现动态的加载。
DynamicRouteService:为底层处理路由的API。
四.总体感想
文章到这里差不多就接近尾声了,大多数功能附带着代码都讲述了一遍。在功能上来说,jeecg提供了很多常用功能,如rabbitMq封装、积木报表、代码生成器等。这些在日常工作中有很大的概率碰上,如果有以上需求,可以来框架中直接复制粘贴即可。
但是在格式规范上,如出入参的规范,代码的写法,代码的格式化等方面,并不是特别统一,且没有严格规范。总体来说非常适合做私活与毕业设计,同时也是最早一批开源的前后端项目脚手架,爆赞。
到此这篇关于java开源项目jeecgboot的文章就介绍到这了,更多相关java开源项目jeecgboot内容请搜索IT俱乐部以前的文章或继续浏览下面的相关文章希望大家以后多多支持IT俱乐部!


最新评论