本文实例为大家分享了jsp实现登录界面的具体代码,供大家参考,具体内容如下
一.用户登录案例需求:
1.编写login.jsp登录页面
username & password 两个输入框
2.使用Druid数据库连接池技术,操作mysql,day14数据库中user表
3.使用JdbcTemplate技术封装JDBC
4.登录成功跳转到SuccessServlet展示:登录成功!用户名,欢迎您
5.登录失败跳转到login.jsp展示:登录失败,用户名或密码错误,验证码错误
二.分析
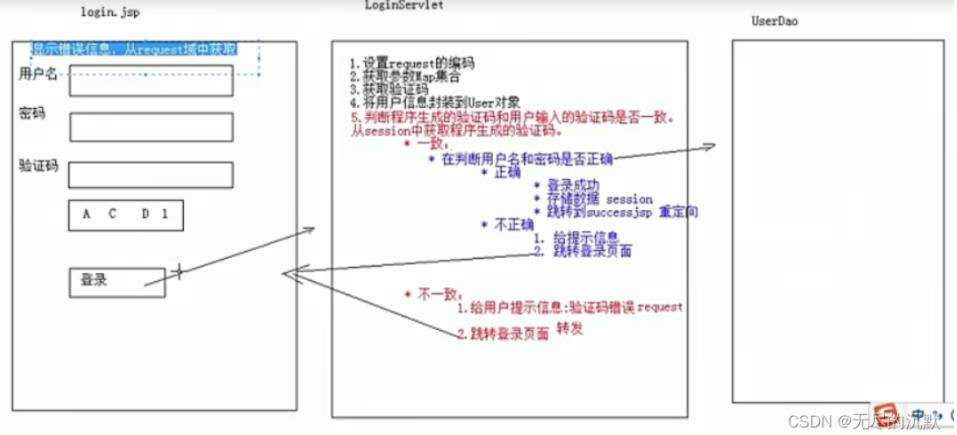
三. 开发步骤
1. 创建项目,配置文件,导入jar包

2. 创建数据库环境
CREATE DATABASE day17;
    USE day17;
            CREATE TABLE loginUSER(   -- 创建表
                 id INT PRIMARY KEY AUTO_INCREMENT,
                username VARCHAR(20) NOT NULL,
          PASSWORD VARCHAR(20) NOT NULL
);
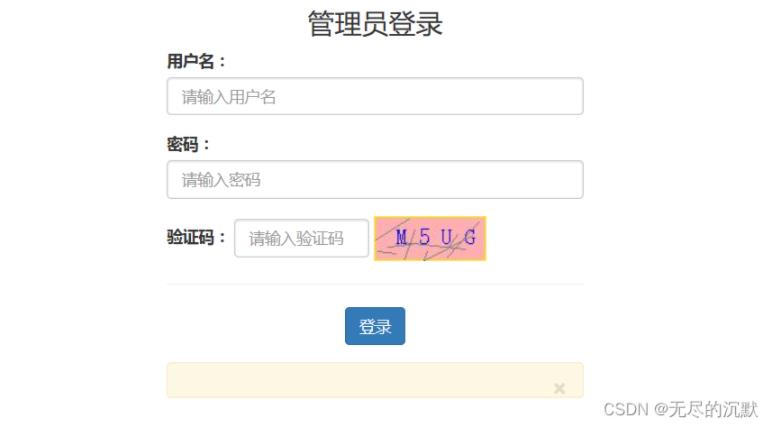
3.创建前端login.jsp和css页面
管理员登录 管理员登录
${log_msg}
4.在domain包下创建类LoginUser
package domain;

public class LoginUser {
    private int id;
    private String userName;
    private String password;
    public int getId() {
        return id;
    }
    public void setId(int id) {
        this.id = id;
    }
    public String  getUserName() {
        return userName;
    }
    public void setUserName(String userName) {
        this.userName = userName;
    }
    public String getPassword() {
        return password;
    }
    public void setPassword(String password) {
        this.password = password;
    }
    @Override
    public String toString() {
        return "LoginUser [id=" + id + ", userName=" + userName + ", password=" + password + "]";
    }
}
5.写utils包下的工具类JDBCUtils ,主要是与mysql数据库连接,创建数据库连接池对象
package cn.itcast.util;


 import com.alibaba.druid.pool.DruidDataSourceFactory;

 import javax.sql.DataSource;
 import javax.xml.crypto.Data;
import java.io.IOException;
import java.io.InputStream;
import java.sql.Connection;
import java.sql.SQLException;
import java.util.Properties;

            /**
             * JDBC工具类 使用Durid连接池
             */
            public class JDBCUtils {

                private static DataSource ds ;

                static {

                    try {
                        //1.加载配置文件
                        Properties pro = new Properties();
                        //使用ClassLoader加载配置文件,获取字节输入流
                        InputStream is = JDBCUtils.class.getClassLoader().getResourceAsStream("druid.properties");
                        pro.load(is);

                        //2.初始化连接池对象
                        ds = DruidDataSourceFactory.createDataSource(pro);

                    } catch (IOException e) {
                        e.printStackTrace();
                    } catch (Exception e) {
                        e.printStackTrace();
                    }
                }

                /**
                 * 获取连接池对象
                 */
                public static DataSource getDataSource(){
                    return ds;
                }


                /**
                 * 获取连接Connection对象
                 */
                public static Connection getConnection() throws SQLException {
                    return  ds.getConnection();
                }
            }
6.创建web层的checkcode的servlet, 用来显示验证码的
package web.servlet;

import java.io.IOException;
import java.util.Random;
import java.awt.Color;
import java.awt.Font;
import java.awt.Graphics;
import java.awt.image.BufferedImage;

import javax.imageio.ImageIO;
import javax.servlet.ServletException;
import javax.servlet.annotation.WebServlet;
import javax.servlet.http.HttpServlet;
import javax.servlet.http.HttpServletRequest;
import javax.servlet.http.HttpServletResponse;

@WebServlet("/checkcode")
public class CheckCode extends HttpServlet{

    /**
     *
     */
    private static final long serialVersionUID = 1L;

    @Override
    protected void doGet(HttpServletRequest req, HttpServletResponse resp) throws ServletException, IOException {
        // TODO Auto-generated method stub
        this.doPost(req, resp);
    }

    @Override
    protected void doPost(HttpServletRequest req, HttpServletResponse resp) throws ServletException, IOException {
        int imgwidth=100;
        int imgheight=40;
        //1.创建图片对象,在内存中图片(验证码图片对象)
        BufferedImage image=new BufferedImage(imgwidth,imgheight,BufferedImage.TYPE_INT_RGB);  //也可以指定读取image=imageIO.read(new file())
        //2.美化图片
        Graphics g=image.getGraphics(); //获得画笔对象

        //设置画笔颜色
        g.setColor(Color.pink);
        //在创建的图片对象大小中填充矩形,颜色为上面设置的颜色,第一,二个参数是起始点的x,y,第三,四个参数是有多宽,有多高
        g.fillRect(0, 0, imgwidth, imgheight);

        //重新设置画笔颜色
        g.setColor(Color.yellow);//画框边缘颜色
        //在image上画边框,第一,二个参数是起始点的x,y,第三,四个参数是有多宽,有多高,注意:边框占一个像素,所以需要宽和高-1才能覆盖全部
        g.drawRect(0, 0, imgwidth-1, imgheight-1);

        //随机设置验证码的值
        String str="abcdefghijklmnopqrstuvwxyzABCDEFGHIJKLMNOPQRSTUVWXYZ1234567890";
        Random random=new Random();
        StringBuilder sb=new StringBuilder();
        //随机在image中写字符串,第三,四个参数是画的位置
        for(int i=1;i
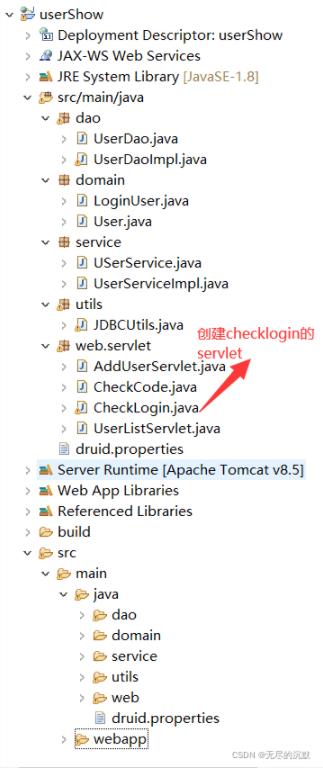
7.创建web层的checklogin的servlet,用来响应用户登录的请求。主要是进行前端参数数据和UserDao进行交互
代码:
package web.servlet;

import java.io.IOException;
import java.lang.reflect.InvocationTargetException;
import java.util.Map;

import javax.servlet.ServletException;
import javax.servlet.annotation.WebServlet;
import javax.servlet.http.HttpServlet;
import javax.servlet.http.HttpServletRequest;
import javax.servlet.http.HttpServletResponse;
import javax.servlet.http.HttpSession;

import org.apache.commons.beanutils.BeanUtils;

import com.mchange.v2.codegen.bean.BeangenUtils;

import dao.UserDaoImpl;
import domain.LoginUser;

@WebServlet("/checklogin")
public class CheckLogin extends HttpServlet{

    /**
     *
     */
    private static final long serialVersionUID = 1L;

    @Override
    protected void doGet(HttpServletRequest req, HttpServletResponse resp) throws ServletException, IOException {
        // TODO Auto-generated method stub
        this.doPost(req, resp);
    }

    @Override
    protected void doPost(HttpServletRequest req, HttpServletResponse resp) throws ServletException, IOException {
        //1.设置编码
        req.setCharacterEncoding("utf-8");
        //2.获取用户的请求
           LoginUser loginUser=new LoginUser();
          Map pMap=req.getParameterMap();
        //3.使用BeanUtil封装对象
          try {
            BeanUtils.populate(loginUser, pMap);
        } catch (IllegalAccessException | InvocationTargetException e) {
            // TODO Auto-generated catch block
            e.printStackTrace();
        }

          //4.现获取前端填写的验证码,比较验证码
            System.out.println(loginUser);
            String exc=req.getParameter("verifycode");//获取前端用户填写的验证码
            HttpSession htp=req.getSession();  //获取session
            String excode=(String) htp.getAttribute("session_code");  //获取后端checkcode随机验证码
            //为防止验证码重复使用,session中的session_code一旦获得,就必须删除
            htp.removeAttribute("session_code");
            if(excode!=null && excode.equalsIgnoreCase(exc)) {
                //忽略字母大小写,比较验证码
                //如果验证码正确,再比较用户的用户名和密码
            //验证码正确
            //5.创建userDao对象
                 UserDaoImpl userDaoImpl=new UserDaoImpl();  //调用与数据库的函数
                 LoginUser lu=userDaoImpl.checkLoginUser(loginUser);
                if(lu!=null) {
                      //如果登录成功
                      //保存数据,用户信息
                      htp.setAttribute("user", lu);  //在session中保存用户的信息
                      htp.setAttribute("username", lu.getUserName());//在session中存储用户名
                      //重定向到success.jsp页面
                      resp.sendRedirect(req.getContextPath()+"/index.jsp");
                  }
                  else {//用户名或密码不正确
                    req.setAttribute("log_msg", "用户名或密码错误");  //存储错误信息,用request域存储
                    //请求转发,重新回到登录页面
                    req.getRequestDispatcher("/login.jsp").forward(req, resp);
                }
            }else {//验证码不正确
                req.setAttribute("log_msg", "验证码错误");  //存储错误信息,用request域存储
                req.getRequestDispatcher("/login.jsp").forward(req, resp);  //请求转发,重新回到登录页面
            }


    }


}
8.在dao层的,操作数据库,查询数据库
操作数据库的UserDao接口:
package dao;

import java.util.List;

import domain.User;

public interface UserDao {
     public List findAll();  //抽象方法
     public LoginUser checkLoginUser( LoginUser loginUser);
}
操作数据库的UserDaoImpl实现类:
package dao;

import java.util.List;

import javax.xml.transform.Templates;

import org.springframework.jdbc.core.BeanPropertyRowMapper;
import org.springframework.jdbc.core.JdbcTemplate;

import domain.LoginUser;
import domain.User;
import utils.JDBCUtils;

public class UserDaoImpl implements UserDao{
    JdbcTemplate jdbcTemplate =new JdbcTemplate(JDBCUtils.getDataSource());
    public List findAll() {
        // 操作数据库,查询
        String sql="select * from user";
        List users=jdbcTemplate.query(sql,new BeanPropertyRowMapper(User.class));
        return users;
    }
    public LoginUser checkLoginUser( LoginUser loginUser) {
        //查询登录用户信息
        String sqlString="select* from loginuser where username=? and password=?";
        //System.out.println("111"+loginUser);
        try {
            LoginUser lu=(LoginUser) jdbcTemplate.queryForObject(sqlString, new BeanPropertyRowMapper(LoginUser.class)
                    ,loginUser.getUserName(),loginUser.getPassword());
            return lu;
        } catch (Exception e) {
            // TODO: handle exception
            e.printStackTrace();
            return null;
        }
    }
}
9.编写success.jsp,在这里指的是index.jsp,对应在checklogin.java中
首页
四.尾声
效果图:
其他:
login.jsp中form表单的action路径的写法
* 虚拟目录+Servlet的资源路径
BeanUtils工具类,简化数据封装
* 用于封装JavaBean的
1. JavaBean:标准的Java类
1). 要求:
1. 类必须被public修饰
2. 必须提供空参的构造器
3. 成员变量必须使用private修饰
4. 提供公共setter和getter方法
2). 功能:封装数据
最后:用户登录的模块功能全部结束!
以上就是本文的全部内容,希望对大家的学习有所帮助,也希望大家多多支持IT俱乐部。

