🤖️ 哈喽!大家好呀。如果无聊就和机器人聊聊天吧
在初步进入Ajax学习 就忍不住给大家分享今天的劳动成果啦
先来看看效果图:
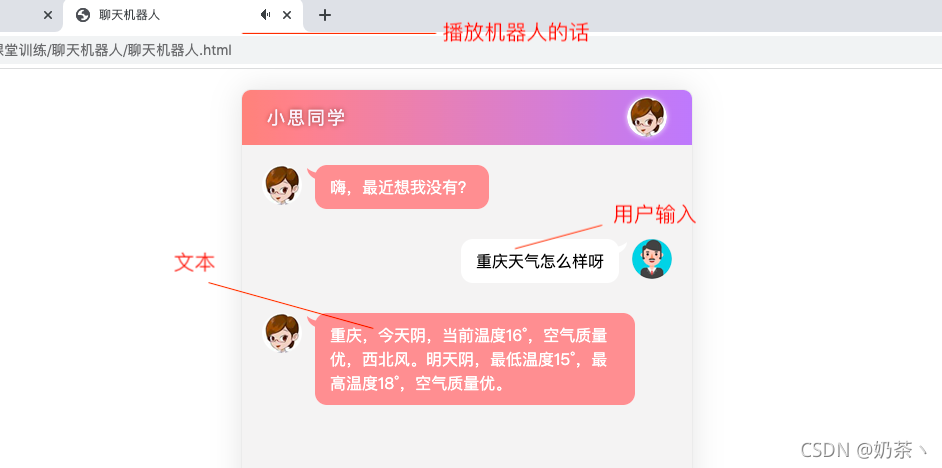

功能实现:
- 点击发送按钮事件
- 将用户输入的内容渲染到页面中
- 点击回车键将表单的内容渲染到页面中
- 获取机器人的内容 渲染到页面中
- 播放机器人的内容
先来看看项目的总体结构
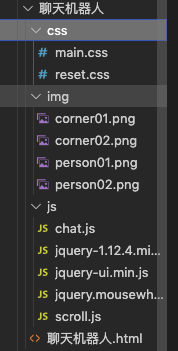
引入相关的文件:


html框架比较简单
小思同学


这里的音频播放标签,一定要添加autoplay属性,自动播放,不过不添加这个属性,播放机器人的功能就不能实现哟
main.css
body {
    font-family: 'Microsoft YaHei';
}
.wrap {
    position: fixed;
    width: 450px;
    left: 50%;
    margin-left: -225px;
    top: 20px;
    bottom: 20px;
    border: 1px solid #ebebeb;
    background-color: #fff;
    border-radius: 10px;
    box-shadow: 0 0 30px rgba(0, 0, 0, 0.1);
    overflow: hidden;
}
.header {
    height: 55px;
    background: linear-gradient(90deg, rgba(246, 60, 47, 0.6), rgba(128, 58, 242, 0.6));
    overflow: hidden;
}
.header h3 {
    color: #faf3fc;
    line-height: 55px;
    font-weight: normal;
    float: left;
    letter-spacing: 2px;
    margin-left: 25px;
    font-size: 18px;
    text-shadow: 0px 0px 5px #944846;
}
.header img {
    float: right;
    margin: 7px 25px 0 0;
    border-radius: 20px;
    box-shadow: 0 0 5px #f7f2fe;
}
.main {
    position: absolute;
    left: 0;
    right: 0;
    top: 55px;
    bottom: 55px;
    background-color: #f4f3f3;
    box-sizing: border-box;
    padding: 10px 0;
    overflow:hidden;
}
.talk_list{
    position: absolute;
    width:100%;
    left:0px;
    top:0px;
}
.talk_list li {
    overflow: hidden;
    margin: 20px 0px 30px;
}
.talk_list .left_word img {
    float: left;
    margin-left: 20px;
}
.talk_list .left_word span {
    float: left;
    background-color: #fe9697;
    padding: 10px 15px;
    max-width: 290px;
    border-radius: 12px;
    font-size: 16px;
    color: #fff;
    margin-left: 13px;
    position: relative;
    line-height: 24px;
}
.talk_list .left_word span:before {
    content: '';
    position: absolute;
    left: -8px;
    top: 3px;
    width: 13px;
    height: 12px;
    background: url('../img/corner01.png') no-repeat;
}
.talk_list .right_word img {
    float: right;
    margin-right: 20px;
}
.talk_list .right_word span {
    float: right;
    background-color: #fff;
    padding: 10px 15px;
    max-width: 290px;
    border-radius: 12px;
    font-size: 16px;
    color: #000;
    margin-right: 13px;
    position: relative;
    line-height: 24px;
}
.talk_list .right_word span:before {
    content: '';
    position: absolute;
    right: -8px;
    top: 3px;
    width: 13px;
    height: 12px;
    background: url('../img/corner02.png') no-repeat;
}
.drag_bar{
    position:absolute;
    right:0px;
    top:0px;
    background-color: #fff;
    height:100%;
    width:6px;
    box-sizing:border-box;
    border-bottom:1px solid #f4f3f3;
}
.drager{
    position:absolute;
    left:0px;
    top:0px;
    background-color: #cdcdcd;
    height:100px;
    width:6px;
    border-radius:3px;
    cursor: pointer;
}

.footer{
    width:100%;
    height: 55px;
    left:0px;
    bottom:0px;
    background-color:#fff;
    position: absolute;
}

.footer img{
    float: left;
    margin:8px 0 0 20px;
}

.input_txt{
    float: left;
    width:270px;
    height:37px;
    border:0px;
    background-color: #f4f3f3;
    margin:9px 0 0 20px;
    border-radius:8px;
    padding:0px;
    outline:none;
    text-indent:15px;
}
.input_sub{
    float: left;
    width:70px;
    height:37px;
    border:0px;
    background-color: #fe9697;
    margin:9px 0 0 15px;
    border-radius:8px;
    padding:0px;
    outline:none;
    color:#fff;
    cursor: pointer;
}
reset.css部分
body,ul,h1,h2,h3,h4,h5,h6{
    margin: 0;
    padding: 0;
}
h1,h2,h3,h4,h5,h6{
    font-size:100%;
    font-weight:normal;
}
a{
    text-decoration:none;
}
ul{
    list-style:none;
}
img{
    border:0px;
}

/* 清除浮动,解决margin-top塌陷 */
.clearfix:before,.clearfix:after{
    content:'';
    display:table;
}
.clearfix:after{
    clear:both;
}
.clearfix{
    zoom:1;
}

.fl{
    float:left;
}
.fr{
    float:right;
}
接下来就是本项目的精华所在
首先为发送按钮绑定点击事件,trim()方法是去除表单里面的空字符,开始为表单内容是否为空来一次判断。
如果用户输入了内容,将表单里面的内容渲染到页面,我相信大家都非常的熟练了
// 为发送按钮绑定鼠标点击事件
  $('#btnSend').on('click', function() {
    var text = $('#ipt').val().trim()
    if (text.length ' + text + '')
    $('#ipt').val('')//文本为空
    // 重置滚动条的位置
    resetui()
    // 发起请求,获取聊天内容
    getMsg(text)
  })
接下来就是机器人的回复内容啦:
用一个getMsg函数封装 传递放入参数就是用户输入的内容
下一些Ajax的get获取内容,根据文档提供的地址http://www.liulongbin.top:3006/api/robot
当 res.message === ‘success’ 表示获取聊天信息成功 就接受聊天信息,将信息追加到页面
  // 获取聊天机器人发送回来的消息
  function getMsg(text) {
    $.ajax({
      method: 'GET',
      url: ' http://www.liulongbin.top:3006/api/robot',
      data: {
        spoken: text
      },
      success: function(res) {
        // console.log(res)
        if (res.message === 'success') {
          // 接收聊天消息
          var msg = res.data.info.text
          $('#talk_list').append('
‘ + msg + ‘
‘)
// 重置滚动条的位置
resetui()
// 调用 getVoice 函数,把文本转化为语音
getVoice(msg)
}
}
})
}
然后就是将文本转化为语音播放功能
同样的封装一个函数getVoice() 传递的参数是接受到的机器人的聊天消息msg
// 把文字转化为语音进行播放
  function getVoice(text) {
    $.ajax({
      method: 'GET',
      url: ' http://www.liulongbin.top:3006/api/synthesize',
      data: {
        text: text
      },
      success: function(res) {
        // console.log(res)
        //下面的值可以通过console.log(res)输出查看里面的属性值
        if (res.status === 200) {
          // 播放语音 路径
          $('#voice').attr('src', res.voiceUrl)
        }
      }
    })
  }
最后一个功能就是用户按回车也可以发送消息
 // 为文本框绑定 keyup 事件
  $('#ipt').on('keyup', function(e) {
    // console.log(e.keyCode)
    if (e.keyCode === 13) {
      // console.log('用户弹起了回车键')
      $('#btnSend').click()
    }
  })
大家赶快去试试吧
到此这篇关于基于Ajax的聊天机器人的文章就介绍到这了,更多相关Ajax聊天机器人内容请搜索IT俱乐部以前的文章或继续浏览下面的相关文章希望大家以后多多支持IT俱乐部!

