下图是效果(文章末尾有所有的源代码)
一、实现人机交互步骤:
获取dom元素,创建点击事件/键盘事件 将我说的话传进ajax服务器中,获取机器人说的话,then()中的数据找到 创建子节点追加并且渲染数据出来 每次说完了都滚动到对话框最下面来
① 获取dom元素,创建点击事件/键盘事件
    const btn = document.querySelector('#btnSend')
    const ipt = document.querySelector('#ipt')
    ipt.addEventListener('keyup', function (e) {
      if (e.key === 'Enter') {
        btn.click()
      }
    })
    btn.addEventListener('click', () => {
      const val = ipt.value.trim()
      console.log(val);
②将我说的话传进ajax服务器中
axios.get('http://ajax-api.itheima.net/api/robot',{ params: { spoken: val}}).then(res => {
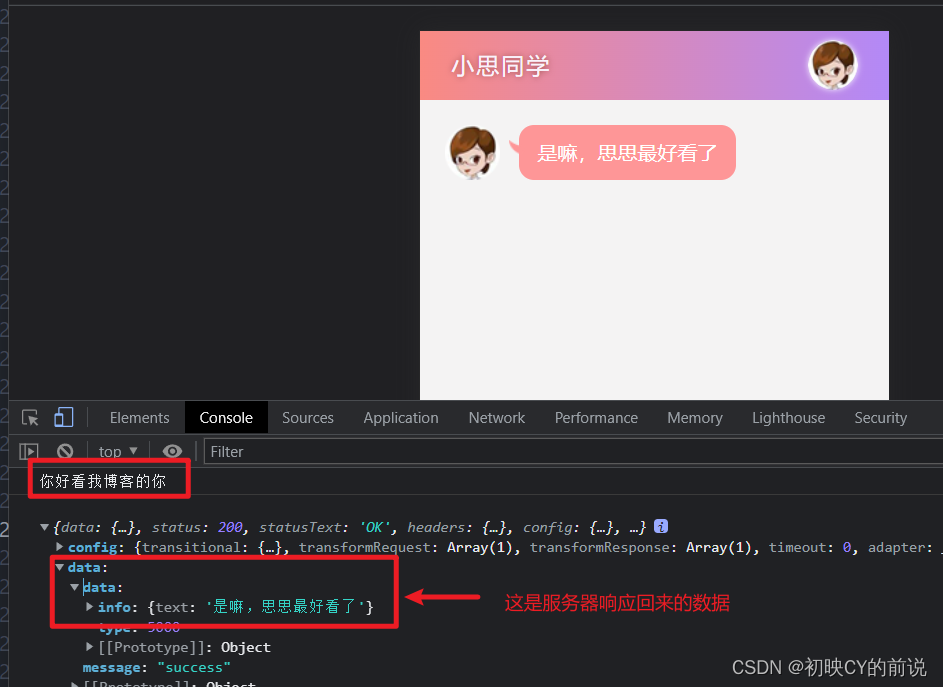
console.log(res);//res本质是服务器响应的值
console.log(res.data.data.info.text);
const words = res.data.data.info.text
这是服务器响应数据返回的值所在的位置(res.data.data.info.text)
③创建子节点追加并且渲染数据出来
li.className = 'left_word'
document.querySelector('#talk_list').appendChild(li)
li.innerHTML = ` ${words}`
④ 每次说完了都滚动到对话框最下面来
document.querySelector('ul').scrollTop = document.querySelector('ul').scrollHeight
以上这是传入Ajax发送的数据渲染,我们发的val同理渲染
// 自己发的
const li = document.createElement('li')
li.className = 'right_word'
document.querySelector('#talk_list').appendChild(li)
li.innerHTML = ` ${val}`
ipt.value=''
// 滚动到页面最下面
document.querySelector('ul').scrollTop = document.querySelector('ul').scrollHeight
${val}`
ipt.value=''
// 滚动到页面最下面
document.querySelector('ul').scrollTop = document.querySelector('ul').scrollHeight
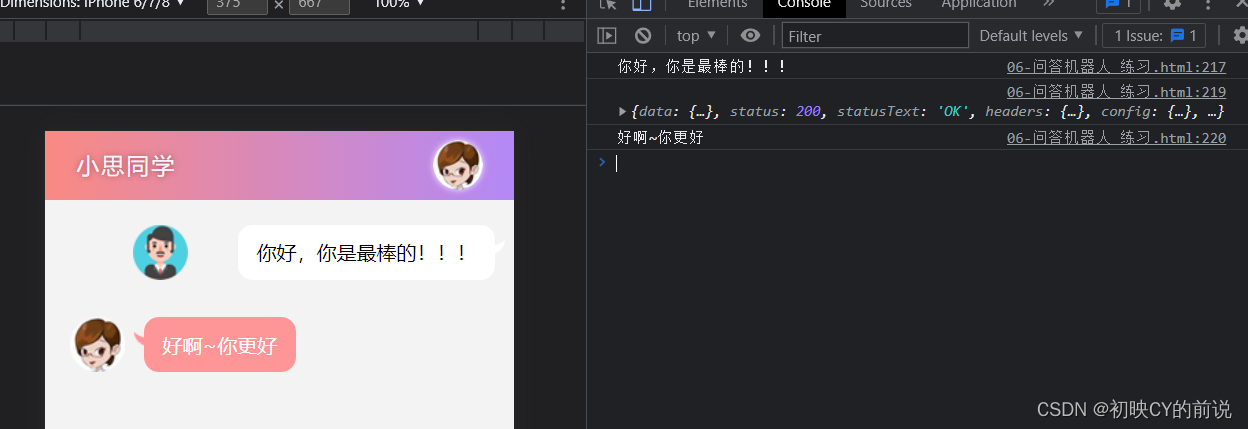
此时再进行校验下:
二、以上的源码(图片素材不方便传,自己随便定义啦~)
案例_问答机器人 body { margin: 0; font-family: 'Microsoft YaHei', sans-serif; } .wrap { position: absolute; width: 100%; height: 100%; overflow: hidden; } .header { height: 55px; background: linear-gradient(90deg, rgba(246, 60, 47, 0.6), rgba(128, 58, 242, 0.6)); overflow: hidden; } .header h3 { color: #faf3fc; line-height: 55px; font-weight: normal; float: left; letter-spacing: 2px; margin-left: 25px; font-size: 18px; text-shadow: 0px 0px 5px #944846; } .header img { float: right; margin: 7px 25px 0 0; border-radius: 20px; box-shadow: 0 0 5px #f7f2fe; } .main { position: absolute; left: 0; right: 0; top: 55px; bottom: 55px; background-color: #f4f3f3; box-sizing: border-box; overflow: hidden; } .talk_list { width: 100%; height: 100%; overflow-y: auto; } .talk_list li { overflow: hidden; margin: 20px 0px 30px; display: flex; } .talk_list .left_word { justify-content: flex-start; } .talk_list .left_word img { margin-left: 20px; width: 44px; height: 44px; } .talk_list .left_word span { background-color: #fe9697; padding: 10px 15px; border-radius: 12px; font-size: 16px; color: #fff; margin-left: 15px; margin-right: 20px; position: relative; line-height: 24px; } .talk_list .left_word span:before { content: ''; position: absolute; left: -8px; top: 12px; width: 13px; height: 12px; background: url('../day01/lib/img/corner01.png') no-repeat; } .talk_list .right_word { justify-content: flex-end; } .talk_list .right_word img { margin-right: 20px; width: 44px; height: 44px; } .talk_list .right_word span { background-color: #fff; padding: 10px 15px; border-radius: 12px; font-size: 16px; color: #000; margin-right: 15px; margin-left: 20px; position: relative; line-height: 24px; } .talk_list .right_word span:before { content: ''; position: absolute; right: -8px; top: 12px; width: 13px; height: 12px; background: url('../day01/lib/img/corner02.png') no-repeat; } .footer { width: 100%; height: 55px; left: 0px; bottom: 0px; background-color: #fff; position: absolute; display: flex; align-items: center; padding: 0 10px; box-sizing: border-box; } .input_txt { height: 37px; border: 0px; background-color: #f4f3f3; border-radius: 8px; padding: 0px; margin: 0 10px; outline: none; text-indent: 15px; flex: 1; } .input_sub { width: 70px; height: 37px; border: 0px; background-color: #fe9697; margin: 0; border-radius: 8px; padding: 0px; outline: none; color: #fff; cursor: pointer; }/* 实现人机交互步骤 1.沟通:通过创建节点的方法获取我说的话并渲染出来 2.将我说的话传进ajax服务器中 3.获取机器人说的话并且渲染出来 4.每次说完了都滚动到对话框最下面来 */ const btn = document.querySelector('#btnSend') const ipt = document.querySelector('#ipt') ipt.addEventListener('keyup', function (e) { if (e.key === 'Enter') { btn.click() } }) btn.addEventListener('click', () => { const val = ipt.value.trim() console.log(val); axios.get('http://ajax-api.itheima.net/api/robot',{ params: { spoken: val}}).then(res => { console.log(res);//res本质是服务器响应的值 console.log(res.data.data.info.text); const words = res.data.data.info.text const li = document.createElement('li') li.className = 'left_word' document.querySelector('#talk_list').appendChild(li) li.innerHTML = `小思同学
到此这篇关于利用Ajax实现智能回答的机器人的文章就介绍到这了,更多相关Ajax机器人内容请搜索IT俱乐部以前的文章或继续浏览下面的相关文章希望大家以后多多支持IT俱乐部!

