前言
在需要权限控制的页面,往往存在根据用户来显示菜单的情况,单独根据用户类型判断显然不是很好,如果后面用户类型发生变化,项目修改维护可能就会比较麻烦,所以比较好的做法是根据后端返回的菜单动态生成页面路由,以达到完全权限控制的目的,并且若权限发生变化,仅需该配置数据即可
1.创建项目
首先用vue-cli3创建好项目
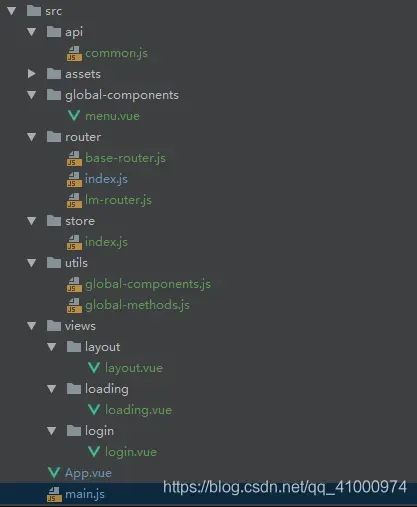
2.新建文件
创建好项目后,新建我们需要的文件。结构如图
下载相关依赖包 :element-ui(菜单样式用) 和 axios(获取菜单用)
npm i element-ui axios --save
3.到main.js中
import Vue from 'vue'
import App from './App.vue'
import router from './router'
import elementUi from 'element-ui'
import 'element-ui/lib/theme-chalk/index.css'
Vue.use(elementUi)

Vue.config.productionTip = false

new Vue({
  router,
  render: h => h(App)
}).$mount('#app')
4.先把菜单组件写好,到menu.vue中
这里使用element-ui的el-menu组件
import {mapState}from 'vuex' export default { name: "Menu", data() { return{ menuMinHeight:0,// openedMenu:[],//展开的菜单 } }, computed:{ ...mapState(['menus']) }, created(){ let pathArr=this.$route.path.split('/') this.openedMenu=[`/${pathArr[1]}`] }, async mounted() { }, methods: { //中菜单 select(cMenu){ // console.log(cMenu) let {routeName}=cMenu this.$router.push({ name:routeName }) }, //菜单展开 open(index,indexPath){ // console.log(indexPath) this.openedMenu=indexPath let menu=this.menus.filter(item=>item.path===index) // console.log(menu) let routeMenuInfo={} let time=0 if(!menu[0] || !menu[0].children || !menu[0].children.length){ routeMenuInfo=menu[0] }else{ routeMenuInfo=menu[0].children[0] time=500 } let {path,}=routeMenuInfo // console.log(path) setTimeout(()=>{ this.$router.push(path) },time) }, } } .menulist-inner{ min-height:calc(100vh - 50px); .menuItemBox{ height:36px; &:hover{ background:rgba(62,70,120,.4); &>span{ color: #fff; } } span{ color:#ffffff; flex-wrap:nowrap; width:150px; cursor:pointer; } } .activeMenu{ background:rgba(62,70,120,1); } } .menuTitlBox{ .menuTitle{ position: relative; z-index: 10; } .firstMenuBk{ position: absolute; left:0; top:50%; width:200px; height:56px; background:#3e4678; -webkit-transform: translateY(-50%); -moz-transform: translateY(-50%); -ms-transform: translateY(-50%); -o-transform: translateY(-50%); transform: translateY(-50%); } .whiteText{ color:#ffffff; } } .el-submenu{ position: relative; } .el-menu{ border:none !important; } .el-submenu__icon-arrow{ width:0; height:0; color:transparent; } .el-submenu__icon-arrow:before{ content:'' !important; } .el-submenu__icon-arrow:before{ content:'' !important; } .el-submenu__title{ background:rgba(44,55,71,1) !important; margin-bottom:5px; height:46px !important; line-height: 46px !important; } .el-menu.el-menu--inline{ background-color: rgba(0,0,0,.2) !important; } .menulist-inner .menuItemBox.rowEnd span{ color: #A7BAC6; } .menulist-inner .menuItemBox.rowEnd.activeMenu span{ color: #fff; }
5.注册全局组件
将menu组件注册为全局组件,方便需要的地方直接引入
到global-components.js文件中
/*
 全局组件引入注册
  */

import Menu from "../global-components/menu" //菜单

export default {
    install(Vue) {
        Vue.component('Menu',Menu)
    }
};
6.到router文件夹写好路由模块
6.1 base-router.js中写好我们需要的固定的路由
/**
 * 页面上固定路由
 */
import Layout from '../views/layout/layout'
import Login from '../views/login/login'
import Loading from '../views/loading/loading'
const routes = [
    {
        path: '/',
        redirect: '/loading',
    },
    {
        path: '/layout',
        component:Layout,
        redirect: '/loading',
    },
    {
        path: '/login',
        name: 'Login',
        component: Login
    },
    {
        path: '/loading',
        name: 'Loading',
        component: Loading
    },
]
export default routes
6.2 lm-router.js中写动态配置路由的方法
import {setUserRoutesData} from "../utils/global-methods";

const RouterPlugin = function() {
    this.$router = null
    this.$store = null
}
RouterPlugin.install = function(router, store) {
    this.$router = router
    this.$store = store
    this.$router.$lmRouter = {
        // 全局配置
        safe: this,
        // 动态路由
        formatRoutes:function (routes) {
            let routers=setUserRoutesData(routes)
            this.safe.$router.addRoutes(routers)
            return routers
        }
    }
}
export default RouterPlugin
6.3 index.js中写路由入口
import Vue from 'vue'
import VueRouter from 'vue-router'
import baseRoutes from './base-router'
import store from '../store'
import LmRouter from './lm-router'

Vue.use(VueRouter)

const createRouter = () => {
    return new VueRouter({
        scrollBehavior (to, from, savedPosition) {
            if (savedPosition) {
                return savedPosition
            } else {
                return {
                    x: 0,
                    y: to.meta.savedPosition || 0
                }
            }
        },
        routes: [...baseRoutes],
        mode:'history',//
    })
}
let router = createRouter()
/**
resetRouter函数用于重置路由,每一次动态配置路由之前要先重置路由
**/
export function resetRouter() {
    const newRouter = createRouter()
    router.matcher = newRouter.matcher // reset router
    LmRouter.install(router, store)
}
/**
当用户刷新页面时,路由数据会丢失,如果已经登录,需要重新渲染路由。渲染的路由数据在登录时存在浏览器本地
**/
if(sessionStorage.getItem('hasLogin')){
    let sessionMenus=localStorage.getItem('menus')
    sessionMenus=sessionMenus ? JSON.parse(sessionMenus) : []
    let sessionRoutes=localStorage.getItem('userRoutes')
    LmRouter.install(router, store)
    sessionRoutes=sessionRoutes ? JSON.parse(sessionRoutes) : []
    router.$lmRouter.formatRoutes(sessionRoutes, true)
    store.dispatch('setUserRoutes',sessionRoutes)
    store.dispatch('setMenus',sessionMenus)
}

router.beforeEach((to, from, next) => {
    let hasLogin = sessionStorage.getItem('hasLogin')
    // console.log(to, from)
    if(to.name===from.name){
        return
    }
    console.log(hasLogin)
    if(to.name==='Login'){
        sessionStorage.clear()
        localStorage.clear()
        store.state.userRoutes=[]
        store.state.menus=[]
        next({replace:true})
        resetRouter()
        return
    }
    if (!hasLogin) {
        next({path: '/login',replace:true})
        return
    }
    next()

})
/**
 * 解决element-ui点击同一个菜单报错
 * @type {VueRouter.push|*}
 */
const originalPush = VueRouter.prototype.push
VueRouter.prototype.push = function push(location) {
    return originalPush.call(this, location).catch(err => err)
}
export default router
7.容器页和加载页
大部分有二级菜单的页面,父级页面通常只需要路由跳转功能,代码一致,为了精简代码,我们新建通用的路由容器页面layout.vue,二级菜单路由页面经layout页面跳转
为避免用户在浏览器直接输入、粘贴路径时,或者直接访问页面根路径时找不到路由(因为用户可能已经登录了,但这是没有已经登录界面),我们新建loading.vue,当用户粘贴路径,或者访问根路径时,在loading.vue中渲染路由
7.1 layout.vue
export default { name: 'Layout', }头部
7.2 loading.vue
import {reqUserRoutes} from "../../api/common"; import {setUserRoutesData,getAndFilterMenus,} from "../../utils/global-methods"; export default { name: 'Loading', data() { return {} }, computed: {}, created(){ let hasLogin = sessionStorage.getItem('hasLogin') if(!hasLogin){ this.$router.replace('/login') }else{ let menus=localStorage.getItem('menus') let userRoutes=localStorage.getItem('userRoutes') userRoutes=userRoutes ? JSON.parse(userRoutes) : [] menus=menus ? JSON.parse(menus) : [] if(!menus.length || !userRoutes.length){ this.getMenuRoutes() return } let userInfo=getUserInfoFromLocalStorage() this.$store.dispatch('setUserInfo',userInfo) let {permissions=[]}=userInfo this.$store.dispatch('setPermissions',permissions) this.$router.replace((userRoutes[0] && userRoutes[0].path) ? userRoutes[0].path : '/404') } }, methods: { //获取菜单和路由 async getMenuRoutes(){ let userRoutes=await reqUserRoutes() console.log(userRoutes) let menus=getAndFilterMenus(JSON.parse(JSON.stringify(userRoutes))) if(!menus.length){ this.$router.replace('/login') return } localStorage.setItem('userRoutes',JSON.stringify(userRoutes)) localStorage.setItem('menus',JSON.stringify(menus)) userRoutes=setUserRoutesData([...userRoutes]) this.$store.dispatch('setUserRoutes',userRoutes) this.$store.dispatch('setMenus',menus) this.$router.addRoutes([...userRoutes]) this.$router.replace((userRoutes[0] && userRoutes[0].path) ? userRoutes[0].path : '/404') } }, } .loadingBox{ .loadingContentbox{ position: absolute; left:50%; top:50%; -webkit-transform: translate(-50%,-50%); -moz-transform: translate(-50%,-50%); -ms-transform: translate(-50%,-50%); -o-transform: translate(-50%,-50%); transform: translate(-50%,-50%); .el-icon-loading{ font-size: 40px; margin-bottom:10px; } } }页面加载中...
8.写筛选菜单和路由的方法
到utils,global-methods.js中写菜单筛选和路由数据方法
首先我们假设后端返回的数据为如下结构(仅列出关键字段)
[
  {
    label:'人员管理',
    path:'/person',
    isLeftMenu:1,
    routeName:'Person',
    isContainer:1,
    children:[
     {
        label:'人员列表',
        path:'/person/person-list',
        routeName:'PersonList',
         isLeftMenu:1,
         component:'/person/person-list',
    },
     {
        label:'新增人员',
        path:'/person/person-add',
        routeName:'PersonAdd',
         component:'/person/person-add',
         isLeftMenu:0
     }
    ]
  },
    {
      label:'订单管理',
      path:'/order',
      isLeftMenu:1,
      routeName:'Order',
       component:'/order/order',
      isContainer:0,
    }
]
其中 label 为菜单显示标题,path 是路由路径,isLeftMenu用于区分是否为菜单,这里isLeftMenu=1表示是菜单,routeName路由名,isContainer用于区分路由是否经过容器组件layout,这里isContainer=1表示使用layout容器,component用于指定组件引入的路径
根据上面的数据结构,我们新建好对应得vue文件
// 公共函数模块,用import引用
// 根据日期时间值获取字符串各是日期
import Layout from '../views/layout/layout'

//获取并筛选菜单
export const getAndFilterMenus=(menus)=> {
    // console.log(menus)
    menus=hanldeChildAppRoute(menus)
    for(let i=0;i{
    // console.log(routes)
    !isChild && (routes=hanldeChildAppRoute(routes))
    for(let i=0;i import( `../views${component}`)
        }
        routes[i].name=routeName
        /**
        如果有子路由,那就用递归继续生成路由
        **/
        if((routes[i].children instanceof Array) && routes[i].children.length){
            setUserRoutesData(routes[i].children,isChild)
        }
    }
    return routes
}
9. 登录成功后生成路由
最后看下登录页,我们将在登录成功后获取菜单数据,然后动态生成页面路由,并且通过Vue路由的addRoutes方法将路由添加到VueRouter中
import {mapState} from 'vuex' import axios from 'axios' import {reqUserRoutes} from "../../api/common"; import {setUserRoutesData,getAndFilterMenus,} from "../../utils/global-methods"; import {resetRouter} from '../../router' import baseRoutes from '../../router/base-router' export default { data() { return { loginForm: {}, rules: { username: [ { required: true, message: '请输入用户名', trigger: 'blur' } ], password: [ { required: true, message: '请输入密码', trigger: 'blur' }, ], },//规则 showLoading:false,//是否显示加载 } }, methods: { //登录 async submitForm() { sessionStorage.clear()//清除所有缓存 localStorage.clear() await this.$refs.loginForm.validate() this.showLoading=true axios({ url:`/login`, method:'POST', data:this.loginForm }).then(async response=>{ console.log(response) if(response){ let userRoutes=await reqUserRoutes() localStorage.setItem(userRoutes,JSON.stringify(userRoutes)) userRoutes=setUserRoutesData(JSON.parse(JSON.stringify(userRoutes))) console.log(userRoutes) this.$store.dispatch('setUserRoutes',JSON.parse(JSON.stringify(userRoutes))) let menus=getAndFilterMenus([...baseRoutes,...JSON.parse(JSON.stringify(userRoutes))]) localStorage.setItem(menus,JSON.stringify(menus)) //重置路由 resetRouter() // console.log(router) //通过addRoutes方法添加路由 this.$router.addRoutes([...userRoutes]) // console.log(router) 将菜单存到vuex this.$store.dispatch('setMenus',menus) if(!menus.length || !userRoutes.length){ return } setTimeout(()=>{ router.replace(path) },500) } }).catch(error=>{ console.error(error) this.showLoading=false }) }, }, }; .login-wrap{ position: relative; background:#111111; height:100vh; overflow: hidden; .loginContent{ .loginFormBox{ position: absolute; left:50%; top:50%; -webkit-transform: translate(-50%,-50%); -moz-transform: translate(-50%,-50%); -ms-transform: translate(-50%,-50%); -o-transform: translate(-50%,-50%); transform: translate(-50%,-50%); .loginForm{ width:300px; padding:20px; .loginTitleBox{ margin-bottom:36px; .loginTitle{ color:#ffffff; } } .loginBtnBox{ width:100%; margin-top:5vh; .loginBtn{ width:100%; height:40px; background:linear-gradient(90deg,rgba(15,70,193,1),rgba(0,147,168,1)); border-radius:4px; color:#ffffff; cursor:pointer; } } } } } } .login-wrap .el-input{ border-bottom: 1px solid; border-image: -webkit-linear-gradient(90deg,rgba(1,233,189,1) 0%,rgba(0,124,222,1) 100%) 30 30; border-image: -moz-linear-gradient(90deg,rgba(1,233,189,1) 0%,rgba(0,124,222,1) 100%) 30 30; border-image: linear-gradient(90deg,rgba(1,233,189,1) 0%,rgba(0,124,222,1) 100%) 30 30; } .login-wrap .el-input__inner{ background:transparent; -webkit-border-radius: 0; -moz-border-radius: 0; border-radius: 0; border:none; color:#ffffff; } .login-wrap .el-input-group__append{ padding:0 !important; border:none !important; background:transparent !important; }登录/Login登录中
附:一些常见问题
1. 用 require 而不用 import
我们在根据字符串生成路由组件的时候,要用 require 而不是 import ,否则会报以下错误信息:
2. 侧边栏消失
在点击动态生成的路由时,页面可以正常跳转,但是测试边不见了。是因为 动态生成的路由没有作为 Layout 组件的子组件,应该添加到 Layout 组件的 children 数组中。
3. 页面无内容
在点击二级菜单的时候,页面是空白的,没有任何内容。以上面案例为例,我们只需要在对应组件的父目录下,新建 index.vue 文件,写入 即可。
4. 二级菜单展示不全
这个问题不属于动态路由的问题,elementui 框架中,如果子菜单只有一个,那么就不会生成多级菜单的形式。
总结
到此这篇关于前端vue如何根据菜单自动生成路由的文章就介绍到这了,更多相关前端vue菜单自动生成路由内容请搜索IT俱乐部以前的文章或继续浏览下面的相关文章希望大家以后多多支持IT俱乐部!

