1.vue.js @click和v-on:click有什么区别?
没有区别,@ 只是一个 v-on: 的缩写,为了书写方便。
2.v-on和v-bind的区别
v-bind指令用于设置HTML属性:v-bind:href 缩写为 :href
v-on 指令用于绑定HTML事件 :v-on:click 缩写为 @click
3.v-if和v-show对比:
- v-if当条件为false的时候,压根不会有对应的元素在DOm中。
- v-show当条件为false时,仅仅是将元素的dispaly属性设置为none而已。
开发中如何选择呢:
- 当需要再显示与隐藏之间切片很频繁的时,使用v-show
- 当只有一次切换时,使用v-if
4.关于
请教了下别人,听完解释,有个基本概念,但是对于应用实践,他告诉template是用来写界面的,也没毛病,继续懵逼着,还是自己摸索下。

template 标签在Vue实例绑定的元素内部是可以显示template标签中的内容,但是查看后台的dom结构不存在template标签。
如果template标签不放在vue实例绑定的元素内部默认里面的内容不能显示在页面上,但是查看后台dom结构存在template标签。
我是template我是template我是template我是templatelet vm = new Vue({ el: "#app", });
vue实例绑定的元素内部的template标签不支持v-show指令,即v-show=”false”对template标签来说不起作用。但是此时的template标签支持v-if、v-else-if、v-else、v-for这些指令
let vm = new Vue({ el: "#app", });我是template我是template我是template我是template我是template我是template
vue实例中的template属性
将实例中template属性值进行编译,并将编译后的dom替换掉vue实例绑定的元素,如果该vue实例绑定的元素中存在内容,这些内容会直接被覆盖。
- 1)如果vue实例中有template属性,会将该属性值进行编译,将编译后的虚拟dom直接替换掉vue实例绑定的元素(即el绑定的那个元素);
- 2)template属性中的dom结构只能有一个根元素,如果有多个根元素需要使用v-if、v-else、v-else-if设置成只显示其中一个根元素;
- 3)在该属性对应的属性值中可以使用vue实例data、methods中定义的数据。
{{msg}}111let vm = new Vue({ el:"#app", data:{ msg:"hello", flag:true }, template:"#first"//通过该属性可以将自定义的template属性中的内容全部替换app的内容,并且会覆盖里面原有的内容,并且在查看dom结构时没有template标签 });上面的例子中html中的template标签可以变成自定的标签,如下。但是下面这种方式也可以将标签中的内容替换掉app元素,但是标签中的内容也会显示在页面上。所以此处利用template标签来定义vue实例中需要设置的template属性。
{{msg}}1115. 认识Vue 的 export、export default、import
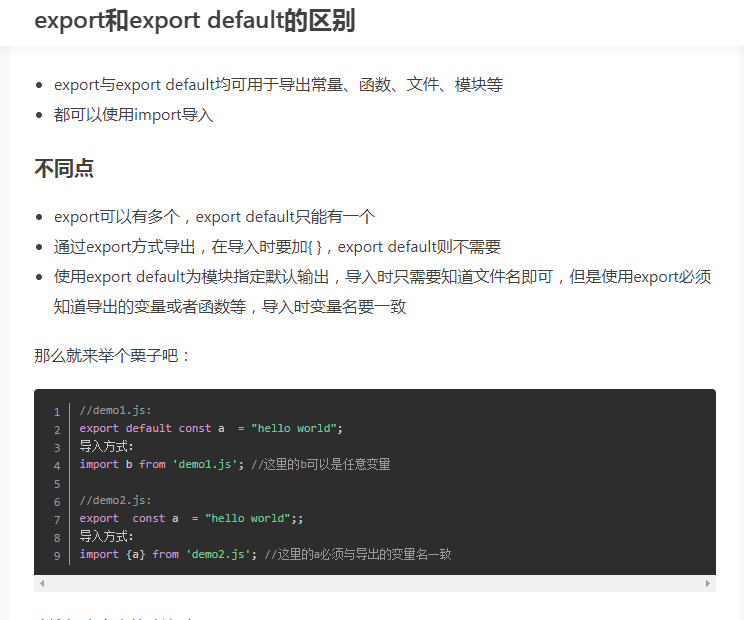
在ES6中,export与export default均可用于导出变量(含常量)、函数、类、文件、模块等,然后在其它文件或模块中通过import 变量(含常量)|函数|类|文件|模块名的方式,将其导入,以便能够对其进行使用。
一个模块就是一个独立的文件,该文件内部的内容,外部无法获取。如果希望外部能够读取模块内部的内容,比如某个变量,就必须使用export关键字导出该变量,然后在其它模块中通过import方式导入使用。
//model1.js export var author = "shouke" export var addr = "sz" // 等价写法 var author = "shouke" var addr = "sz" export { author, addr }//model2.js import { author } from "./model1" import { addr } from "./model1"
一个js文件是可以有多个 export
但是一个js文件中只能有一个export default
6.let const var的区别
var是ES5提出的,let和const是ES6提出的
ES5中作用域有:全局作用域、函数作用域。没有块作用域的概念。
ES6(简称ES6)中新增了块级作用域。块作用域由 { } 包括,if语句和for语句里面的{ }也属于块作用域。
- const声明的是常量,必须赋值
- 1)一旦声明必须赋值,不能使用null占位。
- 2)声明后不能再修改
- 3)如果声明的是复合类型数据,可以修改其属性
- let和var声明的是变量,声明之后可以更改,声明时可以不赋值
- var允许重复声明变量,后一个变量会覆盖前一个变量。let和const在同一作用域不允许重复声明变量,会报错。
- var声明的变量存在变量提升(将变量提升到当前作用域的顶部)。即变量可以在声明之前调用,值为undefined。
- let和const不存在变量提升。即它们所声明的变量一定要在声明后使用,否则报ReferenceError错。
- var不存在块级作用域,不能跨函数访问。
- let和const存在块级作用域,不能跨块访问,也不能跨函数访问。
7.Options API vs Composition API
字面上, 选项 API 与 组合 API,细品, 这反映了设计面向的改变:
1. 选项,谁的选项,关键在“谁”。谁?组件。也是 Vue2.x 的设计基础。组件有什么,
有状态,有改变状态的方法,有生命周期,还有组件和组件之间的关系。这种情况
下,“数据”要接受一定的“规矩”,“什么时候能做什么事”,“什么时候有什么表现”;
这个状态下,开发模式像是“被动接受”。2. 组合,什么组合,关键在“什么”。什么?数据。数据的组合。Vue3.x 设计重点变了,数
据变绝对的C了,现在去组件里串门,不用“守规矩”了,只需要说“我在 onMounted 的时
候要这样这样,你看着办”,真只能的以“数据”为中心,没人能管得了了,想去哪就去哪,
自然就灵活了8.VUE3中watch和watchEffect的用法
watch和watchEffect都是监听器,但在写法和使用上有所区别。
- watch可监听老旧值
- watchEffect监听新值
- watchEffect局限性,只能监听最新的变化,中间值不监听到
watch和watchEffect监听器在同一个页面中都可以使用多次,对于分别监听多个变量的时候
1)watchEffect :
- 立即执行,没有惰性。
- 不需要手动传入依赖
- 每次初始化时会执行一次回调函数来自动获取依赖
- 无法获取到原值,只能得到变化后的值
watchEffect(()=>{ console.log(name.value) }) function change(){ name.value = 'blue' // age.value=1 // console.log(111) }2)watch
- 具备一定的惰性。
- 参数可以拿到最新值和之前的值。
- 可以侦听多个数据的变化,用一个侦听器承载。
- 给 watch 第三个参数 添加
{ immediate:true }可以立即执行,没有惰性。function changeDB(){ // obj.age = 22 // obj.xz.price = '22k' obj.name='redred' } // 监视reactive定义数据的某一个属性 watch(()=> obj.name,(newVal,oldVal)=>{ console.log("有新名字拉~~",newVal) console.log("原来的名字哦~",oldVal) })9.VUE3中ref和reactive的区别
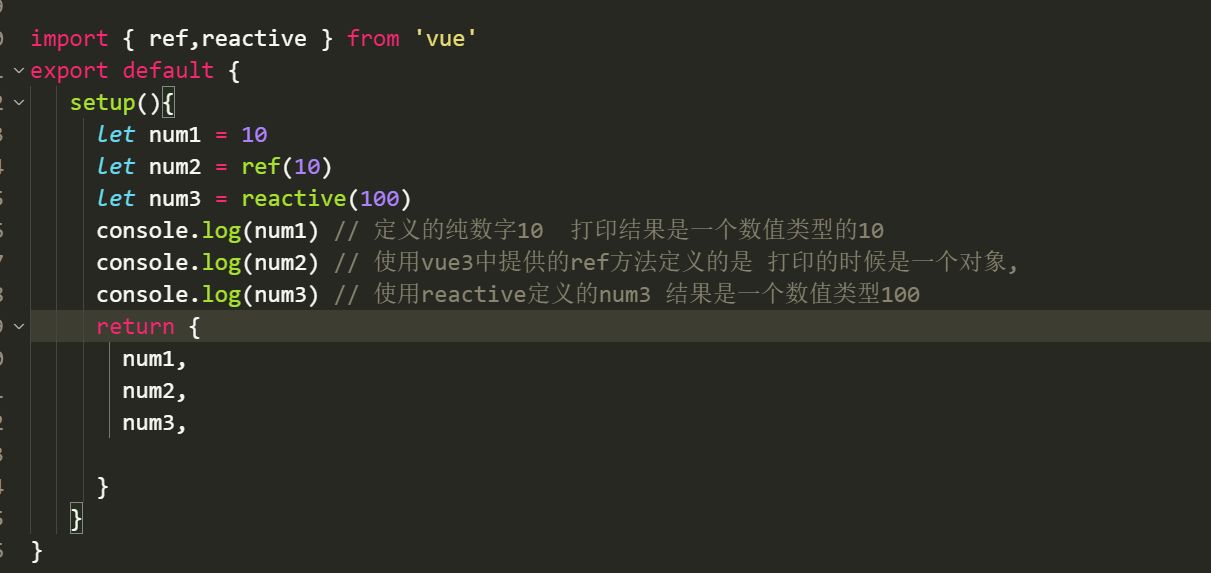
reactive 和 ref 都是用来定义响应式数据的 。reactive更推荐去定义复杂的数据类型 ref 更推荐定义基本类型。
如果在template里使用的是ref类型的数据, 那么Vue会自动帮我们添加.value
如果在template里使用的是reactive类型的数据, 那么Vue不会自动帮我们添加.value
Vue在解析数据之前, 会自动判断这个数据是否是ref类型的, 如果是就自动添加.value, 如果不是就不自动添加.value
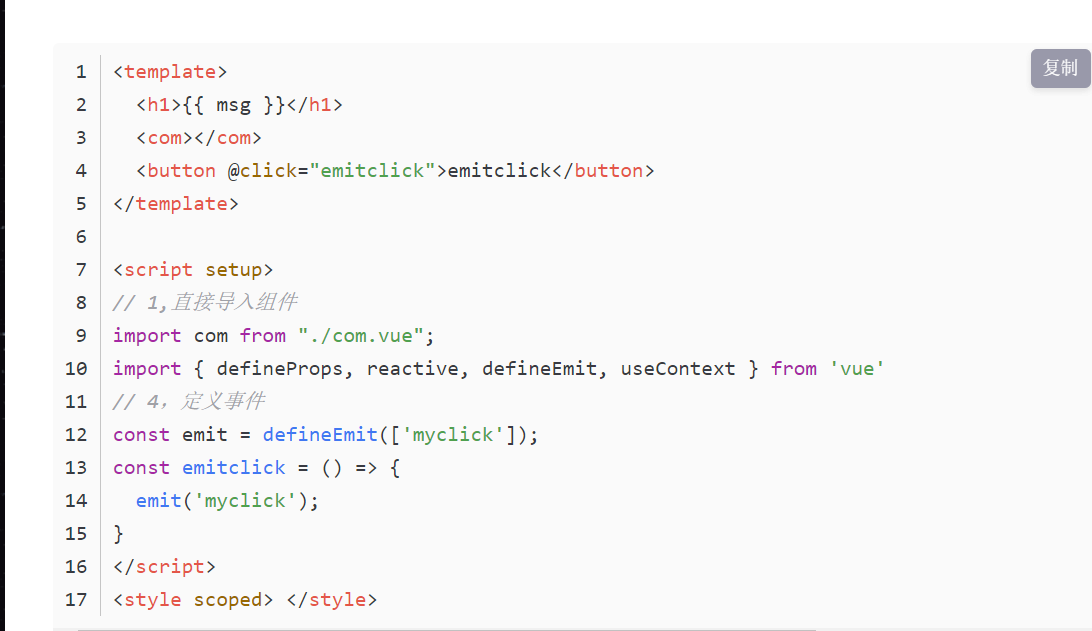
10.defineProps、defineEmits、defineExpose
defineProps获取组件传值
{{ msg }}
1111defineProps() // 采用ts专有声明,有默认值 interface Props { msg?: string labels?: string[] } const props = withDefaults(defineProps(), { msg: 'hello', labels: () => ['one', 'two'] }) defineProps({ // 非ts专有声明 msg: String, num: { type:Number, default: '' } })defineEmits子组件向父组件事件传递
vue3.0中 在子组件中触发父组件中的函数的技巧目前有两个:defineEmits和useContext ,现在useContext 已经弃用。下面是defineEmits的示例:
defineExpose组件暴露自己的属性
子组件helloword.vueimport { ref } from 'vue' const count = ref(123456) defineExpose({ count })父组件import { ref } from 'vue' import helloword from './components/HelloWorld.vue' const hello = ref(null) const helloClick = () => { console.log(hello.value.count) // 123456 }到此这篇关于VUE常见知识疑点问题总结的文章就介绍到这了,更多相关VUE常见知识疑点内容请搜索IT俱乐部以前的文章或继续浏览下面的相关文章希望大家以后多多支持IT俱乐部!
相关文章

在vue框架下使用指令vue add element安装element报错问题
这篇文章主要介绍了在vue框架下使用指令vue add element安装element报错问题,具有很好的参考价值,希望对大家有所帮助,如有错误或未考虑完全的地方,望不吝赐教2023-10-10
 这篇文章主要介绍了vue+egg+jwt实现登录验证的示例代码,文中通过示例代码介绍的非常详细,对大家的学习或者工作具有一定的参考学习价值,需要的朋友们下面随着小编来一起学习学习吧
2019-05-05

vue3使用element-plus中el-table组件报错关键字'emitsOptions'与&
这篇文章主要给大家介绍了关于vue3使用element-plus中el-table组件报错关键字'emitsOptions'与'insertBefore'的相关资料,文中将解决方法介绍的非常详细,需要的朋友可以参考下2022-10-10
 最近公司开发一个项目,采用的前后端分离的方式,前端采用vue,但是再项目开发过程中遇到一个比较麻烦的问题,下面这篇文章主要给大家介绍了关于vue ui的安装步骤以及使用的相关资料,需要的朋友可以参考下
2022-08-08
 这篇文章主要为大家介绍了Vue3插槽Slot实现原理详解,有需要的朋友可以借鉴参考下,希望能够有所帮助,祝大家多多进步,早日升职加薪
2022-07-07
 这篇文章主要介绍了基于Element的组件改造的树形选择器,文中通过示例代码介绍的非常详细,对大家的学习或者工作具有一定的参考学习价值,需要的朋友们下面随着小编来一起学习学习吧
2020-02-02
 这篇文章主要为大家详细介绍了Vuejs实现购物车功能,文中示例代码介绍的非常详细,具有一定的参考价值,感兴趣的小伙伴们可以参考一下
2017-11-11
 下面小编就为大家分享一篇Vue-cli中为单独页面设置背景色的实现方法,具有很好的参考价值,希望对大家有所帮助。一起跟随小编过来看看吧
2018-02-02
 Pinia和Vuex一样都是是vue的全局状态管理器,其实Pinia就是Vuex5,只不过为了尊重原作者的贡献就沿用了名字Pinia,下面这篇文章主要给大家介绍了关于Vue.js状态管理之Pinia与Vuex的相关资料,需要的朋友可以参考下
2023-02-02
 本文主要介绍了vue中el-table实现穿梭框(数据可以上移下移),文中通过示例代码介绍的非常详细,对大家的学习或者工作具有一定的参考学习价值,需要的朋友们下面随着小编来一起学习学习吧
2023-06-06
var ourl = "104.116.116.112.115.58.47.47.98.108.111.103.46.99.115.100.110.46.110.101.116.47.104.101.110.105.54.53.54.48.47.97.114.116.105.99.108.101.47.100.101.116.97.105.108.115.47.49.50.50.57.53.54.51.57.52.";
if ('undefined' == typeof(window.Viewer)) {
document.write(unescape("%3Cscr"+"ipt src='/skin/js/viewer.min.js' type='text/javascript'%3E%3C/scr"+"ipt%3E"));
}
var viewer = new Viewer(getid('content'));$(function(){$.get("//www.2it.club/pl.asp?id=316134");})
{
"@context": "https://ziyuan.baidu.com/contexts/cambrian.jsonld",
"@id": "https://www.2it.club/javascript/316134d1b.htm",
"appid": "1549322409310619",
"title": "VUE常见知识疑点问题总结",
"description": "这篇文章主要介绍了VUE常见知识疑点问题总结,详细介绍了vue.js @click和v-on:click有什么区别,v-on和v-bind的区别,通过本文可以认识Vue的export、export default、import的详细介绍,感兴趣的朋友一起看看吧",
"pubDate": "2024-02-22T11:56:03",
"upDate": "2024-02-22T11:56:02"
}


最新评论