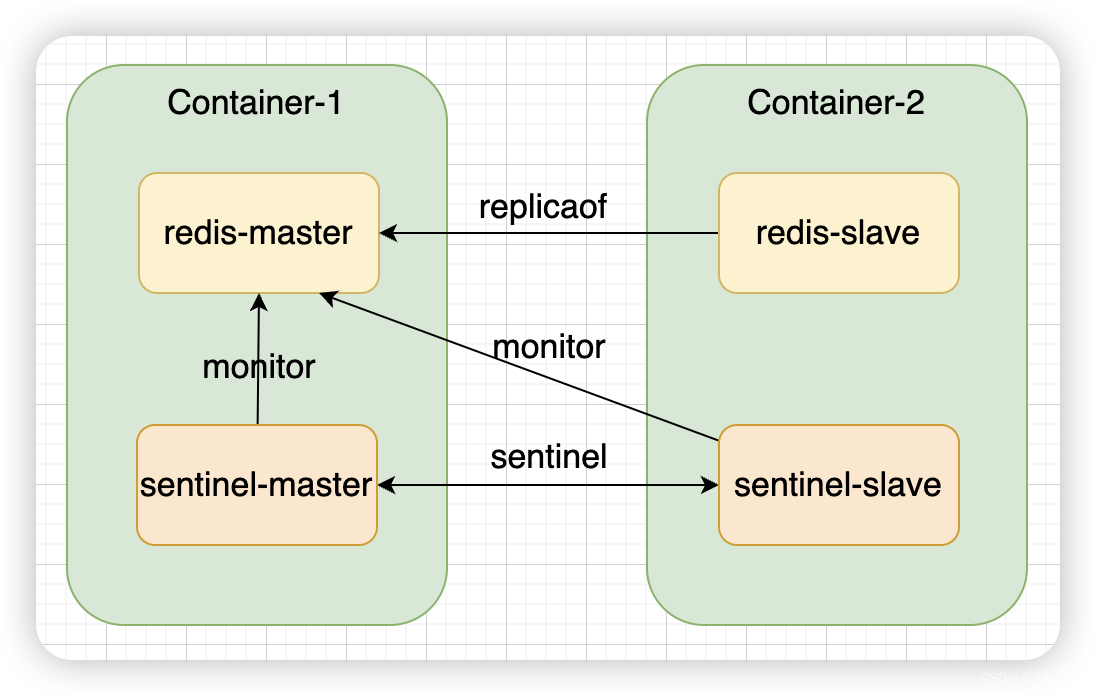
本文主要介绍了redis主从+哨兵搭建的实现示例,具体如下:
1. 工程准备
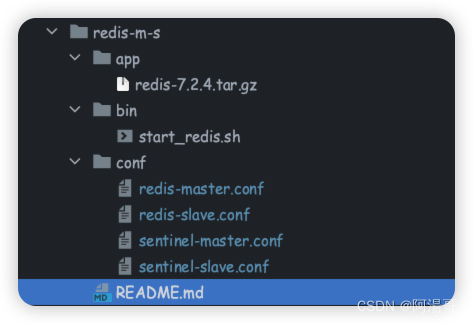
将安装包、配置文件、启动脚本统一放置到redis-m-s工程中。
2. 基于Dockerfile构建
2.1 拷贝工程到工作目录
# 设置工作目录
WORKDIR ${WORK_DIR}

# 文件拷贝:将所有本地文件拷贝到容器目录
COPY ./redis-m-s ${WORK_DIR}/redis-m-s
2.2 安装依赖包
RUN yum -y install make gcc gcc-c++
2.3 解压redis安装包、编译、安装
RUN tar -xzvf ${WORK_DIR}/redis-m-s/app/redis-${REDIS_VERSION}.tar.gz &&
    cd redis-${REDIS_VERSION} &&
    make  && make PREFIX=${SRC_APP_DIR}/redis install &&
2.4 拷贝配置文件到安装目录
拷贝配置文件和启动脚本
	mkdir -p ${SRC_APP_DIR}/redis/bin/ &&
	mkdir -p ${SRC_APP_DIR}/redis/conf/ &&
	cp ${WORK_DIR}/redis-m-s/conf/* ${SRC_APP_DIR}/redis/conf &&
	cp ${WORK_DIR}/redis-m-s/bin/* ${SRC_APP_DIR}/redis/bin &&
	chmod +x ${SRC_APP_DIR}/redis/bin/start_redis.sh &&
清理安装包
	cd ${WORK_DIR} &&
	rm -rf redis-${REDIS_VERSION}
3. 配置文件
3.1 redis-master.conf
基于安装目录下redis.conf进行修改,主要修改项:
bind 0.0.0.0
protected-mode no
logfile /export/Logs/redis/master/redis.log
dir /export/Data/redis/db
requirepass your_pass
3.2 redis-slave.conf
基于安装目录下redis.conf进行修改,主要修改项如下,注意将master_ip替换为实际IP
bind 0.0.0.0
protected-mode no
logfile /export/Logs/redis/slave/redis.log
dir /export/Data/redis/db
replicaof master_ip 6379
masterauth your_pass
requirepass your_pass
3.3 sentinel-master.conf
基于安装目录下sentinel.conf进行修改,主要修改项如下,注意将master_ip替换为实际IP
logfile /export/Logs/redis/sentinel/sentinel.log
sentinel monitor redis-master master-ip 6379 1
sentinel auth-pass redis-master your_pass
sentinel down-after-milliseconds redis-master 30000
sentinel parallel-syncs redis-master 1
sentinel failover-timeout redis-master 180000
SENTINEL master-reboot-down-after-period redis-master 0
# 容器部署时需声明
sentinel announce-ip master_ip
sentinel announce-port 26379
3.4 sentinel-slave.conf
基于安装目录下sentinel.conf进行修改,主要修改项如下,注意将master_ip替换为实际IP
logfile /export/Logs/redis/sentinel/sentinel.log
sentinel monitor redis-master master-ip 6379 1
sentinel auth-pass redis-master your_pass
sentinel down-after-milliseconds redis-master 30000
sentinel parallel-syncs redis-master 1
sentinel failover-timeout redis-master 180000
SENTINEL master-reboot-down-after-period redis-master 0
# 容器部署时需声明
sentinel announce-ip slave_ip
sentinel announce-port 26379
4. 启动redis
4.1 redis主节点+哨兵启动
redis-server $REDIS_HOME/conf/redis-master.conf &
redis-sentinel $REDIS_HOME/conf/sentinel-master.conf &
4.2 redis从节点+哨兵启动
redis-server $REDIS_HOME/conf/redis-slave.conf &
redis-sentinel $REDIS_HOME/conf/sentinel-slave.conf &
5. 验证redis
5.1 登录主节点
下述 slave_ip 为从节点实际IP
# ./redis-cli
> auth your_pass
OK
> info replication
# Replication
role:master
connected_slaves:1
slave0:ip=slave_ip,port=6379,state=online,offset=28160117,lag=1
master_failover_state:no-failover
master_replid:201648fb313a4359fea11e57c434afe8f372316d
master_replid2:0000000000000000000000000000000000000000
master_repl_offset:28160410
second_repl_offset:-1
repl_backlog_active:1
repl_backlog_size:1048576
repl_backlog_first_byte_offset:27103441
repl_backlog_histlen:1056970
>
5.2 登录哨兵
下述 master_ip 为主节点IP,slave_ip为从节点IP
./redis-cli -h master_ip -p 26379
> sentinel sentinels redis-master
1)  1) "name"
    2) "a23117a8d41fb1ace5785a5b940e7e43e5efe316"
    3) "ip"
    4) "slave_ip"
    5) "port"
    6) "26379"
    7) "runid"
    8) "a23117a8d41fb1ace5785a5b940e7e43e5efe316"
    9) "flags"
   10) "sentinel"
   11) "link-pending-commands"
   12) "0"
   13) "link-refcount"
   14) "1"
   15) "last-ping-sent"
   16) "0"
   17) "last-ok-ping-reply"
   18) "988"
   19) "last-ping-reply"
   20) "988"
   21) "down-after-milliseconds"
   22) "30000"
   23) "last-hello-message"
   24) "49"
   25) "voted-leader"
   26) "?"
   27) "voted-leader-epoch"
   28) "0"
>
6. springboot应用集成redis
6.1 配置文件
spring:
  redis:
    sentinel:
      master: redis-master
      nodes:
        - redis://master_ip:26379
        - redis://slave_ip:26379
    password: your_pass
6.2 启动应用
启动应用时日志打印日志
:   master: redis://master_ip:6379 added
:   slave: redis://slave_ip:6379 added
:   sentinel: redis://slave_ip:26379 added
:   sentinel: redis://master_ip:26379 added
到此这篇关于redis主从+哨兵搭建的实现示例的文章就介绍到这了,更多相关redis主从+哨兵搭建内容请搜索IT俱乐部以前的文章或继续浏览下面的相关文章希望大家以后多多支持IT俱乐部!

