导读
如果使用nestjs开发接口并部署之后,我们通常需要考虑到接口是否会被恶意盗刷消耗过多的资源,一个简单的方式就是限制在单位时间内的访问次数。
本文使用的库包版本如下:
| 库名 | 版本号 |
|---|---|
| @nestjs/core | 10.0.0 |
| @nestjs/common | 10.0.0 |
| @nestjs/schedule | 4.1.2 |
| ioredis | 5.4.2 |
本文的主要工作环境基于Macbook Pro M1 MacOS 14.6.1。
新建nestjs 项目
nest new nestjs-with-ip-limit -g
nestjs中的守卫Guard
nestjs 提供了一种可以是否拦截请求的方式,守卫(Guard),我们可以通过实现CanActive接口来完成,详细解释参考官方链接。
自定义的一个ip.guard.ts文件,用于最终实现我们的ip请求拦截。
//ip.guard.ts
import { Injectable, CanActivate, ExecutionContext } from '@nestjs/common';
import { Observable } from 'rxjs';
@Injectable()
export class IpGuard implements CanActivate {
canActivate(
context: ExecutionContext,
): boolean | Promise | Observable {
const request = context.switchToHttp().getRequest();
console.log(request.headers['origin'], request.headers);
return request.headers['text'] != 'zoo' ? false : true;
}
}
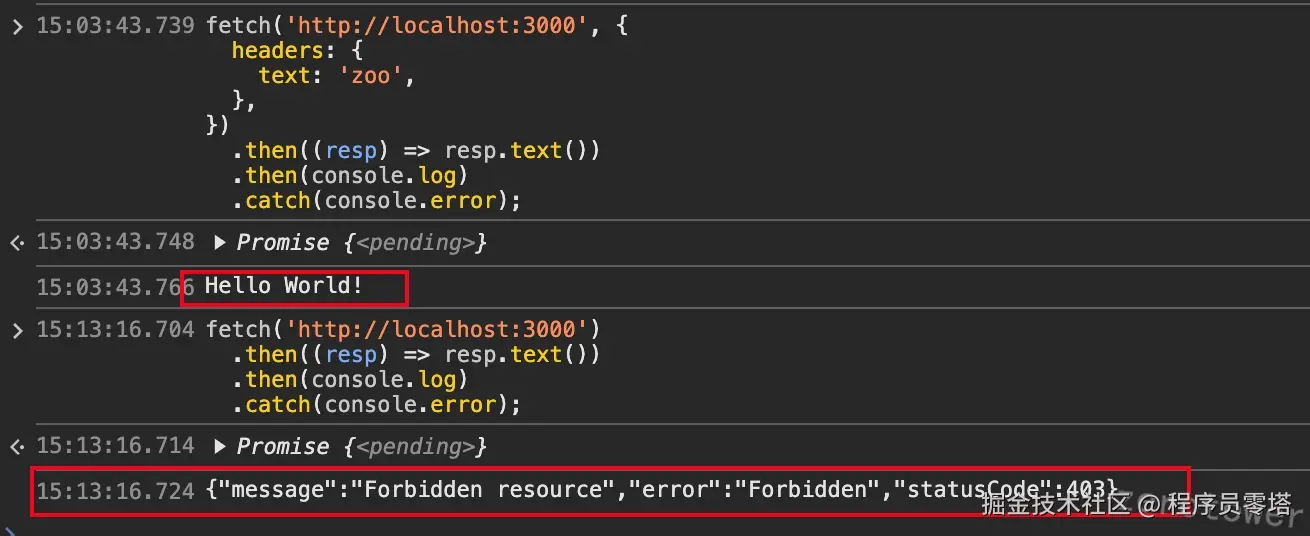
在示例中,我们增加当请求头没有text=zoo就拦截的逻辑,并直接在浏览器控制台中使用fetch测试:
fetch('http://localhost:3000', {
  headers: {
    text: 'zoo',
  },
})
  .then((resp) => resp.text())
  .then(console.log)
  .catch(console.error);

可以看到,一旦守卫中返回了false,请求将报403请求错误。
Guard中获取IP
现在的问题就是如何在实现的IpGuard中获取ip地址,可以通过context.switchToHttp().getRequest()获取请求对象来提取。
const request = context.switchToHttp().getRequest();
const ip = request.headers['x-forwarded-for'] || request.headers['x-real-ip'] || request.socket.remoteAddress || request.ip;
x-forwarded-for和x-real-ip的依据主要是我们很多网站可能使用代理的方式运行,尤其是nginx代理,如下所示。
location ^~ /api {
    rewrite ^/api(.*) $1 break; # 重写规则,将/api之后的路径提取出来并去掉/api前缀
    proxy_pass http://127.0.0.1:6689;
    proxy_set_header Host $host;
    proxy_set_header X-Real-IP $remote_addr; // 设置 X-Real-IP 头为客户端的真实 IP 地址。这对于后端服务识别客户端 IP 地址非常重要,特别是在请求经过多个代理的情况下
    proxy_set_header X-Forwarded-For $proxy_add_x_forwarded_for; // 设置 X-Forwarded-For 头为通过 proxy_add_x_forwarded_for 指令添加的信息。此头通常用于跟踪客户端 IP 地址以及任何之前的代理 IP 地址
    proxy_set_header REMOTE-HOST $remote_addr;
    proxy_set_header Upgrade $http_upgrade;
    proxy_set_header Connection "upgrade";
    proxy_set_header X-Forwarded-Proto $scheme;
    proxy_http_version 1.1;
    add_header X-Cache $upstream_cache_status;
    add_header Cache-Control no-cache;
    proxy_ssl_server_name off;
}
ip存储
提取到ip地址后我们需要将其和请求数保存,并同时记录访问数(每次增加1),且在某段时间后清除,为此,我们需要引入redis。
npm i ioreds -s
为了后续更方便的使用,把redis封装为一个自建的module
nest g module redis --no-spec
新建src/redis/redis.service.ts
import { Injectable } from '@nestjs/common';
import Client, { type RedisOptions } from 'ioredis';
@Injectable()
export class RedisService extends Client {
constructor(options: RedisOptions) {
super(options);
}
}
在redis.module.ts中加入代码
import { Module } from '@nestjs/common';
import { RedisOptions } from 'ioredis';
import { RedisService } from './redis.service';

@Module({})
export class RedisModule {
  static forRoot(optionts: RedisOptions) {
    return {
      module: RedisModule,
      providers: [
        {
          provide: 'REDIS_OPTIONS',
          useValue: optionts,
        },
        {
          provide: RedisService,
          useFactory: (options: RedisOptions) => {
            return new RedisService(options);
          },
          inject: ['REDIS_OPTIONS'],
        },
      ],
      exports: [RedisService],
    };
  }
}
在app.module.ts中使用
新建一个redis容器:

随后改造ip.guard.ts文件
import { Injectable, CanActivate, ExecutionContext } from '@nestjs/common';
import { RedisService } from './redis/redis.service';

@Injectable()
export class IpGuard implements CanActivate {
  constructor(private redisService: RedisService) {}
  async canActivate(context: ExecutionContext): Promise {
    const request = context.switchToHttp().getRequest();
    const ip =
      request.headers['x-forwarded-for'] ||
      request.headers['x-real-ip'] ||
      request.socket.remoteAddress ||
      request.ip;
    const redis_key = 'limit_ip_' + ip;
    const data = await this.redisService.get(redis_key);
    const count = data ? parseInt(data) : 0;
    if (count >= 5) {
      return false;
    }
    await this.redisService.set(
      redis_key,
      data ? parseInt(data) + 1 : 1,
      'EX',
      60,
    );
    return true;
  }
}
每次接口访问时,都会先从redis里读取对应ip的访问次数,如果达到五次后,就返回false禁止接口应答,否则通过,并且该限制在一分钟内有效。
在浏览器请求http://localhost:3000,刷新四次后,显示如下。::1是由于本地开发的缘故,如果有服务器可以在服务器上启动服务,本地测试。

部署到服务器后显示:

补充
现在经常使用的一些AI工具,其免费计划每天都只有很少的额度,其也可以基于redis实现限流,不过是根据用户id来设置key值。除此之外,其每天到零点时还可以恢复额度。为此,可以在nestjs使用定时器在零点时删除所有的redis的ke y。
安装相关依赖
npm install @nestjs/schedule
注册定时任务模块
imports: [
    RedisModule.forRoot({
      host: 'localhost',
      port: 6378,
      db: 0,
    }),
    ScheduleModule.forRoot(),
  ],
在app.service.ts加入代码
import { Injectable } from '@nestjs/common';
import { Cron, CronExpression } from '@nestjs/schedule';
import { RedisService } from './redis/redis.service';

@Injectable()
export class AppService {
  constructor(private readonly redisService: RedisService) {}
  getHello(): string {
    return 'Hello World!';
  }

  @Cron(CronExpression.EVERY_DAY_AT_1AM)
  async handleCron() {
    console.log('Called when the current time is 1AM');
    //删除所有的redis keys: limit_ip_*
    await this.redisService.del('limit_ip_*');
  }
}
此外,也可以在定时任务中将相关的限流ip的计数同步到MySQL,让相关逻辑更稳档一些。
以上就是nestjs使用redis实现ip限流的步骤详解的详细内容,更多关于nestjs redis实现ip限流的资料请关注IT俱乐部其它相关文章!

